How to configure Auth0 MFA using Twilio Verify
Time to read:
As part of Twilio's account security offerings, the Twilio Verify API makes it simple to add user verification and Multiple Factor Authentication (MFA) to any user authentication flow. It supports One Time Passcodes (OTP) sent via voice, SMS, and email as well as App-based push authentication. Silent Network Authentication was also recently added to the Verify service.
Auth0 is a popular Identity Access Management (IAM) platform. If you are an Auth0 customer and want to use Twilio Verify for Multiple Factor Authentication (MFA), please read on.
This blog post will walk you through the steps of how to configure Auth0 to use Twilio Verify for MFA. It will use both the Verify SMS and Voice channels to deliver OTPs so users can choose to receive the OTP via SMS or Voice.
What will you need?
- Twilio Account. Log in or create one for free here.
- Twilio Verify Service. Create a service in the console.
- Auth0 Account.
- A mobile phone to receive SMS and voice OTP.
If you do not have a Twilio account and or an Auth0 account, you can sign up for a free Twilio account and a free Auth0 account.
Setting up a Verify Service
Log in to the Twilio Console and then create a new Verify service. If you prefer you can also use Verify REST API to create a new Verify service. Please note down the following details. These will be used in Auth0 MFA configuration.
- Twilio Account SID (ACXXX…. ….)
- Twilio Auth Token (you can locate both Account SID and Auth Token at the home page after you login your Twilio account)
- The newly created Verify service SID (VAXXX… …)
Everything in Twilio has now been set up. Now let us head over to Auth0 Console.
Connecting Twilio Verify with Auth0 Action for MFA
Log in to the Auth0 dashboard and click the Actions menu item on the left and click the Flows menu item, click Send Phone Message icon from the Flows page. On the right of the flow page, click Add Action (the + icon) and select Build Custom from the drop down. The Create Action pop up window appears, choose a name (in the example, I use Twilio Verify as the name), make sure the Trigger is Send Phone Message and Runtime is Node 18, then click Create button. In the code editor, clear everything and copy/past the code from my github library
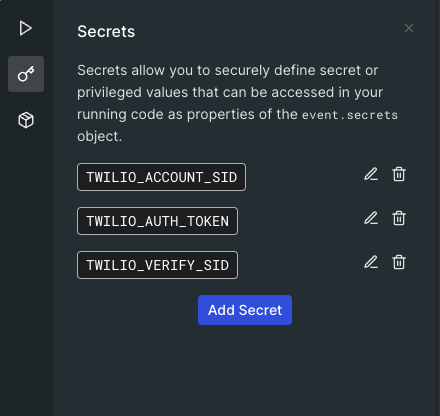
Now create Secrets (environmental variables), still on the code editor page, click the Key icon on the left to open the Secrets menus:
- TWILIO_ACCOUNT_SID
- TWILIO_AUTH_TOKEN
- TWILIO_VERIFY_SID
and add the values from the above Setting up a Verify Service section.

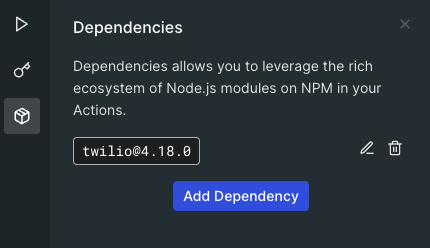
The last step is to load the Twilio helper library. Click the dependency icon and click Add Dependency button, the Add Dependency pop up windows appears, use twiio under the Name and Version should be auto populated with latest, then click Create button. Auth0 will search for Twilio helper library and load the latest version, at the time of the writing, 4.18.0 is the latest version, but you can check the latest version on npm.

Don't forget to save and deploy the changes by click the Deploy button at top right corner.
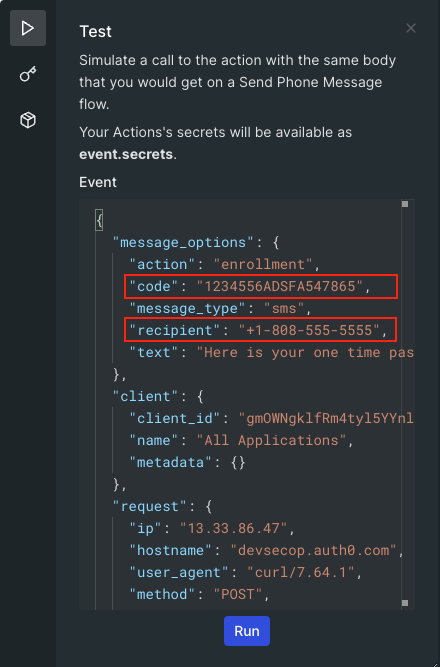
Now you can test the code. Still on the code editor page, click the Test icon on the left of code editor, replace recipient with your mobile number and change the code to “12345”, then click the Run button. You should now receive a SMS message with the code “12345”.

Configuring Auth0 MFA
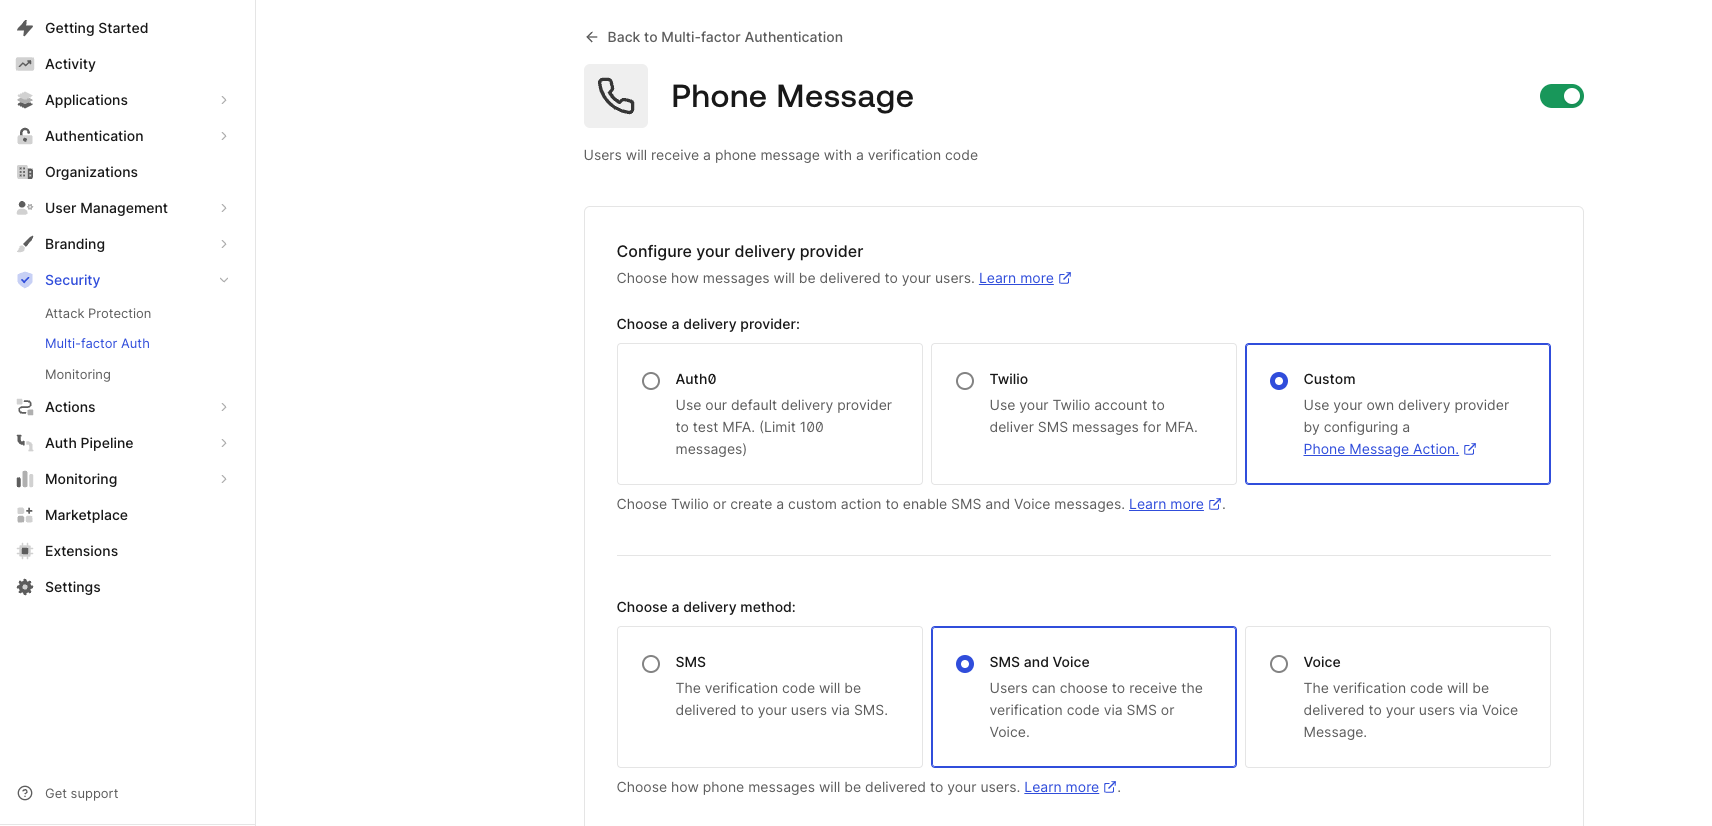
Go to Dashboard > Security > Multi-factor Auth, and click Phone Message. On the phone message page, select Custom in the Choose Delivery Provider, and then select SMS and Voice in Choose Delivery Method. Please note, if you only want to use SMS to deliver OTP, then select SMS in Choose Delivery Method instead. We are not going to use Enrollment Template and Verification Template, so you can leave them as it is. Now click Save to save the configuration.


You also need to enable MFA either globally or required for specific contexts using rules. To learn how to enable the MFA features, see:
Call Verify Feedback API and Enable Twilio Verify Fraud Guard
In order to benefit from Twilio Verify Fraud Guard, you must call Twilio Verify Feedback API to update OTP status.
Create Custom Log Streams Using Webhook
Please follow this instruction to create custom log streams using webhook. Please note, you will need to create another Twilio function (acting as webhook receiver) and use it to receive the webhook call from Auth0 log stream. The Payload URL of custom log stream will be the the Twilio Function URL.
The Twilio Function will receive the webhook call from Auth0 log stream and parse the payload (e.g the successful login event and the phone number used for login), then call Verify Feedback API. For example, when using Auth0 MFA with Twilio Verify SMS OTP, you can filter the event "Success Login" which indicates a successful login or more specifically filter “MFA Auth success” event and then call Twilio Verify feedback API (you only need to call Verify feedback API for successful login event). If you are not sure, you can always check what log events are triggered for a successful MFA login with the OTP and then use them as the triggers to call Verify feedback API.
Enable Twilio Verify Fraud Guard
Please follow this instruction to enable Verify Fraud Guard. It is extremely important that you use Verify feedback API and enable Fraud Guard feature. We had seen many SMS pumping victims, so you have been warned.
End to End Testing with Auth0 Sample Application
You can now test the end to end user experience using Auth0 sample application. In this example, I will use Auth0 JavaScript Single Page Application. Please login Auth0 and follow the instructions to download the application and configure it in Auth0.
In this example, I use both Database and Google connections for user login. I also added a test user account to the database and enrolled the user account including a mobile number to MFA.
Next, Click the Universal Login menu item and make sure you select New experience. You might also want to add your company logo.
Now, everything has been set up. Run the Single Page App and access it at https://127.0.0.0:3000/ You will see the welcome page. Click the Login button, your browser will be directed to Auth0 universal login page.
Sign in using email and password and click Continue. It will take you to the Verify Identity page where you can input the OTP that you receive on your mobile to complete the authentication.
Alternatively you can click the get a call link under the Continue button you will then receive a phone call and the OTP will be read out to you.
Congratulations! Your users now can login your MFA-enabled application with the OTP sent via Twilio Verify.
What’s Next?
Interested to know more about Twilio Verify? Check out Twilio Verify API documentation or continue building with Auth0 Passwordless Login with Twilio Verify or other Verify integrations for Okta.
If you have any questions, reach me on my GitHub. I can't wait to see what you build.
Dr Mingchao Ma has more than 15 years’ experience in Cybersecurity. In the account security team at Twilio he helps customers build solutions using Twilio Cloud security APIs. He previously worked at Microsoft UK helping financial sector customers adopt Microsoft Cloud security technologies. Before this he was a lead security architect at IBM UK. Mingchao has a PhD in information security, and cybersecurity certifications such as CISSP-ISSAP, CISM, SABSA etc. He is a Microsoft Certified Azure Solutions Architect Expert, Microsoft 365 Certified Enterprise Administrator Expert and Microsoft Certified Azure DevOps Engineer Expert.
Related Posts
Related Resources
Twilio Docs
From APIs to SDKs to sample apps
API reference documentation, SDKs, helper libraries, quickstarts, and tutorials for your language and platform.
Resource Center
The latest ebooks, industry reports, and webinars
Learn from customer engagement experts to improve your own communication.
Ahoy
Twilio's developer community hub
Best practices, code samples, and inspiration to build communications and digital engagement experiences.


