Build a WhatsApp Bot with Sentiment Analysis using Python and Twilio
Time to read:
This post is part of Twilio’s archive and may contain outdated information. We’re always building something new, so be sure to check out our latest posts for the most up-to-date insights.
As chatbots become more popular in the marketplace assisting companies to manage customer interaction, it is important to provide a high-level customer experience. Chat Robot technology is still early and much of the focus has been on the basic question/answer interaction.
Although some chatbots have been trained to be incredibly accurate in their response, most lack the ability to monitor the human emotion and perhaps for good reason.
Emotions vary not only among individuals but also within a person and the moment. Detecting an emotional response requires multisensorial awareness, something most of us do instinctively.
The only way we are able to capture emotions in a chatbot is through sentiment analysis of a chat, posing its own set of challenges. If we are able to detect and analyze each user response to obtain an emotional index, we could use this information then to help us monitor the level of satisfaction of a customer.

With sentiment analysis tools we can try to detect the emotional level of an individual on the per sentences bases. As each user sentence is captured during a chat session, it can be evaluated for negative sentiment.
Normally the analyzer vectorices the sentence, returning a float value, depending on the model the index value can then be used to trigger a response.
Based on the index range we can extract the emotional level of each response. As we evaluate each sentence, we can program our chatbot to also take into consideration the emotional level of the user input.
In this tutorial we will write a WhatsApp proof-of-concept bot using Twilio’s WhatsApp API, the Twilio's Python Helper Library, ChatterBot and TextBlob.
We will use ChatterBot to create a corpus file in JSON format that defines a custom built, rule based chatbot. Textblob will provide sentiment analysis capabilities and its other built-in tools to help us write our chatbot.
Project requirements
To get started, the following are needed.
- Python 3.7+: You may download the appropriate interpreter from python.org
- Virtual environment:
venvcomes with Python. - ngrok: a utility program to create a secure tunnel from the internet to your local development environment.
- Twilio account: You can get a Twilio free account and get started now.
Project setup
Please make sure you have the appropriate Python version installed on your system.
To create our virtual environment follow the instructions below. We will be using Python’s built-in virtual environment, venv.
For Unix or Mac OS systems, open a terminal and enter the following commands to do the tasks described above:
On Windows, enter the following commands in a command prompt window:
Our project will consist of six files, five python scripts and one JSON file. They exist at root level in our project folder, twily. These files will be created and explained throughout the tutorial.
Installing the Python Dependencies
In addition to the tools needed to get the project all setup we are also going to need to install a few python dependencies.
- Twilio Python Helper Library: comes with a number of tools to get started with Twilio APIs.
- ChatterBot: a Python library making it easy to generate automated responses to a user’s input.
- Flask: a flexible web Framework supporting just about any type of app configuration.
- TextBlob: a Python library for processing textual data.
Once you have created and activated your virtual environment, you can pip install your packages.
To install TextBlob the documentation requires doing a couple of steps
If you type pip list in your activated virtual environment, it should give you a list of all your installed libraries and dependencies.
ChatterBot
"ChatterBot uses a selection of machine learning algorithms to produce different types of responses. This makes it easy for developers to create chat bots and automate conversations with users." ~ ChatterBot documentation
We are going to use ChatterBot's training corpus as the dataset for our sentiment analysis robot. At this point the complexity and branching of the conversation is limited, but we will be able to write an adequate application to explore a user's emotional state during a chat session with a chatbot.
In ChatterBot the user needs to create a conversation and train the bot in order for the chatbot to answer properly. ChatterBot also allows us to export the trained data. We are going to train a bot and export the data into a JSON formatted file, which we'll then use for our custom bot. We won't be using ChatterBot beyond that point.
If you would like to download the corpus file and skip this section, please click here to download.
ChatterBot allows a chatbot to be trained using a list of strings where the list represents a conversation. For example, each list below could be considered a conversation with ChatterBot responding “Hello” to three different types of user inputs or questions.
[ "Hi there!", "Hello",][ "Greetings!", "Hello",][ "What’s up!", "Hello",]
Although ChatterBot is able to handle longer lists of training conversations, for our project we will use a simple “question/answer” format.
Start by creating a python file named, chatter_trainer.py in the root of our project folder, twily. In the file let's write our code.
Setting up the trainer
- We first need to import the ChatterBot library and trainers
- We assign our
ChatBot()instance by passing a chatbot name and assign it to thechatbotvariable. - We instantiate the appropriate trainer. We will use the
ListTrainer(), pass the bot name as an argument and assign it to thetrainervariable.
Training lists
Our three types of arbitrary conversations are documentation_topics, twilio_knowledge and classifier.
documentation_topicsprovides documentation links based on keywords found in the user's questiontwilio_knowledgewill answer predefined general questionsclassifierhas some keywords associated with a user frustration response, the bot will use these to try to de-escalate the user's frustration.
Training iterators
Below the training list we will write three list iterators, each with a pre-formatted question/answer. Each loop calls the trainer instance and the train() method, passing the name of the list as an argument. This will generate conversations using the information found in each list.
Corpus file export
Finally we export our trainer instance to a JSON file using ChatterBot's .export_for_training() method, which takes an argument in the form of the JSON filename.
To generate the JSON file, twilybot.json, all we have to do is run the program as python chatter_trainer.py, and the file will be saved in the twily folder. We can now put ChatterBot aside. We are going to keep this file in the same directory as the others.
TextBlob
"TextBlob provides a simple API for diving into common natural language processing (NLP) tasks such as part-of-speech tagging, noun phrase extraction, sentiment analysis, classification, translation, and more." ~ TextBlob documentation
This application will mostly rely on TextBlob to create a custom classifier as well as do sentiment analysis and create our rule base chatbot.
Textblob custom classifier
In this section we will write our custom classifier, the other Textblob features will be explained as they are implemented throughout the tutorial.
For this portion we need to create our train data. The data sets can be written in the script or imported from a file. TextBlob supports a few file formats for this operation, but we will write the data in our script.
The data is a list of tuples, each housing the training string separated by a comma followed by "pos" or "neg", representing positive or negative sentiment.
Let's write our classifier module. Begin by creating a python file named twily_classifier.py, in our twily folder
We will create a function in order to import it into other scripts as a module.
- We will import the Naive Bayers classifier from TextBlob.
- Then we will create a function called
trainer()which does not take any parameters at this point. - In it, we will assign our training data list to the
trainvariable. The train data listed below is truncated to minimize the length of this tutorial. - Finally return
NaiveBayesClassifier()constructor passing the train data as an argument.
To test our classifier as a stand alone script, we will write test code below our trainer function.
- We test our script by calling the
trainer()function - And get the probability distribution by calling the
.prob_classify()method and pass a test string we want analyzed as an argument. - We can extract the negative value by calling the
.prob()method and passing the"neg"label as an argument.
To run the test above simply run the file with python twily_classifier.py. Edit the user_input variable if you want to see how other sentences are classified.
NLTK stop word set
We are going to need a list of stop words. These are commonly used filler words that we want filtered out from the user input. Later we will learn how to use the stop word set.
As NLTK was installed as one of the dependencies of TextBlob, we can use it to generate a set of stop words.
We can use Python’s interactive console to generate a set of stop words and print them to the screen, then copy and paste this set into a new python file.
- Create a document called
stop_words.py. - In the new file add a variable called
sw_list. - Paste the set to the variable.
- Save and close the file.
The list below has been truncated. The one you generate will be a lot longer. This list can be edited if need be by adding or removing words.
By saving the set of stop words into a new python file our bot will execute a lot faster than if, everytime we process user input, the application requested the stop word list from NLTK.
Sentiment analysis
We will write our chatbot application as a module, as it can be isolated and tested prior to integrating with Flask.
We are going to call our module simplebot.py, this will be the core application. The application will take one argument, the user_input as a str.
The application will do a sentiment analysis of the un edited string, and it will also normalize the string and turn keywords into a set that will be used to intersect the dialog corpus file for matching responses.
Module setup
Lets create a file named simplebot.py, in the twily folder, let's start by importing the libraries.
twily_classifieris our TextBlob trained sentiment classifier.stop_wordsis the list of words to exclude from our input string.jsonto open the conversation corpus generated with ChatterBot.
Below the imports, start by opening our JSON file with the trained conversationcorpus. using the built-in open() function to access the file and load it into the array variable.
We can then call the array index conversation, it holds all the corpus data.
Lets go ahead and set up a few other constants and variables.
BOT_NAMEconstant (string type) holds the name of our bot.STOP_WORDSconstant (set type) holds a list of all the stop words. This was the set we generated using NLTK.neg_distributionvariable (list type) holds the negative sentiment floating point value. This will be used to monitor the user's sentiment index. It will be appended everytime there is user input, with the negative probability percent value.
Our simplebot.py module is made up of three functions, sentiment(), simplebot() and escalation(), where escalation() is the main function while the other two are auxiliary dependencies.
The sentiment() function
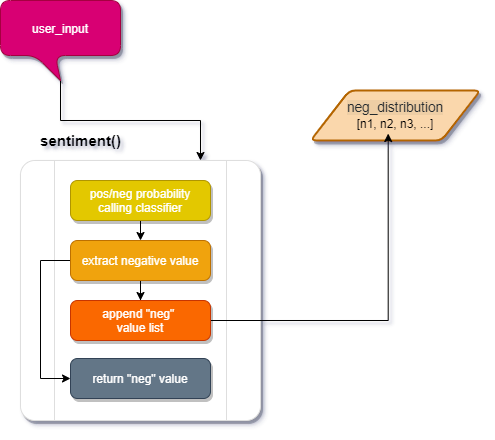
This function appends the neg_distribution list with negative probability and returns the appended value.
- From
twily_classifiercall thecl.trainer()function and the.prob_classify(u_input)passing our input string when called. Assign it toblob_itvariable. - From the returned value in
blob_itwe are going to extract just the negative values, rounded up to two decimal points and assigned to thenpdvariable. - With the most recent negative value, we are going to update our
neg_distributionlist. - We also return the appended value in case it is needed for another operation.
This function will be called by our main function escalation().
The simplebot() function
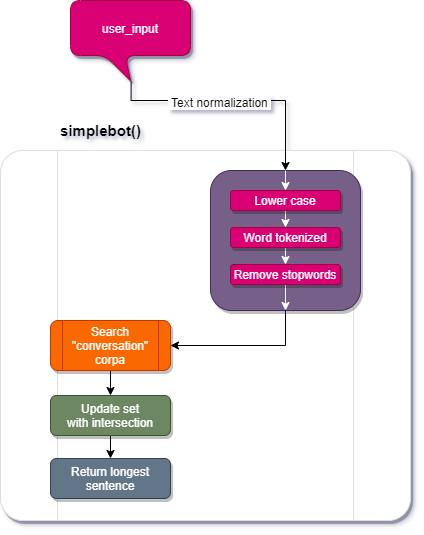
This function implements a rule-based bot. It takes the user input in the form of a string and in sequence it pre-processes the input string, converts it to lowercase, tokenizes it and removes stop words. It then iterates through CONVERSATION, if filtered_input intersects response_set is updated. if the set is empty, it returns a message, else it returns the longest string in the set.
User input
- Define the function,
def simplebot(user): - Here we take the user input and turn it into a
TextBlobobject.
pre-processing and normalization
Once we have a textblob object we can modify it by using textblob built in tools
- We normalize our input string by turning it into an all lower case string.
user_blob.lower().
- We then tokenize the textblob object into words by calling:
lower_input.words.
- Finally we create a list of words not listed in
STOP_WORDSfrom our textblob object and assign it to thefiltered_inputvariable.
Set iterator
We are going to create an empty set to be updated with all the possible matches returned by our set intersection of user input and CONVERSATION.
- Assign an empty set to
response_set - Create a for loop to iterate through every list in
CONVERSATION - Add a nested loop to iterate through every
sentencein eachlist. - Turn each
sentenceinto alistof words by using the.split()method. Assign it to thesentence_splitvariable - If the
set()offiltered_input**intersects**sentence_split- Update
response_setwith the intersection
- Update
Returned value based on response_set
We want to return one value from the response_set, it could be empty, with one value or more.
- If
response_setis empty we want to return a string"I am sorry, I don't have an answer, ask again"
- If the set has one value or more we will return the longest value
return max(response_set, key=len)
Although returning the longest value seems arbitrary, in our case it works, most correct answers will be the longest, but there is room for error. In our case some arbitrary errors are desirable as we need to increase the emotional index of the users.
The escalation() function
This function takes an argument user_input in the form of a string and calls sentiment() to monitor the user sentiment index. If the emotional index, set by sentiment() and taken from neg_distribution, increases above a set threshold and is sustained, an automatic response/action is triggered. The function also sends user_input to simplebot() to generate a chatbot response.
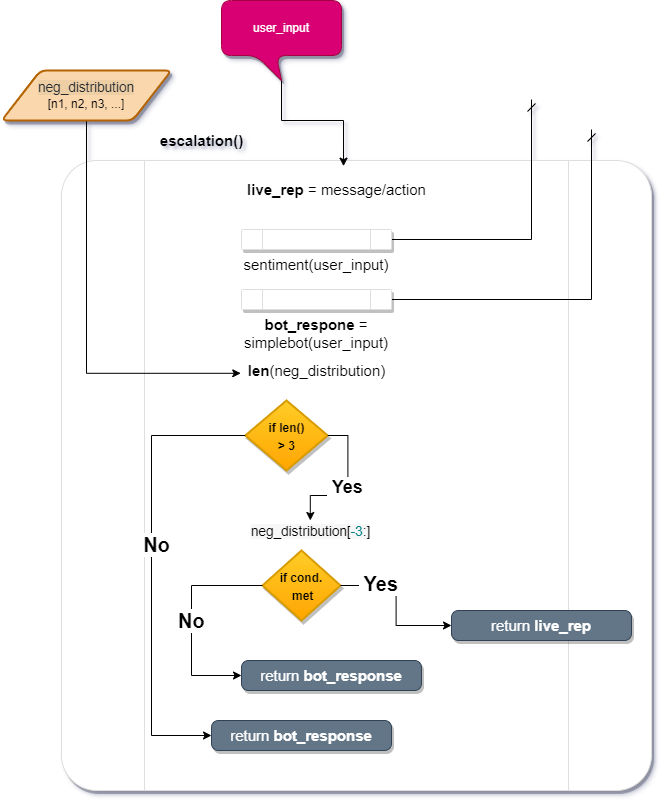
live_reprepresents the trigger action taken if the emotional conditions are met for escalation.- We pass the
user_inputtosentiment(), to analyse the negative sentiment of the sentence. - We calculate the length of
neg_distributionby using thelen()function and assign it tolist_len - We send the input_string to
simplebot()to get a response - Create a condition, if the
list_lenis greater than3- Take the last three items in the list
- If the first item of the last three is greater than .40 and greater or equal to the next two items take action by triggering
live_rep
- If the first item of the last three is greater than .40 and greater or equal to the next two items take action by triggering
- If not,
return bot_response
- Take the last three items in the list
- If none of the conditions above are met,
return bot_response
Stand-alone testing
In order to test our script, write a stand-alone test block that runs the chatbot as follows:
while Truewe are going totryto run our program.- In case of an
exceptwe end the program.
Here we can test our application as we write it and before transforming it into a web service with Flask.
By printing neg_distribution we are able to see the negative index on every response and see the application trigger on the last three values of the list. In our final WhatsApp application we won't display the emotional values.
When we run the simplebot.py in your interactive prompt, we should see a prompt waiting for our input. This is an example of an actual interaction with simplebot.py
Our application is now working as intended. We can tweak it by modifying the values in our conditions as well as generating a more granular conversation corpus file.
Creating a Flask Application
Let's now create the Flask server, which will ultimately call our chat sentiment analysis application and be a liaison between Twilio Sandbox for WhatsApp and our bot application.
In our project folder, begin by creating a file called app.py, We will host our Flask app in this file, where we will perform the following tasks:
- Import the flask library.
- Instantiate the app.
- Enable
DEBUGmode. - Write placeholders for the routes that we will use.
Simplebot as a web service
Integrating our simplebot.py module with Flask and testing it is relatively easy. If we open the app.py file we created above we can import our module and escalation() function.
In the app.py file, we can import our simplebot as sb. We can do the import right below the Flask import:
Lets update the ("/test") route, as this will allow us to test the bot through our browser by getting the user_input and integrating the escalation function as well as importing the neg_distribution list.
- We will request the user input through
requestand use the.lower()method to turn the input string to all lowercase. - Inside an
fstring, we can call thesb.escalation()function in order to get our response and updateneg_distribution
- To test the app through flask in your interactive console type
python app.py
- In your browser, enter a question as a query string argument to the
/testURL exposed by the Flask server.- http://localhost:5000/test?msg=”get me some Twilio SDK”
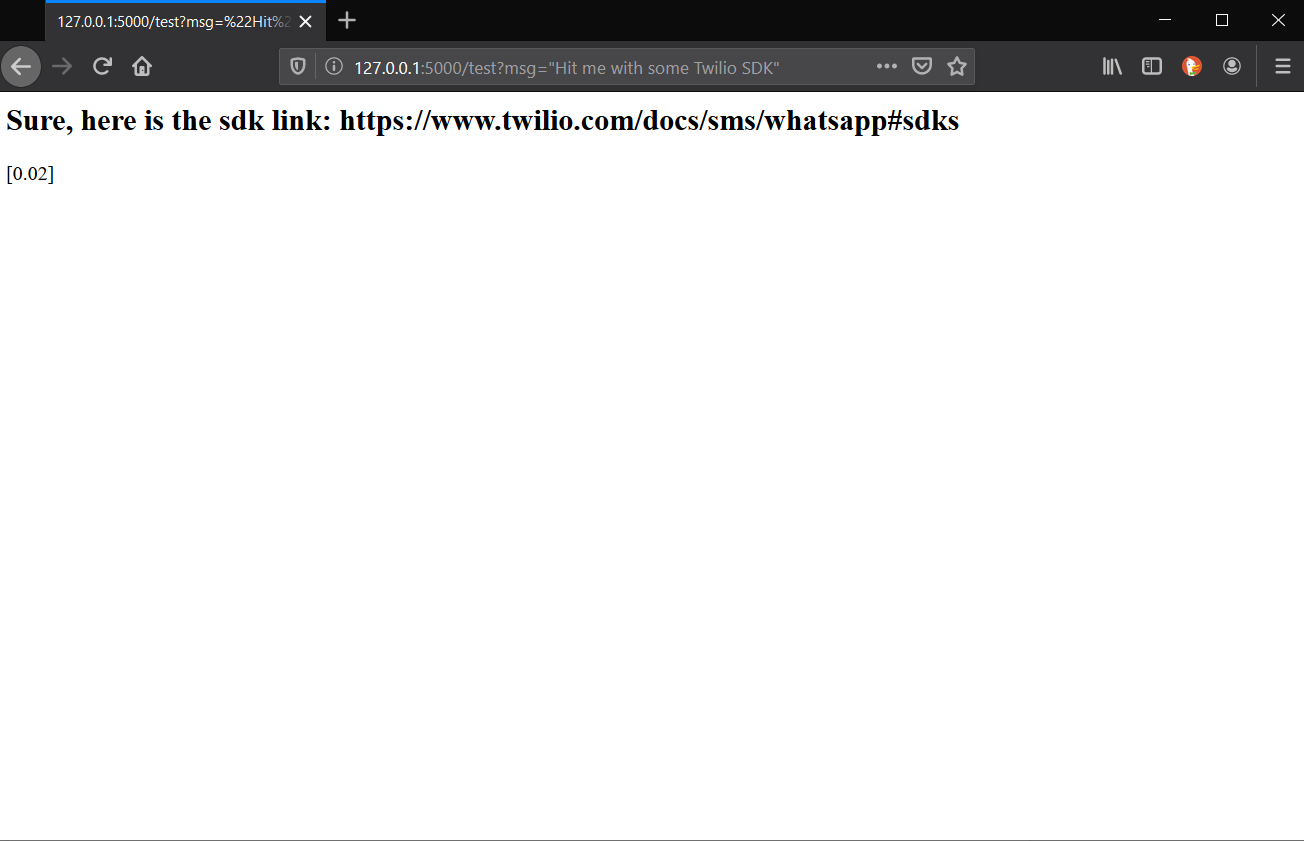
As we can see above, we call our test route, followed by a question mark, then the appropriate parameter, msg=“<your question here>”. Simplebot is working with Flask as intended!
Running the chatbot with ngrok
We have our flask app up and running. We can make sure it also responds through ngrok.
Expose a local web server to the internet
ngrok allows you to expose a web server running on your local machine to the internet. Just tell ngrok what port your web server is listening on.
If you don't know what port your web server is listening on, it's probably port 80, the default for HTTP.
Launch ngrok, make sure Flask’s and ngrok ports match.
When you start ngrok, it will display the public URL of your tunnel in your terminal, along with other status and metrics information about connections received.
Now that we are running ngrok and our Flask app, we can test by accessing the http forwarding domain with another device, you could use a smartphone for this test.
Enter the forwarding URL followed by /test in a web browser, either in your computer or your smartphone. Note your forwarding URL will have a different subdomain every time you run ngrok. Example:
- https://92832de0.ngrok.io/test?msg=“<your question here>’
If all is working well, your testing device should return an answer to your question.
Configure the Twilio WhatsApp Sandbox
Twilio provides a WhatsApp sandbox where you can easily develop and test your application. Once your application is complete you can request production access for your Twilio phone number, which requires approval by WhatsApp.
Let’s connect your smartphone to the sandbox. From your Twilio Console, select Programmable SMS and then click on WhatsApp. The WhatsApp sandbox page will show you the sandbox number assigned to your account, and a join code.
To enable the WhatsApp sandbox for your smartphone send a WhatsApp message with the given code to the number assigned to your account. The code is going to begin with the word join, followed by a randomly generated two-word phrase. Shortly after you send the message you should receive a reply from Twilio indicating that your mobile number is connected to the sandbox and can start sending and receiving messages.
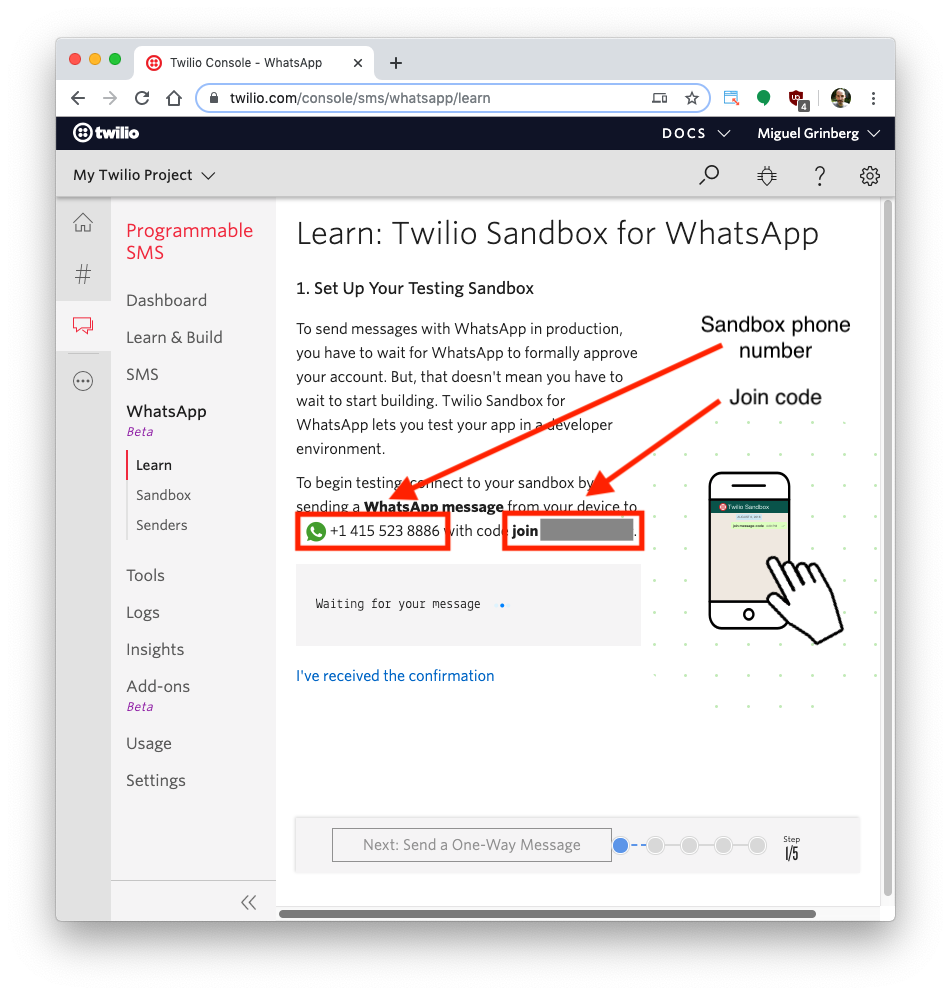
Note that this step needs to be repeated for any additional phones you’d like to have connected to your sandbox.
Using the WhatsApp app
Before we can use our app from WhatsApp we need to format the text response as required by Twilio. We will leave the /test route as is for testing and add the WhatsApp formatting on the /get route.
Twilio route ("/get")
The input message from the user comes in the payload of the POST request with a key of ’Body’. It can be accessed through Flask’s request object.
Testing the Twily chatbot from WhatsApp
We have configured all the necessary elements in order to test our first chat with Twily. To recap let's make sure the following are working and completed.
- Our script has been tested outside of Flask.
- Our script is working with Flask with the test route.
- ngrok is working with Flask
Run the Flask app.py file to start twily bot again.
If ngrok isn’t still running, start it again.
Now the Twilio endpoint needs to be updated with the ngrok URL.
- Go to the Twilio Console
- Click on Programmable SMS
- Then on WhatsApp
- Finally Sandbox
Once in the appropriate menu, paste the https:// URL from ngrok into the “When a message comes in” field. Remember to add the Flask route, in this case /get
https://<subdomain>.ngrok.io/get- Make sure the request method is set to
HTTP Post - Click the Save button
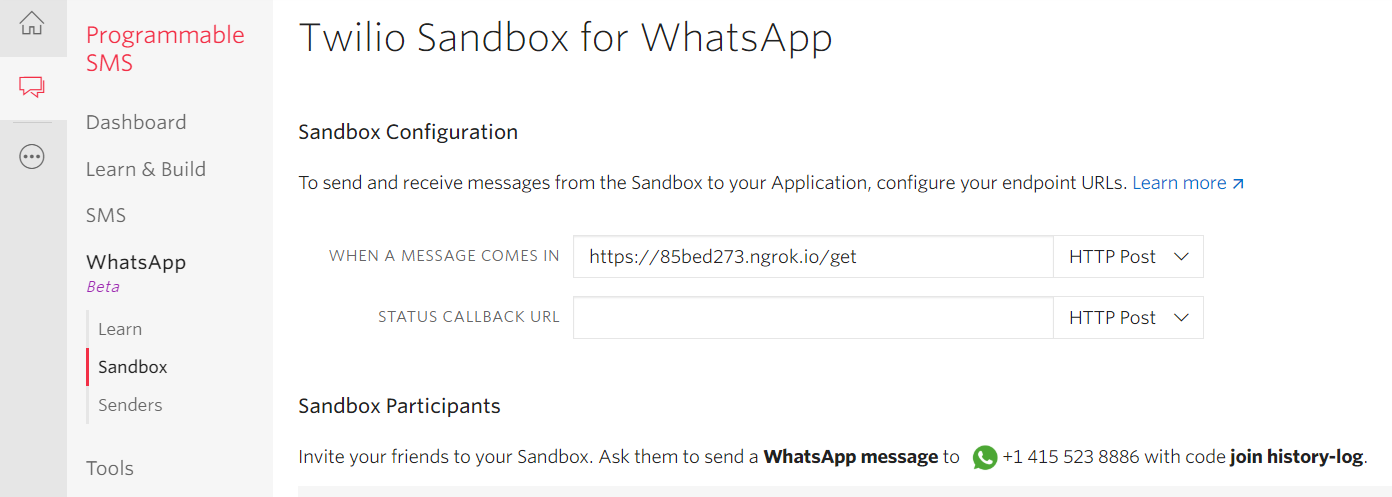
We are all set to start using Twily, the Twilio chatbot for sentiment analysis from WhatsApp. Start sending messages using the phone you connected to the sandbox.
This chat bot has been trained to answer some very basic Twilio API questions as well as detect any negative user input and take appropriate action based on set rules.
Conclusion
Although this is a relatively simple application showing the potential of sentiment analysis, there is still a lot to learn from human emotions as a communication layer.
As we become more and more dependent on software automation, it is important to monitor the emotional variances from the users responses to try to improve service and perhaps develop artificial empathy. Digital response systems can be designed to detect human emotions and respond with follow up questions and emotional consideration.
Although simplebot is able to show the basic theory, it would require a more sophisticated robot, able to carry a conversation thread and branching to further engage the user. This level of interaction would encourage the user to become more emotionally vested in the exchange thus allowing for better emotional monitoring and empathetic response.
Things to try
- Try to expand and improve the conversation.
- Refine the classifier.
- Implement the built-in TextBlob translator in order to detect and translate into English.
- Expand the level of granularity in the train corpus with more detailed answers without generating false positives.
- Future enhancement: SimpleBot would benefit greatly from being integrated with user sessions, allowing for multiple and more complex conversations between users and the bot.
This project is available for download from GitHub
Enrique Bruzual is a software developer, active Python community member and technical writer. Please feel free to contact him through the links below.
- Github: https://github.com/kikeven
- Twitter: https://twitter.com/hilomental911
- website: https://tiny.cc/py911/about/
Related Posts
Related Resources
Twilio Docs
From APIs to SDKs to sample apps
API reference documentation, SDKs, helper libraries, quickstarts, and tutorials for your language and platform.
Resource Center
The latest ebooks, industry reports, and webinars
Learn from customer engagement experts to improve your own communication.
Ahoy
Twilio's developer community hub
Best practices, code samples, and inspiration to build communications and digital engagement experiences.


