Google Spreadsheets and PHP
Time to read:

Have you ever needed to pull some data from a Google Spreadsheet? My default in the past would be to export the data and upload it to the app directly, but it turns out it’s not very difficult to read directly from Google Spreadsheets using the Google Drive API.
In this tutorial, we’ll read, write, update, and delete data from a Google Spreadsheet with just a few lines of PHP.
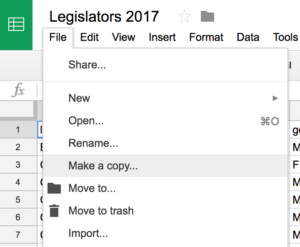
I’ve spent a lot of time recently working with tech activism groups, and one piece of data folks often want to work with is legislators’ contact information. Let’s take this spreadsheet with the contact information for all United States legislators. Make a copy of this spreadsheet in your own account and we’re ready to go.

Getting Your Spreadsheet Ready for Programmatic Access
By default, a new spreadsheet cannot be accessed via Google’s API. We’ll need to go to your Google APIs console and create a new project and set it up to expose your Spreadsheets’ data.
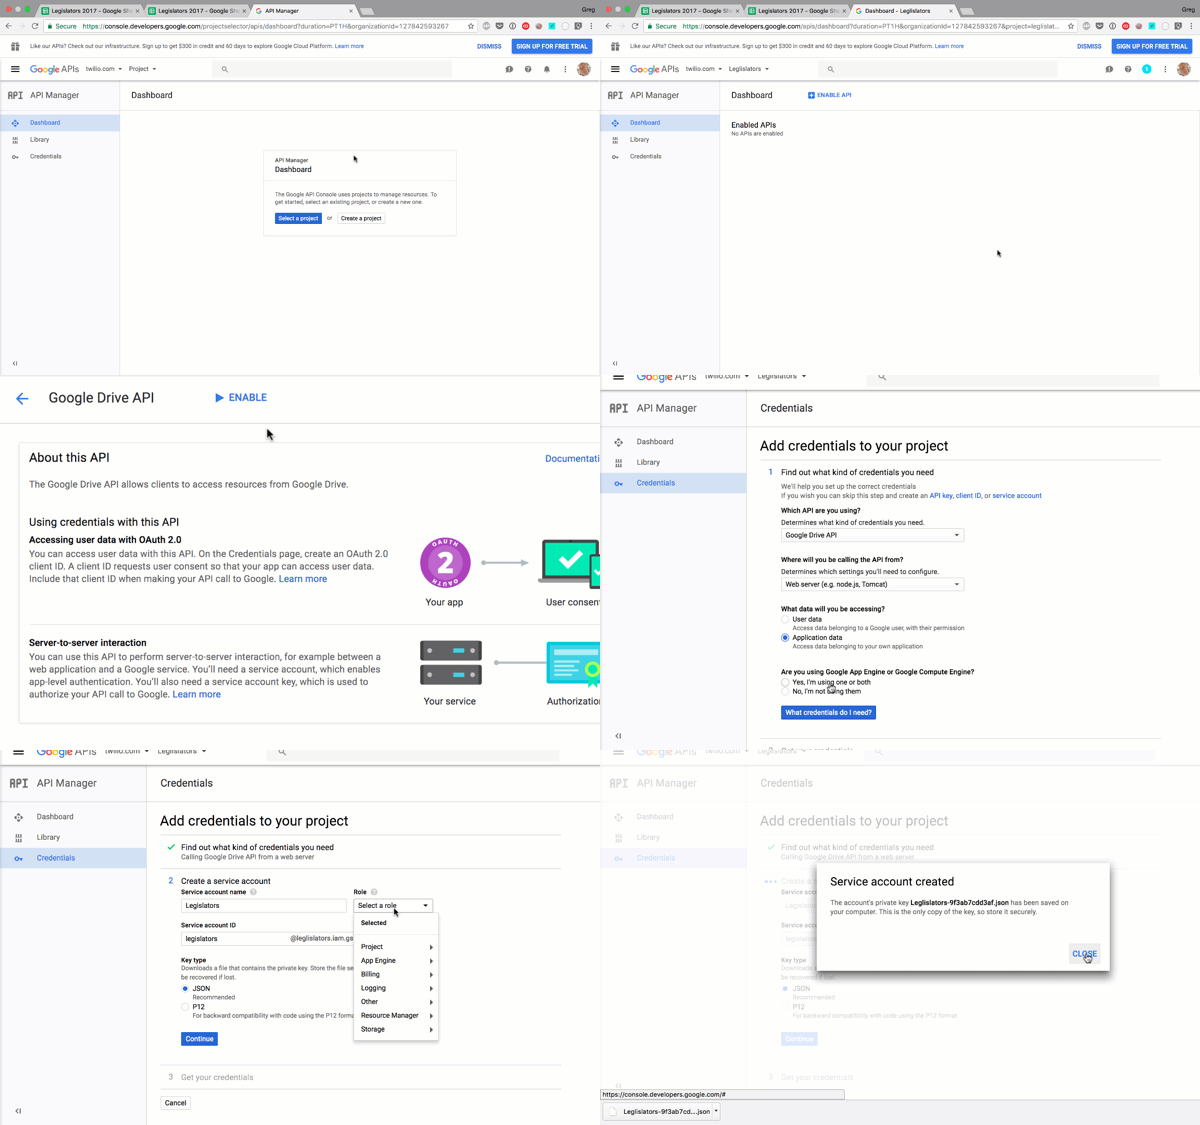
- Go to the Google APIs Console.
- Create a new project.
- Click Enable API. Search for and enable the Google Drive API.
- Create credentials for a Web Server to access Application Data.
- Name the service account and grant it a Project Role of Editor.
- Download the JSON file.
- Copy the JSON file to your app directory and rename it to client_secret.json

We now have a big chunk of authentication information, including what Google calls a client_email , which uniquely represents this OAuth service account. Grab the value of client_email from your client_secret.json , and head back to your spreadsheet. Click the Share button in the top right, and paste the client_email value into the field to give it edit rights. Hit send. That’s it!
Read Data from a Spreadsheet with PHP
Let’s start building!
We won’t be writing any framework-specific code here; as long as you have Composer installed and loaded, you’re ready to follow along.
Want to try this out with vanilla PHP? Create a PHP file in your project directory to hold this code and at the head of the file, right after
<?php put this line:
Now create a file in your project named composer.json and place an empty JSON object in it:
When you want to test your code, just run php yourfilename.php. You’re ready to start coding!
Bootstrapping Google API Authentication
First, require our packages; we’ll be using google/apiclient library for authentication and the asimlqt/php-google-spreadsheet-client library for accessing Spreadsheets:
Next, somewhere in your boot process (in a framework, I would put it in a boot file or a service provider, but for now you can just put it at the top of a file) you’ll want to initialize the client with a token that we’ll generate using the google/apiclient library:
I know this is a bit hairy, but you only have to do it once, and then all of your requests in your app will just authenticate correctly. You’ll know the app is connecting correctly if the steps in the next section work without errors.
Getting Real Data
Next, let’s create a route that you can visit in your browser and start pulling real data. If you’re testing this out in vanilla PHP, just add this at the bottom of the file you’re working on.
All of our calls will start by getting the spreadsheet, and, from there, the worksheet that contains our data.
To show that this worksheet works, let’s iterate over every entry and echo it out:
We’re working with a ListFeed object here, which represents a “list” of rows, and each row inside that list is returned as a ListEntry object.
When we print these out, we’ll see our output with the value of each cell attached to the header row for each column. The array will be shaped a bit like this:
Note that this SDK is using Google Spreadsheet API v3, which is XML-based; one of the shortcomings of the format is that it removes all underscores from column names, turning last_name into lastname and first_name into firstname. If you want to get around this, you can just deal with it as it is, use one of the few relatively-untested Google Spreadsheets v4 libraries, or map your records manually using the CellFeed object as defined below.
We could instead, get a CellFeed object, which allows us to get each row as its raw entries, without mapping to the title:
… which returns:
We can also use the CellFeed object to get a single cell by column/row indexes:
Finally, we can also just export the entire sheet as a CSV:
Insert, Update, and Delete from a Spreadsheet with PHP
So far we’ve only read from the spreadsheet. But we can also update and delete the rows or cells we retrieve, or even insert our own cells or worksheets.
Updating Cells
First, let’s take one of those cells we retrieved and update it:
The Spreadsheets package we’re using is focused on getting us full lists, not pulling individual items out of the list, so we’ll need to use and break a foreach. If we were using a collection pipeline like Laravel’s collections, this would be a bit cleaner:
Inserting Rows
We can also add our own rows to a worksheet. We need to grab a ListFeed object and run insert on that.
It’s likely because you didn’t define one of the columns. Even if you’re setting it to a blank value, you still need to provide it.
Now that you know how to read, insert, update, and delete records from your Google Spreadsheet, you have a fully functional database layer that’s easy to spin up and has a built-in UI layer for non-tech folks to view and administer your data.
Thanks to Greg Baugues for the idea and the original post on using Google Spreadsheets and Python.
—————
Matt Stauffer is the author of O’Reilly’s Laravel: Up and Running and Partner & Technical Director at Tighten Co. You can find him on Twitter at @stauffermatt.
Related Posts
Related Resources
Twilio Docs
From APIs to SDKs to sample apps
API reference documentation, SDKs, helper libraries, quickstarts, and tutorials for your language and platform.
Resource Center
The latest ebooks, industry reports, and webinars
Learn from customer engagement experts to improve your own communication.
Ahoy
Twilio's developer community hub
Best practices, code samples, and inspiration to build communications and digital engagement experiences.


