Building an automated assistant with .NET MVC6, Entity Framework and Twilio on a Mac

August 19, 2015
Written by

Building an automated assistant with .NET MVC6, Entity Framework and Twilio on a Mac

A few months back I showed you how I used Twilio to build my own personal assistant that would keep tabs with my Google Calendar and call into all my meetings for me.

Ever since I started using it I have managed to not only keep up with all my conference calls but also spend more time remembering about the other things I can’t automate… yet.

I have a pretty solid way of making sure I’m present on all my conference calls, but what happens when someone calls me? If you’re a developer you will know concentrating is pretty hard thing to do and making sure that you keep concentrated is almost impossible. In fact, the graph below shows it really well.
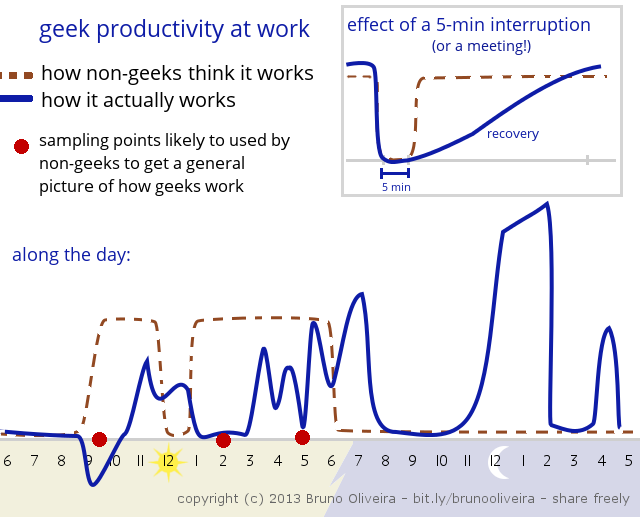
With that in mind I thought it was time for me to tackle the fact that answering calls is pretty high in a PA’s list of priorities and mine simply didn’t. This time we will build an automated assistant with .NET MVC6, Entity Framework and Twilio on a Mac that takes care of all our incoming calls and decides what to do with them based on the number that is calling.

That way I can, for example, decide to only accept calls from certain people which will then be automatically transferred to a number of my choice or ignore those calls completely by playing a personal message and ask the caller to call me later.

If you would rather skip straight to the final application feel free to download it from the Github Repository.

Our tools

Our setup

We will start by getting ourselves a Twilio number which we will then use to give away to any of our friends or contacts.
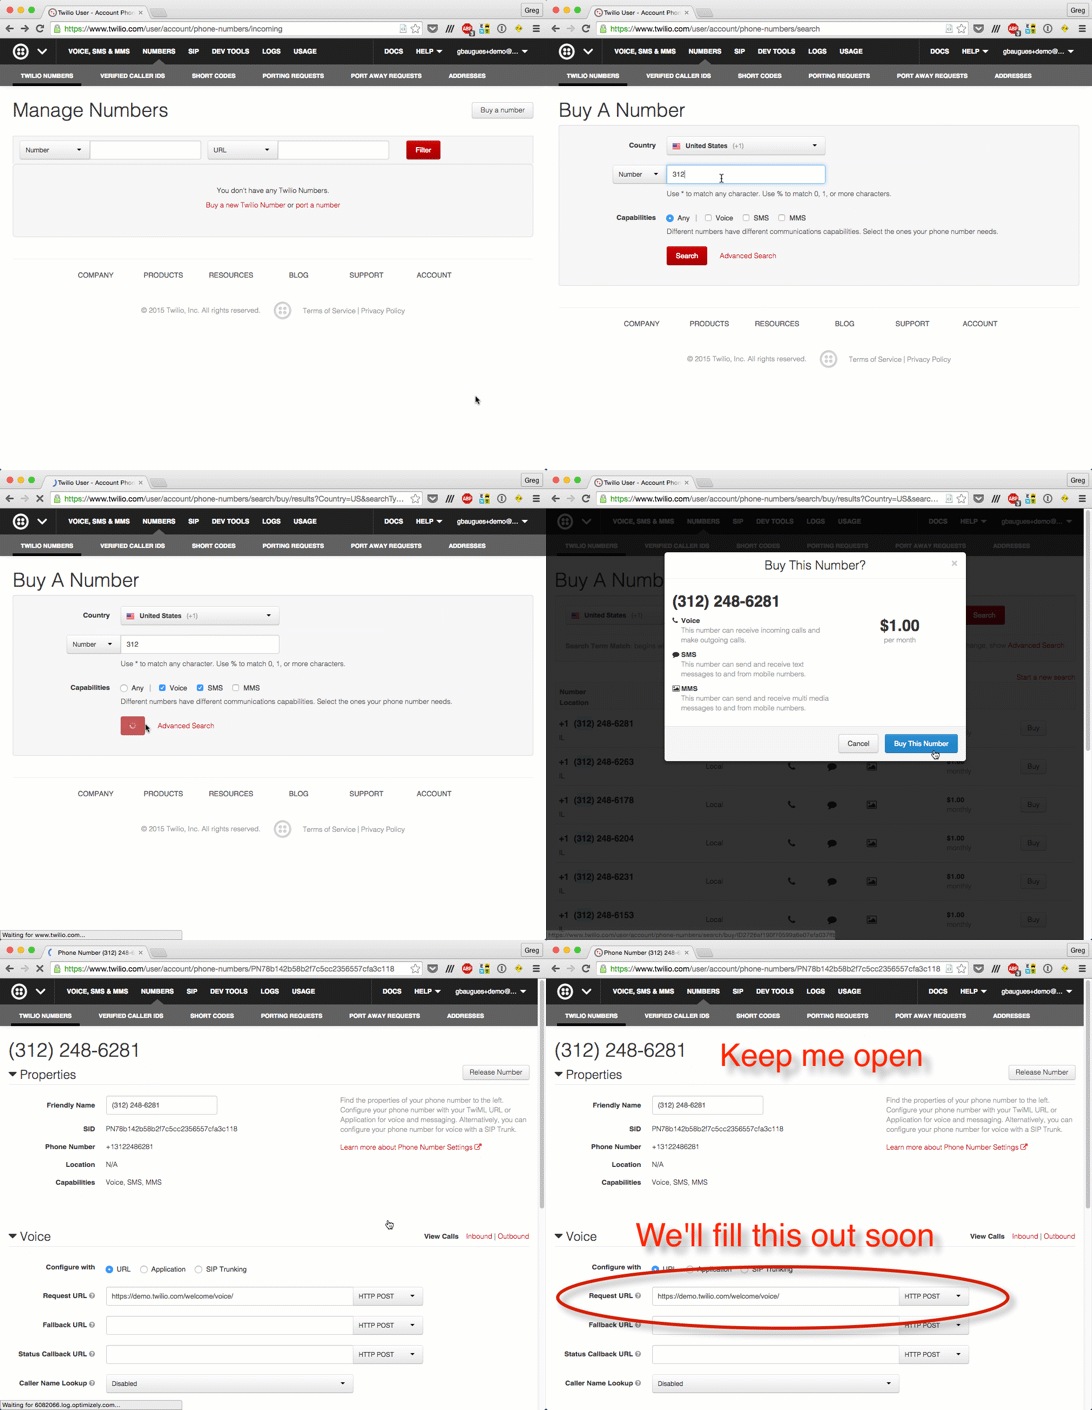
7XDHALQwo1bni1wLx59jCmktY9QXajsUmy-KRYTWy9QHmwBP-VP2Wtp2zwL567kccE_l0Zr8jBr915vJ-kmhid3CBuUNAC7fVca_PdfDMW8MxmtmRZp6IPdCLgVic2sXjoWxXlg1.png

Head to your favourite terminal application and create a new Web Application Basic [without Membership and Authorization] project with Yeoman called PhonePA.

phone-pa.gif

Once it’s created head to Visual Studio code and open the file project.json. Add dependencies to Twilio and Entity Framework 7, which we will use to scaffold our database via migrations.

"dependencies": {
    "Microsoft.AspNet.Diagnostics": "1.0.0-beta6",
    "Microsoft.AspNet.Mvc": "6.0.0-beta6",
    "Microsoft.AspNet.Mvc.TagHelpers": "6.0.0-beta6",
    "Microsoft.AspNet.Server.IIS": "1.0.0-beta6",
    "Microsoft.AspNet.Server.Kestrel": "1.0.0-beta6",
    "Microsoft.AspNet.Server.WebListener": "1.0.0-beta6",
    "Microsoft.AspNet.StaticFiles": "1.0.0-beta6",
    "Microsoft.AspNet.Tooling.Razor": "1.0.0-beta6",
    "Microsoft.Framework.Configuration.Json": "1.0.0-beta6",
    "Microsoft.Framework.Logging": "1.0.0-beta6",
    "Microsoft.Framework.Logging.Console": "1.0.0-beta6",
    "Kestrel": "1.0.0-beta6",
    "EntityFramework.Sqlite": "7.0.0-beta6",
    "EntityFramework.Commands": "7.0.0-beta6",
    "Twilio": "4.0.4",
    "Twilio.TwiML": "3.3.6"
  },

  "commands": {
    "kestrel": "Microsoft.AspNet.Hosting --server Kestrel --config hosting.ini",
    "web": "Microsoft.AspNet.Hosting --server Microsoft.AspNet.Server.WebListener --config hosting.ini",
    "ef": "EntityFramework.Commands"
  },

We will be using SQLite as the database for this example to keep everything self-contained. We have also added an entry under commands called ef. This is so we can invoke Entity Framework migrations straight from the Terminal later on.

Save that file and VS Code will prompt you to restore packages. Click Restore and once that is complete check that Entity Framework has been installed and configured correctly by running the following code on the same terminal screen.
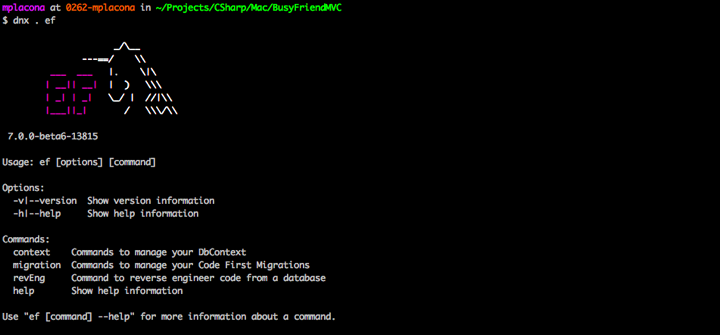
dnx . ef

Still on that screen create a new directory called Models and cd into it.

mkdir Models

Back on VS Code create a new file under Models called Contact.cs and add the following to it.

using System.ComponentModel.DataAnnotations;
using Microsoft.Data.Entity;

namespace PhonePA.Models
{
    public class ContactsContext : DbContext
    {
        public DbSet<Contact> Contacts { get; set; }
        protected override void OnConfiguring(DbContextOptionsBuilder optionsBuilder)
        {
            // Declare that we want to use SQLite and name the database
			optionsBuilder.UseSqlite("Data Source=./contacts.db");
        }
    }
    public class Contact
    {
        [Key]
        public int ContactId { get; set; }
        [Display(Name = "Contact Name")]
        public string Name { get; set; }
        [Display(Name = "Phone Number")]
        public string Number { get; set; }
        [Display(Name = "Custom Message")]
        public string Message { get; set; }
        public bool Blocked { get; set; }
    }
}

Now that we have created our model go back to Terminal and get Entity Framework to create a migration for us. We will be able to verify everything that it is going to do before we apply our migration by opening the generated classes.

dnx . ef migration add InitialMigration

After running that you will notice that back in VS Code a new directory called Migrations has been automatically created. This directory will contain all the migrations we create. Open up the file called [timestamp]_InitialMigration.cs. Notice the timestamp will vary according to when you created your migration.

In this file you will be able to see everything that will be done when we apply this migration. As of version 7.0.0-beta6, Entity Framework has a bug that will prevent you from successfully running your migrations unless you comment out the AutoIncrement annotation. So lets go ahead and comment that line out as shown.

public override void Up(MigrationBuilder migration)
{
    migration.CreateTable(
        name: "Contact",
        columns: table => new
        {
            ContactId = table.Column(type: "INTEGER", nullable: false),
            //    .Annotation("Sqlite:Autoincrement", true),
            Blocked = table.Column(type: "INTEGER", nullable: false),
            Message = table.Column(type: "TEXT", nullable: true),
            Name = table.Column(type: "TEXT", nullable: true),
            Number = table.Column(type: "TEXT", nullable: true)
        },
        constraints: table =>
        {
            table.PrimaryKey("PK_Contact", x => x.ContactId);
        });
}

We’re ready to have our database scaffolded. Go ahead and run the following command on terminal.

dnx . ef migration apply

After that completes you will see that a new file called contacts.db has been created on the root directory of your project. Our database is scaffolded and ready to be used.

Run the application and check that it is running as expected. We will change the HomeController later and add a few views to allow us to create and update contacts. In terminal run the following:

dnx . kestrel

You can now navigate to http://localhost:5000 and verify that the application is running correctly.
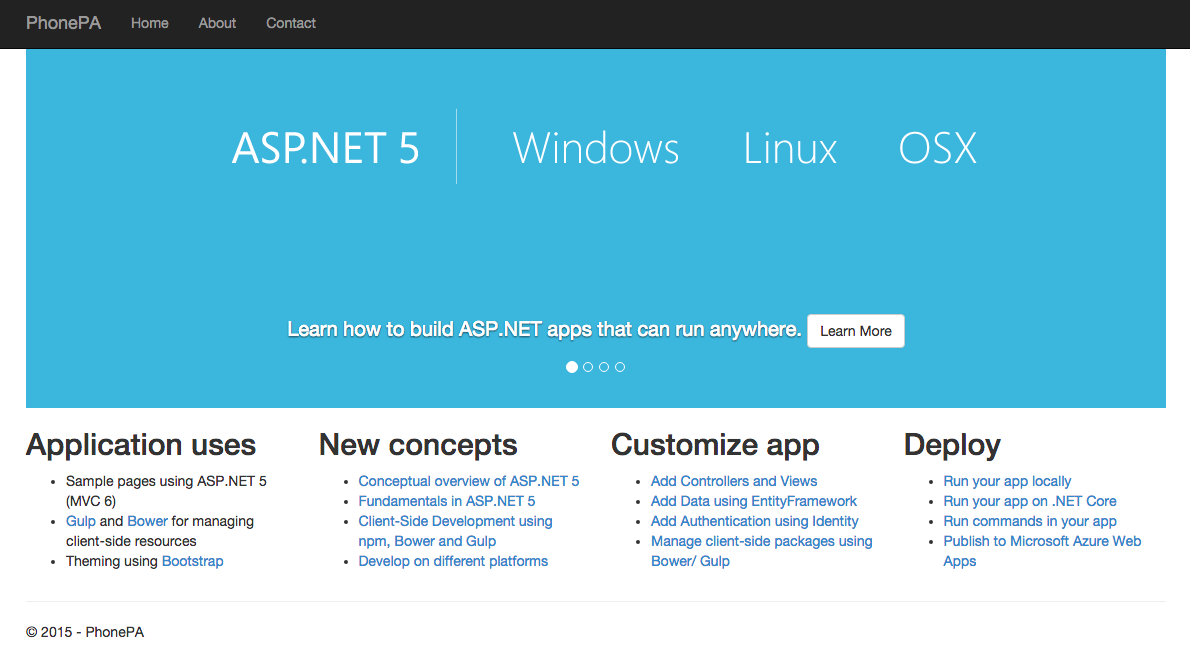
Adding Contacts

Now that our application is running, we will modify the HomeController to display a list of our contacts already in the database. Change its contents to the following:

using System;
using System.Linq;
using Microsoft.AspNet.Mvc;
using Twilio;
using Twilio.TwiML;
using PhonePA.Models;

namespace PhonePA.Controllers
{
    public class HomeController : Controller
    {
        private ContactsContext _db;
        private TwilioRestClient _client;

        public HomeController()
        {
            _db = new ContactsContext();
        }

        public IActionResult Index()
        {
            return View(_db.Contacts);
        }

        protected override void Dispose(bool disposing)
        {
            if (disposing)
            {
                _db.Dispose();
            }
            base.Dispose(disposing);
        }
    }
}

Notice we have also added some dependencies to the Twilio .NET Libraries which we will use later on.

Now that we have created our endpoint, open Views/Home/Index.cshtml and replace its contents with the following markup to display our contact’s information.

@model IEnumerable<PhonePA.Models.Contact>

@{
    ViewBag.Title = "Contacts";
}

<h2>Contacts</h2>

<p>
    @Html.ActionLink("Create New", "Create")
</p>
<table class="table">
    <tr>
        <th>
            @Html.DisplayNameFor(model => model.Name)
        </th>
        <th>
            @Html.DisplayNameFor(model => model.Number)
        </th>
        <th>
            @Html.DisplayNameFor(model => model.Message)
        </th>
        <th>
            @Html.DisplayNameFor(model => model.Blocked)
        </th>
        <th></th>
    </tr>

@foreach (var item in Model) {
    <tr>
        <td>
            @Html.DisplayFor(modelItem => item.Name)
        </td>
        <td>
            @Html.DisplayFor(modelItem => item.Number)
        </td>
        <td>
            @Html.DisplayFor(modelItem => item.Message)
        </td>
        <td>
            @Html.DisplayFor(modelItem => item.Blocked)
        </td>
        <td>
            @Html.ActionLink("Edit", "Edit", new { id=item.ContactId }) |
            @Html.ActionLink("Delete", "Delete", new { id=item.ContactId })
        </td>
    </tr>
}
</table>

Back on your Terminal kill the running application with CTRL C, start it again and browse to it. You should see a page that looks like the one below.

There aren’t any results yet since we haven’t created the functionality that will allow us to create, edit and delete contacts.

Go back to the HomeController.cs file and add the following four action methods to it:

// GET: /Home/Create
[HttpGet]
public IActionResult Create()
{
    return View();
}

//POST: /Home/Create/
[HttpPost]
[ValidateAntiForgeryToken]
public IActionResult Create(Contact contact)
{
    ModelState.Clear();
    TryValidateModel(contact);
    if (ModelState.IsValid)
    {
        using (var db = new ContactsContext())
        {
            db.Contacts.Add(contact);
            var count = db.SaveChanges();
            return RedirectToAction("Index");
        }
    }
    return View(contact);
}

// GET: Home/Edit/5
[HttpGet]
public IActionResult Edit(int id)
{
    var contact = _db.Contacts.FirstOrDefault(s => s.ContactId == id);
    if (contact == null)
    {
        return HttpNotFound();
    }
    return View(contact);
}

//POST: /Home/Edit/
[HttpPost]
[ValidateAntiForgeryToken]
public IActionResult Edit(Contact contact)
{
    ModelState.Clear();
    TryValidateModel(contact);
    if (ModelState.IsValid)
    {
        using (var db = new ContactsContext())
        {
            db.Contacts.Update(contact);
            var count = db.SaveChanges();
            return RedirectToAction("Index");
        }
    }
    return View(contact);
}

public IActionResult Delete(int id)
{
    var contact = _db.Contacts.FirstOrDefault(s => s.ContactId == id);
    if (contact == null)
    {
        return HttpNotFound();
    }
    else
    {
        _db.Contacts.Remove(contact);
        _db.SaveChanges();
        return RedirectToAction("Index");
    }
}

Now that we have added the endpoints we need, let’s create the views for them. Create a new file called Create.cshtml under /Views/Home and add the following to it:

@model PhonePA.Models.Contact

@{
    ViewBag.Title = "Create";
}

<h2>Create</h2>


@using (Html.BeginForm())
{
    @Html.AntiForgeryToken()

    <div class="form-horizontal">
        <h4>Contact</h4>
        <hr />
        <div class="form-group">
            @Html.LabelFor(model => model.Name, htmlAttributes: new { @class = "control-label col-md-2" })
            <div class="col-md-10">
                @Html.EditorFor(model => model.Name, new { htmlAttributes = new { @class = "form-control" } })
            </div>
        </div>

        <div class="form-group">
            @Html.LabelFor(model => model.Number, htmlAttributes: new { @class = "control-label col-md-2" })
            <div class="col-md-10">
                @Html.EditorFor(model => model.Number, new { htmlAttributes = new { @class = "form-control" } })
            </div>
        </div>

        <div class="form-group">
            @Html.LabelFor(model => model.Message, htmlAttributes: new { @class = "control-label col-md-2" })
            <div class="col-md-10">
                @Html.EditorFor(model => model.Message, new { htmlAttributes = new { @class = "form-control" } })
            </div>
        </div>
        
        <div class="form-group">
            @Html.LabelFor(model => model.Blocked, htmlAttributes: new { @class = "control-label col-md-2" })
            <div class="col-md-10">
                <div class="checkbox">
                    @Html.EditorFor(model => model.Blocked)
                </div>
            </div>
        </div>

        <div class="form-group">
            <div class="col-md-offset-2 col-md-10">
                <input type="submit" value="Create" class="btn btn-default" />
            </div>
        </div>
    </div>
}

<div>
    @Html.ActionLink("Back to List", "Index")
</div>

On that same directory create a new file called Edit.cshtml and add the following to it.

@model PhonePA.Models.Contact

@{
    ViewBag.Title = "Create";
}

<h2>Edit</h2>


@using (Html.BeginForm())
{
    @Html.AntiForgeryToken()

    <div class="form-horizontal">
        <h4>Contact</h4>
        <hr />
                @Html.HiddenFor(model => model.ContactId)
        <div class="form-group">
            @Html.LabelFor(model => model.Name, htmlAttributes: new { @class = "control-label col-md-2" })
            <div class="col-md-10">
                @Html.EditorFor(model => model.Name, new { htmlAttributes = new { @class = "form-control" } })
            </div>
        </div>

        <div class="form-group">
            @Html.LabelFor(model => model.Number, htmlAttributes: new { @class = "control-label col-md-2" })
            <div class="col-md-10">
                @Html.EditorFor(model => model.Number, new { htmlAttributes = new { @class = "form-control" } })
            </div>
        </div>

        <div class="form-group">
            @Html.LabelFor(model => model.Message, htmlAttributes: new { @class = "control-label col-md-2" })
            <div class="col-md-10">
                @Html.EditorFor(model => model.Message, new { htmlAttributes = new { @class = "form-control" } })
            </div>
        </div>
        
        <div class="form-group">
            @Html.LabelFor(model => model.Blocked, htmlAttributes: new { @class = "control-label col-md-2" })
            <div class="col-md-10">
                <div class="checkbox">
                    @Html.EditorFor(model => model.Blocked)
                </div>
            </div>
        </div>

        <div class="form-group">
            <div class="col-md-offset-2 col-md-10">
                <input type="submit" value="Save" class="btn btn-default" />
            </div>
        </div>
    </div>
}

<div>
    @Html.ActionLink("Back to List", "Index")
</div>

Time for another run. Start the application again on your Terminal and create a new contact. You should see that every new contact is listed on the index screen and that you can now update or delete their details.
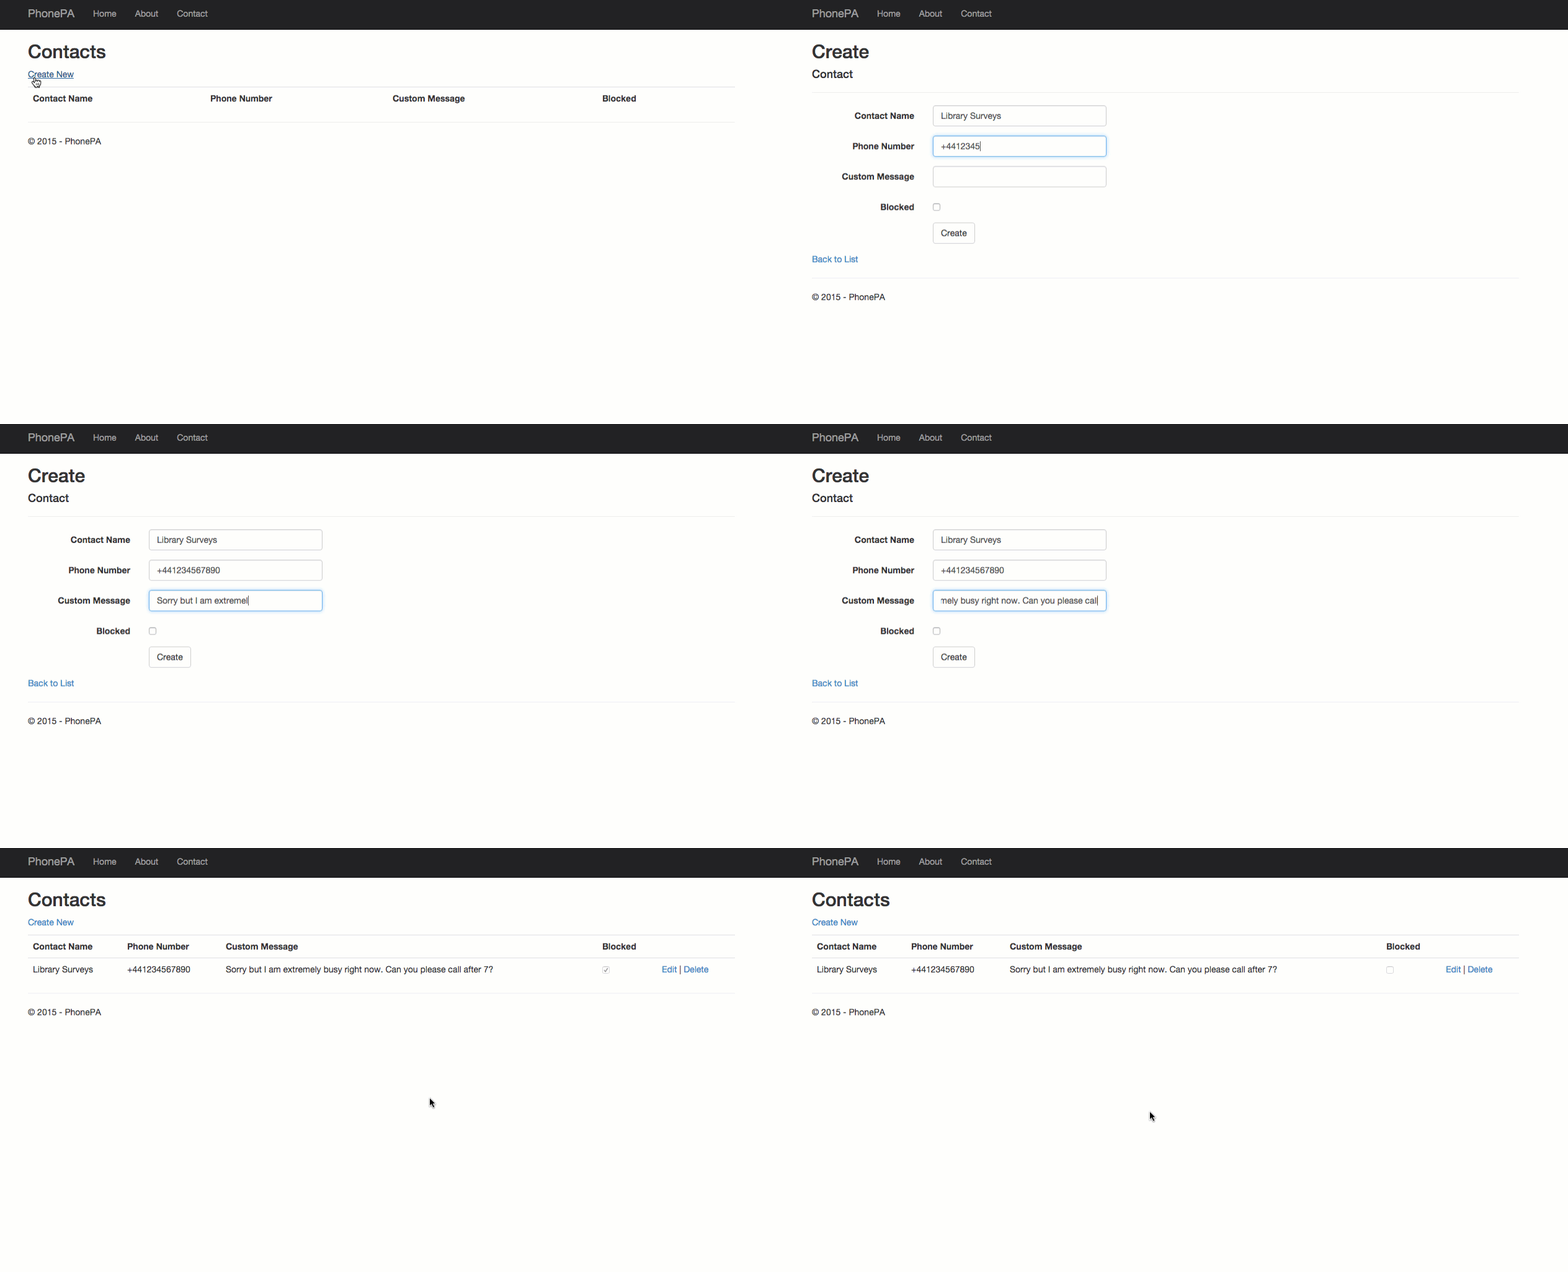
running-app.gif

Hooking up with Twilio

Now that we can create and edit our contacts it is time to let Twilio know about their existence and what to do about each one of them when they call our Twilio number.

Because Twilio needs access to your application we will use ngrok to make our local environment accessible externally. My colleague Kevin Whinnery wrote a great blog post on getting up and running with ngrok.

Back on your terminal open a new tab and run the following to create a tunnel to your local environment. Make sure you copy the forwarding URL.

ngrok 5000

ngrok.gif

Head back to the number you purchased earlier and under Voice change the Request URL to point to the forwarding URL and a new endpoint we will create. The URL should look like this:

http://{my-ngrok-forwarding-url}/Home/HandleCall

Save that and go back to HomeController.cs. We’re now going to add one last endpoint called HandleCall which will have logic to respond to requests coming from Twilio.

[HttpPost]
public IActionResult HandleCall(string From)
{
    var contact = _db.Contacts.FirstOrDefault(s => s.Number == From);
    var twiml = new TwilioResponse();
    if (contact != null)
    {
        // It is a contact.
        // check whether they're allowed through
        if(!contact.Blocked){
            return Content(twiml.Dial(Environment.GetEnvironmentVariable("MY_NUMBER")).ToString(), "text/xml");
        }
        else{
            return Content(twiml.Say(contact.Message).ToString(), "text/xml");
        }
    }
    else{
        return Content(twiml.Say("This number is only for contacts.").ToString(), "text/xml");
    }
}

The logic above is very simple but powerful. It checks the database for a number on every incoming call and tells Twilio what to do via TwiML. There are three possible outcomes:

  1. An incoming number doesn’t exist on the database: The caller gets a standard message saying this number is only for contacts
  2. The incoming number exists and isn’t blocked: The caller is then redirected to our real telephone number. I’ve used an environment variable for this, but you could just replace that with your own mobile number for example. For more information on creating and managing environment variables on a Mac, check this article out.
  3. The incoming number exists but is blocked: The caller gets a custom message played.

To test it out, you can create  a new contact with another mobile or landline number you own, and try to call your Twilio number from it. Depending on the status, you will see that there will be different messages being played.

What next?

We started off by having to answer every single one of our calls and now have an fully automated system that will handle each and every one of the calls to our Twilio number. It will not only answer them but also decide whether the call is important to us at that time.

There are other features we could add to our phone application such as recording calls using the  verb, or building an options menu that will eventually give the caller an automated answer to something they’re looking for by using the  verb.

How about making it handle incoming SMS messages and using the statuses to auto-reply the messages?

I would love to see what you come up with. Hit me up on Twitter @marcos_placona or by email on marcos@twilio.com to tell me about it.