Implementing real-time data visualization in Node.js with Twilio Sync
Time to read:
February 21, 2020
Written by
.png")
In today’s world, almost every existing application is a real-time app. From chat apps, online games, ride-hailing apps, to collaboration tools, users expect to see instant updates as other users interact with the application. This goes to show that application state synchronization is important in building modern and interactive applications.
Twilio Sync offers a state synchronization API for managing synchronized application states at scale across multiple devices and users.
In this post you will learn how to add real-time functionality to a Node.js application using Sync. You will be building a sports survey application that shows the results of the survey in real time.
Prerequisites
To build the case study project for this post you need to have the following development tools installed on your system:
- Node.js JavaScript runtime environment
(The Node.js installer includes the npm package manager, which is also required.) - Twilio account – Sign up for a free trial account with this link and you’ll receive a $10 credit.
- Git – Source code control is your friend.
This post requires basic knowledge of JavaScript. Prior experience with Node.js and Express will be helpful.
The companion repository for this post is available on GitHub.
Setting up the development environment
Start by creating a project directory, twilio_voting, on your computer.
In the twilio_voting directory, create a new Node.js project using the Express web application framework’s scaffolding tool. Run the following command-line instructions in the twilio_voting directory:
The first command above initializes an empty Git repository. The next command creates a .gitignore file that excludes files that should not be tracked by Git, including the project’s node_modules directory. The third line adds an MIT open source software license, while the fourth line installs express-generator.
The -f flag in the fourth command forces an install of express-generator on a non-empty directory. The next installs all the dependencies added by the express-generator library. The final two commands add all the initialized files to the Git repository.
To complete the project setup, run the commands below in your terminal window to install other required dependencies:
With all dependencies now installed, run npm start in your console window and visit http://localhost:3000/ in your browser to see the Express welcome message.
Getting Twilio credentials
Twilio authenticates API requests using certain credentials. These credentials include the Account SID and Auth Token. In addition to these two credentials, you also need revocable API keys to sign the access tokens which are used by Twilio’s real-time communication SDKs.
To access your Account SID and Auth Token, log into your Twilio project console dashboard and copy them somewhere safe. These values can be found on the upper-right side of the dashboard, below the Project Name.
To generate your API keys, select Dashboard > Settings > API Keys with the left-hand navigation panel. Click the + (plus sign) to create a new API Key. On the New API Key panel, enter a descriptive value, like “TwilioVoting” in the Friendly Name field. Leave the Key Type field set to “Standard”. Click the Create API Key button to generate your API keys. Ensure you copy your SID and Secret API keys somewhere safe before closing the page, as it will only be shown once.
Storing environment variables
Secret keys and tokens should be stored and accessed privately, and as such will be stored and accessed as environmental variables.
In the root directory of the project, create a .env file and add the following to the file, replacing the specific values with the corresponding information from your Twilio accounts:
If you followed the instructions in the project setup, .env should already be added to your .gitignore file. If not, add .env to your .gitignore file to ensure your credentials are safe.
Building the homepage
The homepage for the sports survey application will contain a form with three radio buttons, a chart section for visualising the survey results, and a stats section showing a summary of the stats for the survey.
Replace the existing contents of the views/index.ejs file with the following HTML markup:
The HTML markup above contains three script tags; the first two scripts include chart.js and the Twilio Sync JavaScript Client Library, via CDN. The last script tag links to a JavaScript file which you’ll create later.
The HTML markup will need a stylesheet to render as intended. Since it’s rather long, visit the companion repository for this post and copy the raw contents of the file, then paste it into public/stylesheets/style.css, replacing the existing contents.
Lastly, create a script.js file in the public/javascripts directory. In the script.js file, add the following code:
The code above contains and instantiates a VoteChart class which has two methods; a barChart method that displays a bar chart on the page, and an updateChart method that displays a new chart with updated values.
The code also contains an updateSummaryStats function that updates the stats summary on the page.
To see the new homepage for the sports survey application, restart your development server and visit http://localhost:3000/ in your browser. You should see an updated page with a survey form, a chart, and a summary section.
Submitting the survey
The survey homepage is ready, but the submit button currently does nothing. Whenever the submit button is clicked, we want to make a request to the server with the selected option and update the chart and stats with the current survey result.
Add the following code to the end of the script.js file:
In the code above, the selected survey option is assigned to a variable, and a POST request is made to the users route with the checkedOption variable value as the payload. The response is used to update both the chart and the stats summary.
With this in place, the survey application will be ready to work once the server can handle and respond to requests.
Handling the survey results
The survey form makes a POST request to the users route and expects a response it will use to update the data on the frontend.
To handle the form request, update the users.js file located at routes/users.js by replacing the existing contents with the following code:
The code above instantiates a voteCount object with the three survey options as keys and sets their initial values to zero. The users route gets the payload from the request body and updates the count of the provided survey option, then sends back the updated voteCount object as a response.
With this, the survey application is fully functional. To test it out, restart your development server and visit http://localhost:3000/ in your browser. You should be able to submit an opinion and see the data on the page updated with your selection.
Connecting the application to Twilio Sync
The sports survey application is currently able to accept survey choices and update the page with the result of the survey. However, this does not happen in real-time and other users have to constantly refresh the app to see updated results.
To change this, connect the application state (survey result) to the Twilio Sync service using a Sync document object. Whenever a new survey choice is submitted the survey result will be updated and published to the Sync service. Any client subscribed to the Sync document object will receive the updated survey result in real time.
To achieve this, create a Sync service that is instantiated whenever the app starts, and creates a Sync document object to store the application state. In addition to this, you’ll need a sync access token so clients can subscribe to the Sync service.
Before creating the Sync service, add the following line of code to the top of your app.js file located in the project’s root directory:
The line of code above makes your environment variables accessible on the server.
To create the Sync service, create a syncService.js file in the project's root directory, and add the following code to it:
In the code above, we imported the Twilio library, as well as our Twilio account SID and auth token. A Twilio client object is instantiated and used to create a sync service that is then exported.
To use the Sync service above whenever the app is started, update the code in your index.js file located at routes/index.js by replacing the contents with the following code:
The code above imports the Twilio Sync service along with the Twilio Node Helper Library and your Twilio credentials. The Sync service is used to create a Sync document object with the unique name of SportsPoll. The Sync document is given an initial data containing the three survey options as keys and sets their initial values to zero.
In the GET route, a Sync access token is generated, and its identity is set to a random string. Lastly, the access token is granted access to the Sync service and is sent as a local variable to the homepage.
To access the token from the homepage, add the following line of code to the body of your index.ejs file located at views/index.ejs. The code should be added anywhere above the script tag linking to the script.js file:
Note: Your code editor’s linter might complain about the line of code above, however, it is a valid Embedded JavaScript (EJS) syntax that outputs unescaped values into the template.
With the Sync service and access token ready, connect the frontend client to the Sync service by adding the code below to the bottom of your script.js file:
The code above creates a sync client using the already generated access token. The sync client listens for a connectionStateChanged event and logs the connection status to the browser console.
To confirm your sync client is connected to the Sync service, restart your development server and visit http://localhost:3000/ in your browser. If the connection was successfully established, you should see the text “Sync is connected” in your browser’s web console.
Real-time survey result update
The sports survey application is now connected to the Twilio Sync service and is ready to receive and broadcast updates to the survey results. For every connected client to get real-time updates of the survey result, the SportsPoll document is updated whenever a new survey result is submitted and the update is received on the client and used to update the application.
To update the SportsPoll document whenever a new survey result is submitted, update your users.js file by replacing the existing contents with the following code:
In the code above, the Sync service is imported, and the SportsPoll document is updated with the updated voteCount object before the response is sent back to the client.
To get this update on the client, add the following code to the bottom of your script.js file:
On the client-side, the SportsPoll document is opened, and the application is updated with initial data from it. When there is an update to the SportsPoll document, the updated data is received and used to update both the chart and the stats section.
Since there's no need to update the app with the response from the server, you can remove two lines from the script.js file. Find the code for the fetch method shown below and remove just the two lines marked with // remove this line from the code:
Removing the lines above ensures that the survey result is no longer being updated from the fetch response. Be sure not to remove the final }; that closes the form declaration.
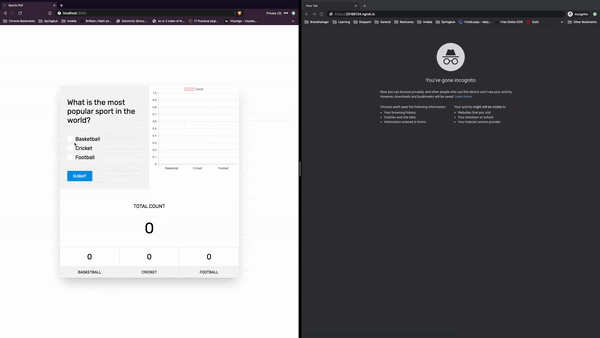
Testing the application
To test the real-time update functionality of the sports survey application, open the application in two different browsers windows. As shown in the animated screenshot below, when a vote is submitted in one browser, the result is instantly updated in both browsers.
The survey results will still be displayed on the page even if the application is restarted. This is because the results are retained by Sync, and the Sync document is the single source of state for the application. In a production application you’ll want to store data in a persistent data layer, such as a database, and account for the difference between users joining ongoing surveys and new surveys.
Note: You may need to modify the security settings of your browser to disable cookie blocking to allow synchronization to work. If a warning the browser console window indicates that access to the Twilio CDN has been blocked, you need to adjust your settings.
Summary
In this post, you learned how to add real-time functionality to a Node.js application using Twilio Sync. Sync can be used to achieve much more than what has been shown in this post, as it is designed to work completely as a stand-alone state management system, or together with other Twilio products.
Additional resources
These resources will help you gain deeper knowledge about the tools, technologies, and techniques mentioned in this post:
Express – The sports survey app is built with Express, a “fast, unopinionated, minimalist web framework for Node.js.”
Twilio Node Helper Library – The reference documentation provides code samples that show you a variety of ways to use Twilio products with Node.js.
Twilio Sync – See this product page for more information on the Sync SDK and Sync API, including links to the complete documentation.
You can find the complete code for this post on GitHub.
Chuks Opia is a Software Engineer at Andela. He is also a technical writer and enjoys helping out coding newbies find their way. If you have any questions please feel free to reach out on Twitter: @developia_ or GitHub: @9jaswag.


Related Resources
Twilio Docs
From APIs to SDKs to sample apps
API reference documentation, SDKs, helper libraries, quickstarts, and tutorials for your language and platform.
Resource Center
The latest ebooks, industry reports, and webinars
Learn from customer engagement experts to improve your own communication.
Ahoy
Twilio's developer community hub
Best practices, code samples, and inspiration to build communications and digital engagement experiences.