Build a Trick or Treat Chatbot with Twilio Studio and Functions, and Node.js
Time to read:
September 29, 2021
Written by
Reviewed by

With Halloween around the corner, I decided I wanted to build a chatbot to help people find trick or treat locations in their neighborhood. The idea was that a user could send an SMS to the chatbot’s phone number and interact with the bot to either find trick or treat locations, or add their location to the list of places giving out candy or hosting spooky events.
In this article, you’ll learn how to build a chatbot like mine that you can customize however you like.
Prerequisites
To get started with this tutorial, you’ll need the following:
- Node.js installed on your machine, along with a package manager like
npmoryarn - A free Twilio account (sign up with this link and get $10 in free credit when you upgrade your account)
- A Twilio phone number
Overview of the chatbot architecture
The chatbot you’re about to build will use the following technologies:
- Twilio Studio, for the chat flow (this part of the solution is no-code)
- Twilio Functions, to build API endpoints that will process user input
In my chatbot, I also used Airtable for my database in order to store my users’ responses. This article will not cover database integration, but it will specify where you can connect with the database of your choosing. The Airtable integration is covered in part two of this project.
Twilio Studio is a drag-and-drop, no-code application builder that allows you to create all kinds of communication apps. It works by providing a blank canvas where you can drag and drop configurable widgets that handle different tasks. You can connect these widgets together to create application flows.
Twilio Functions is a serverless Node.js environment where you can host application code.
The chatbot, built with Studio, will collect responses from your users and depending on what the user wants to do, will send their responses to Functions to be processed - this is like a webhook.
To build the chatbot, you’ll create the Functions portion of the app first. This way, when you get to the Studio portion, your code will be complete and you can configure and connect your widgets without having to jump back and forth between Functions and Studio.
Create your Functions Service
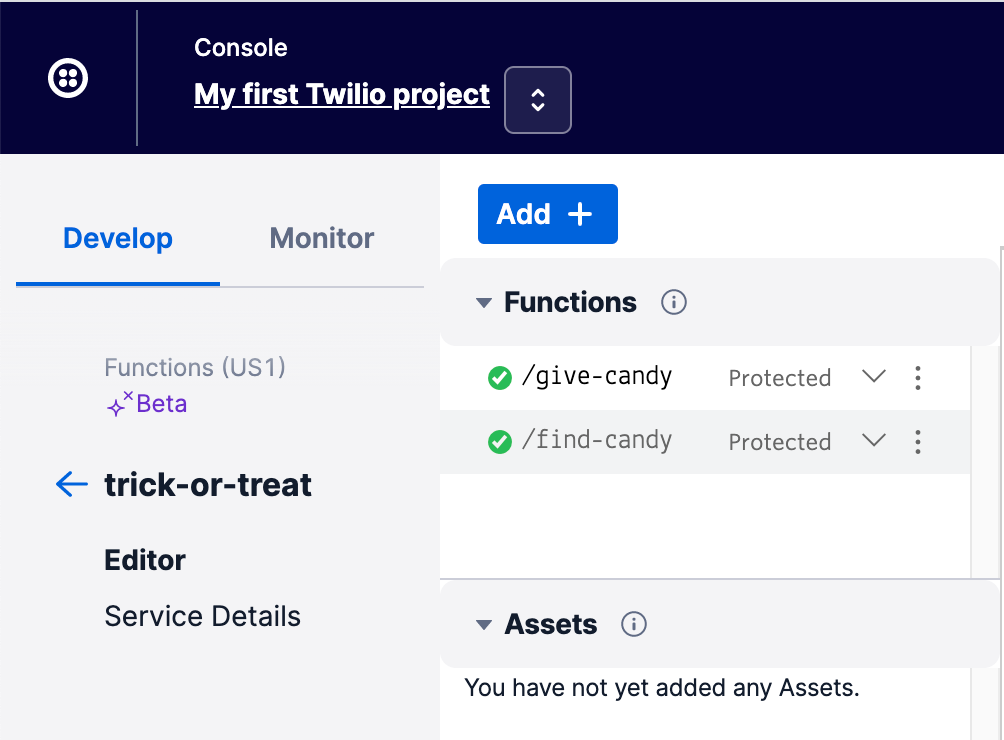
Navigate to the Functions section of the Twilio Console. Click the blue Create Service button and when prompted, give your service a brief, human-readable name like trick-or-treat or halloween. Then click Next.
This will open the editor for your new service. A Functions Service is a collection of assets, functions, and environment details (like variables or dependencies).
Your chatbot needs to be able to do two things: lookup trick-or-treat locations based on the user’s submitted zip code, and store trick-or-treat locations added by users. You’ll create one function for each of these tasks.
Create functions
Click the blue Add + button and then select Add Function to create a new function. In the input field, change the path name to /find-candy. Leave the visibility status as protected. Repeat this process to create a second function with the path /give-candy.
Find candy
The Studio workflow will make a POST request to the /find-candy function after the user has both indicated they are looking to find trick or treat locations and submitted their zip code. The user’s zip code will be passed in the body of the request. This zip code will be available on the function’s event object.
Click on the /find-candy function in the list of functions and the code editor for this function will open to the right. Delete any stock code visible in the editor and replace it with the following:
As you’re building your chatbot, you’ll want to connect to your database at the beginning of this function and lookup all addresses associated with the provided zip code. As shown in the code above, you’ll then return a TwiML message with the list of local trick-or-treat spots, or a message that lets the user know there’s no locations nearby. For testing purposes, feel free to add more fake locations to the allLocations array.
Be sure to click the Save button beneath the editor.
Give out candy
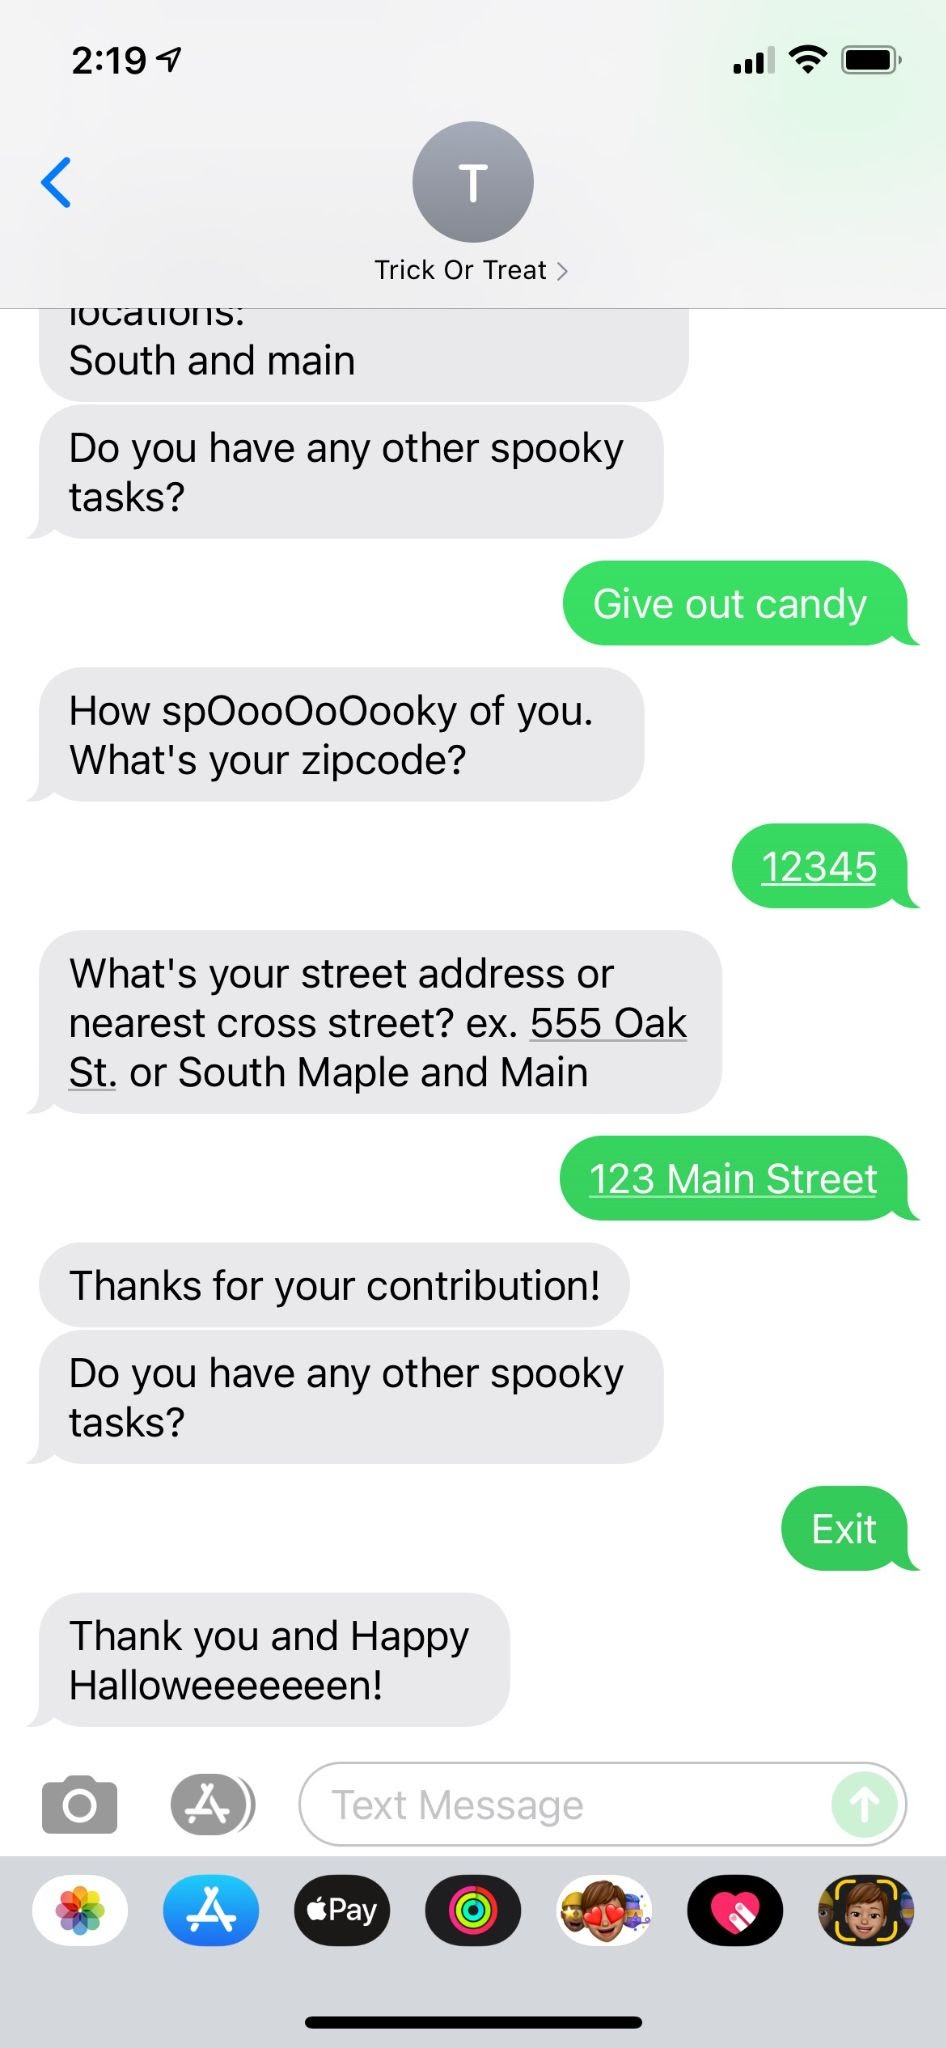
When the user has indicated that they want to add their location to the list of trick-or-treat locations, the chatbot will prompt them for their zip code, and then in a second prompt, for their street address or cross streets. After these two responses have been collected in Studio, the workflow will make a POST request to the /give-candy function and pass these two data points in the request body.
Click on the /give-candy function to open its editor. Replace any placeholder code with the following:
In this function, you will access the user-provided zip code and address via event.zipcode and event.address respectively. You can then insert those values in your database, and on successful insertion, you can return a “thank you” TwiML message to the user.
Click Save beneath the editor. Then, at the bottom of the screen, click the blue Deploy All button to deploy your function service.

Build your Studio flow
With your function service deployed, it’s time to build out your Studio flow.
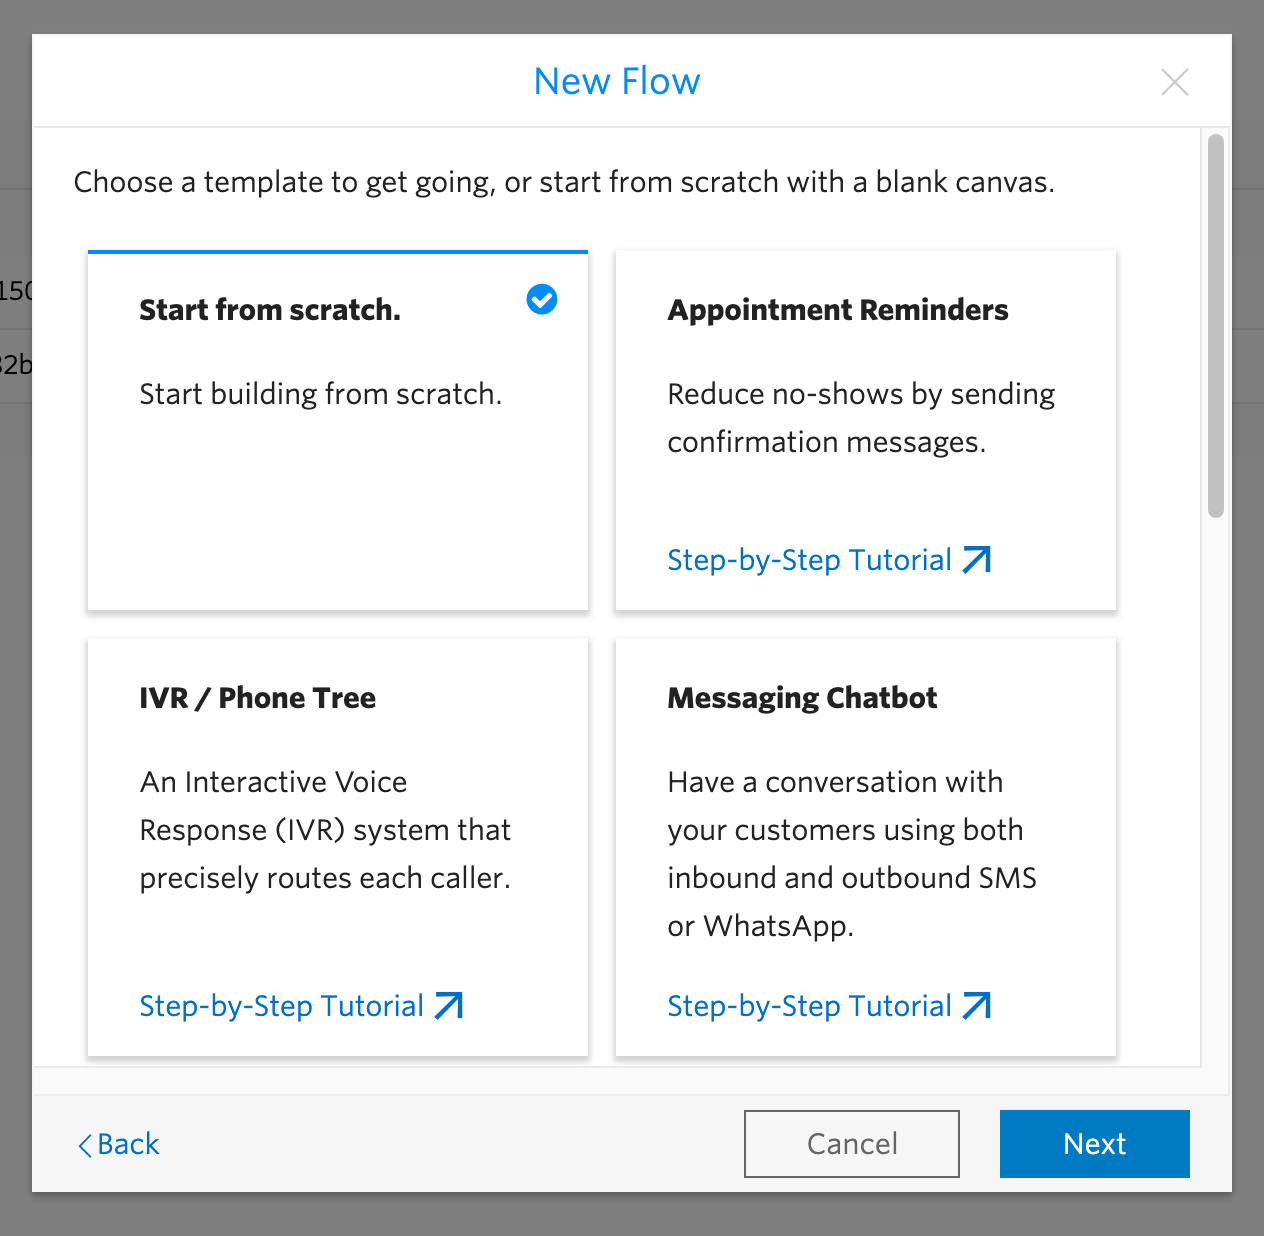
Navigate to the Studio section of the Twilio Console. Click the + button or the button that says Create Flow to create a new Studio flow. Give it a short, human-readable name (one that matches your Functions service name is fine). Then, when prompted to choose a template, pick the Start from scratch option, and click Next.
This will open the canvas for your new Studio flow.
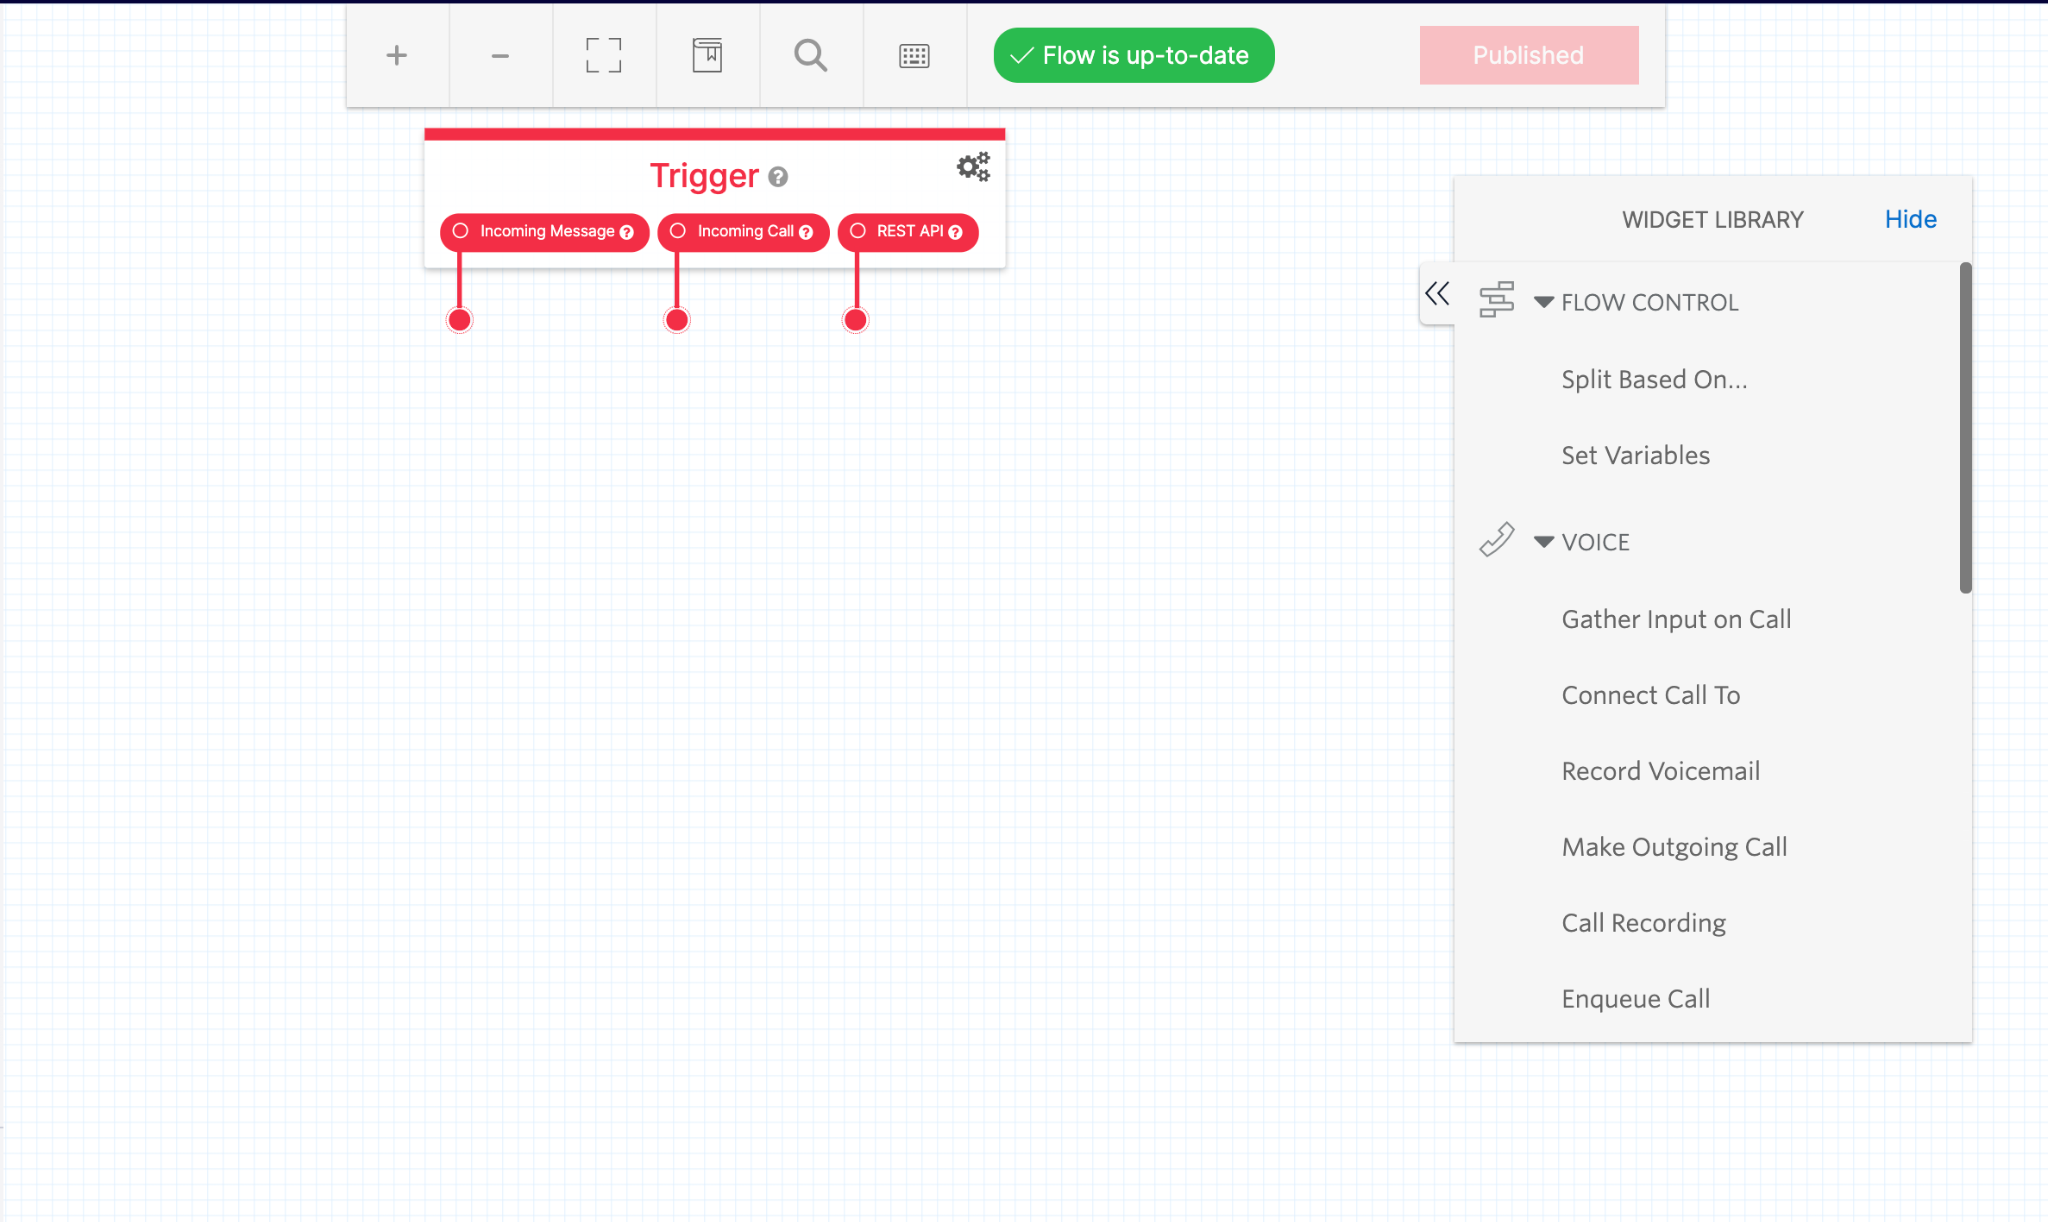
In this image you can see the Trigger widget, outlined in red, along the top of the canvas. On the right side, you can see the Widget Library. This library can be collapsed to a tiny bar by clicking the Hide button on the top right of the library.
The Widget Library is where you will find all the widgets you need for the chatbot flow. As you scroll through the list, when you find one you want to use, drag the title to the canvas and the widget will appear. You can drag the widget around the canvas to place it where you want for visual organization. When a widget is selected, the widget library will convert to a widget configuration space where you can edit the widget’s actions and properties.
Here is an overview of what the completed flow will look like:
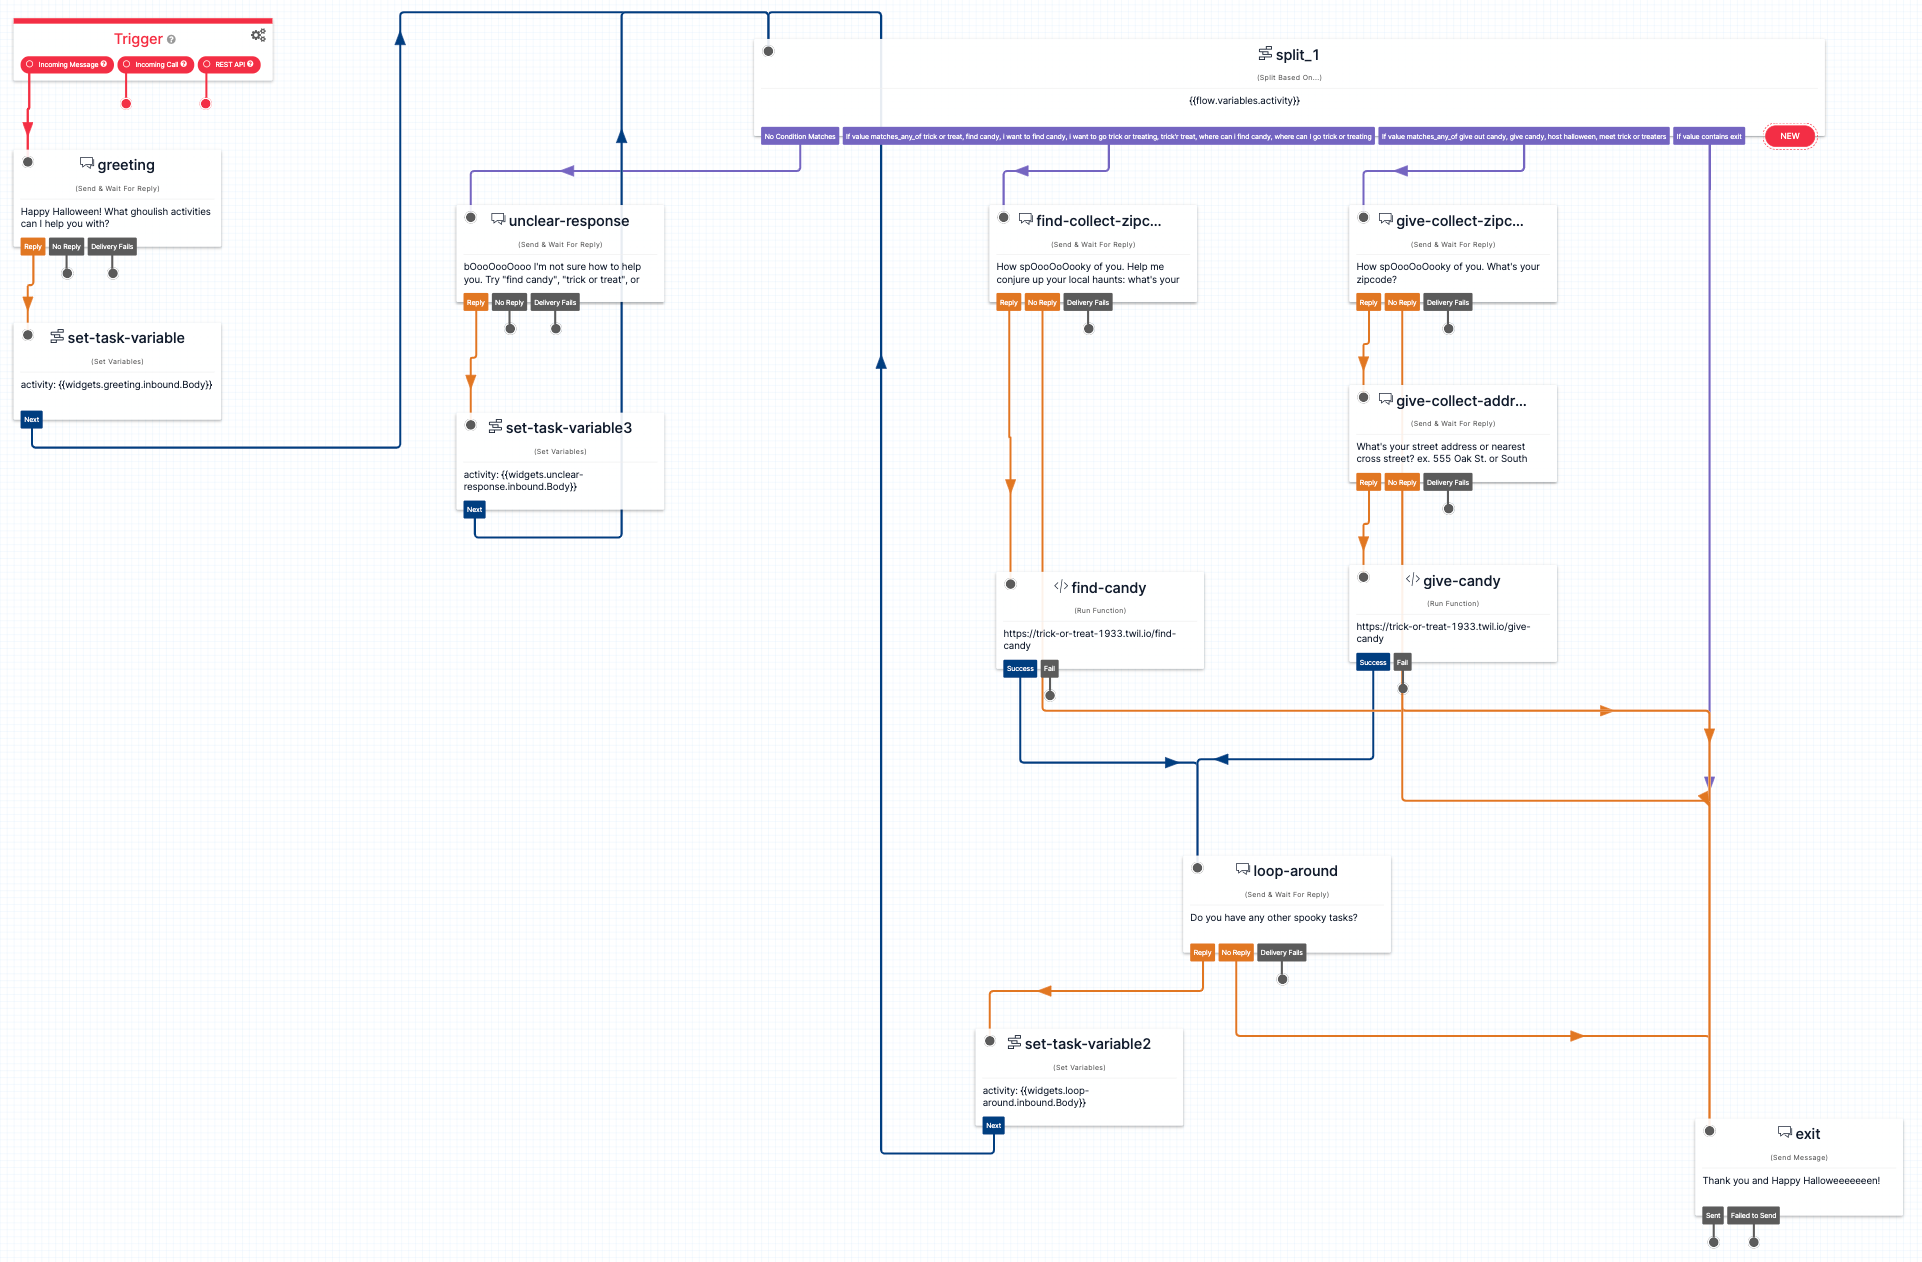
I will walk through an overview of each part of this flow and provide basic information on using Studio, starting with the Trigger widget.
Chatbot initiation
When a user texts your Twilio phone number, the Studio workflow will be engaged (you’ll form this connection in the final step).
The user can text anything to the chatbot to get started. Once the chatbot is engaged, you want it to send a response prompting the user for their desired task (finding or giving candy).
To create this flow, look for the Send & Wait For Reply widget in the Widget Library. When you find it, drag it to the canvas beneath the Trigger widget.
To connect the two widgets, drag the red-filled circle beneath the Incoming Message option on the Trigger widget to the grey-filled circle in the top-left corner of the new Send & Wait For Reply widget.
Congratulations, you’ve performed your first widget connection!
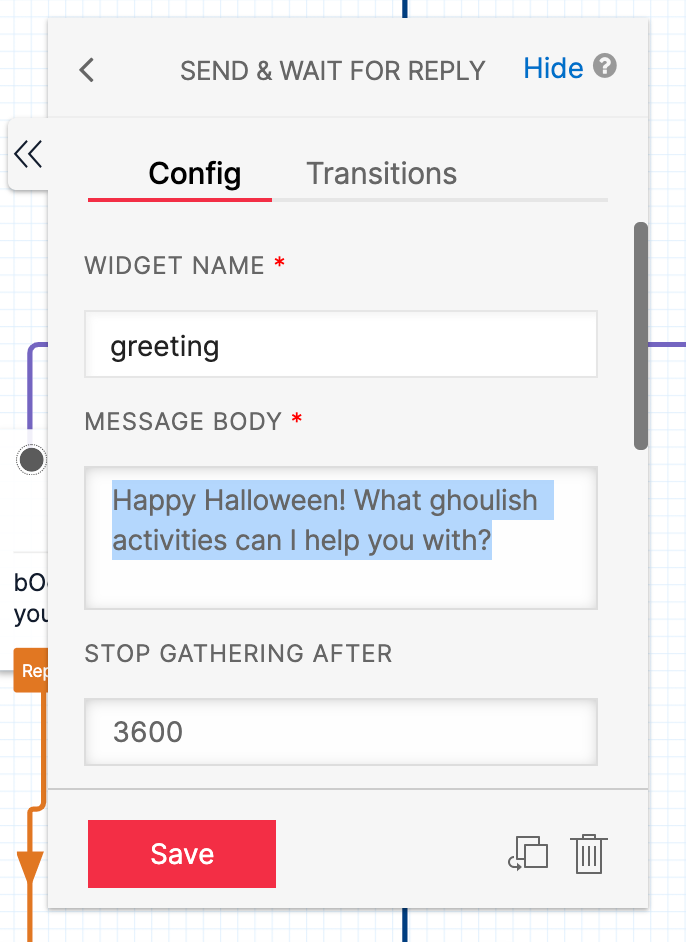
Now select your new widget, and take a look at the Widget Library/configuration editor. Change the widget name to greeting and in the Message Body input, type in the message you want sent to your users once they engage the chatbot. Mine was “Happy Halloween! What ghoulish activities can I help you with?” Then click the Save button.
Any Save & Wait For Reply widget will send a message to the user and then capture their reply. In later widgets, you can access this reply by referencing the widget name, but in this case, you want to save the reply value to a variable that can be overwritten by future replies.
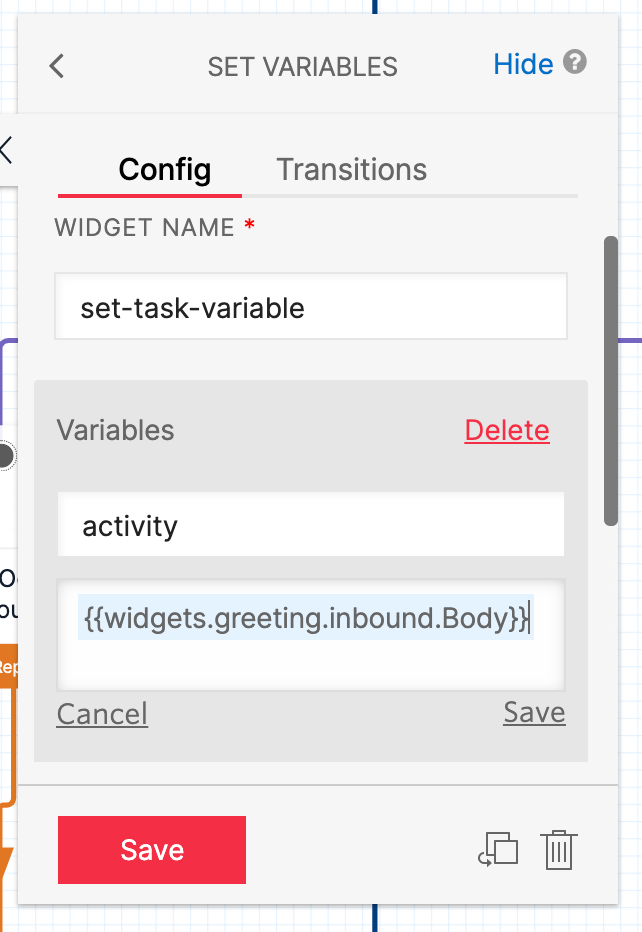
To do this, find the Set Variables widget in the Widget Library and drag it beneath the greeting widget. Connect the Reply option of the greeting widget to your new widget.
Configure the widget name to set-task-variable, and in the configuration editor, add a new variable by clicking the + button. The Key field is where you name the variable. Call it activity.
The Value field is where you assign the reply value to the variable. To access the value in this field, use {{ widgets.greeting.inbound.Body }}. This syntax is liquid templating syntax.
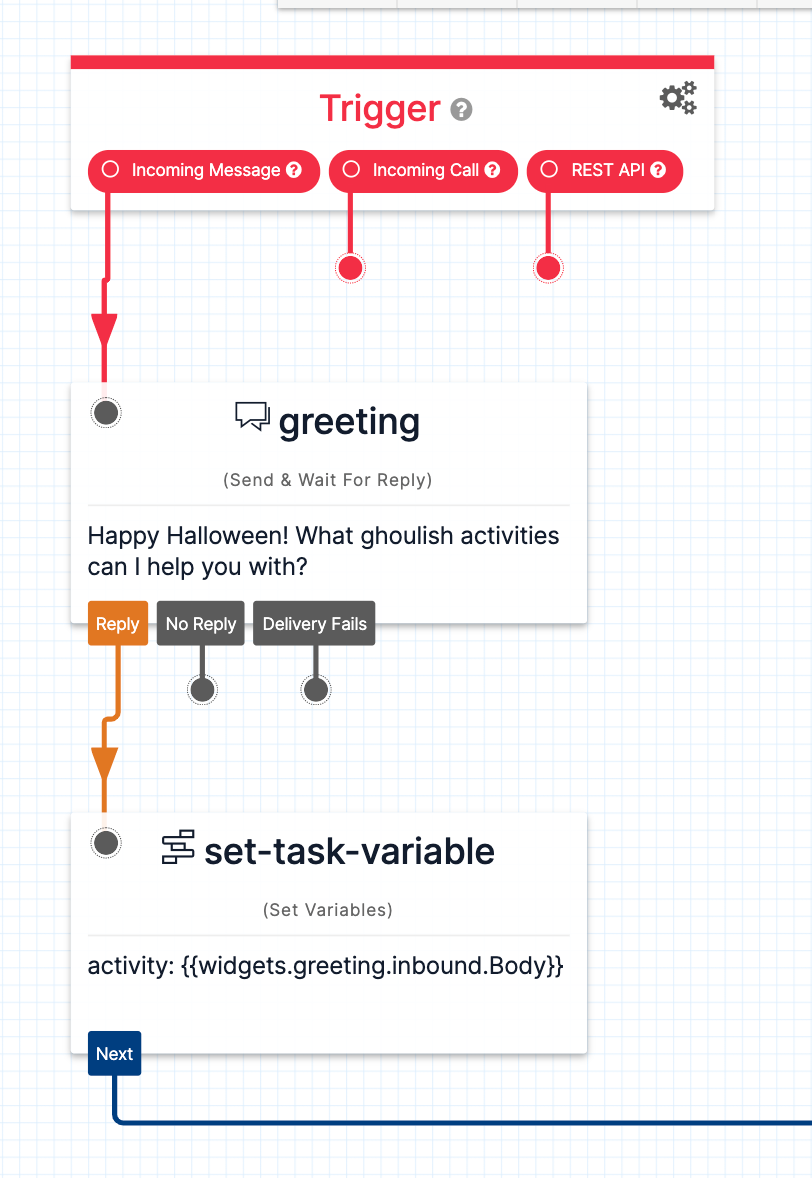
Save the widget. At this point your widget layout should look like similar to this:
Process user input
At this point, your user has been greeted by the chatbot, has sent a reply, and the reply has been stored in a variable. Now you need to branch out the flow based on what they replied.
There’s four reply classifications that you’ll want to handle for this part of the flow:
- The user indicates that they want to find trick-or-treat locations
- The user indicates they want to list their location as a trick-or-treat option
- The user indicates they want to exit the bot
- The user sends a reply that doesn’t fit into any of the first three classifications
Studio does not help you create AI powered bots, so you can’t train it on sample responses to classify the user’s reply for you.
Instead, you should generate a list of potential replies for each of the first three response classifications (find candy, give candy, exit). You’ll then input these lists into a Split Based On… widget.
Here’s the list of sample responses I used:
|
Response classification |
Sample responses |
|---|---|
|
find candy |
trick or treat, find candy, i want to find candy, i want to go trick or treating, trick'r treat, where can i find candy, where can I go trick or treating |
|
give out candy |
give out candy, give candy, host halloween, meet trick or treaters, add my location, add location |
|
exit |
exit, stop, no, cancel, quit |
Find the Split Based On… widget in the widget library and drag it to the right of the widgets you’ve added so far.
Before configuring the new Split Based On… widget, create a connection from the Next option of the set-task-variable widget to the new Split Based On… widget.
Select the new widget, and then in the widget configuration panel, change the Variable to Test value to flow.variables.activity. Any variables created in your studio flow can be accessed via the flow.variables object.
You’ll edit the Transitions section of the configuration panel shortly. Before that though, add widgets for each of the four options. These should be configured as follows:
|
Widget type |
Widget name |
Message body |
|---|---|---|
|
Send and Wait for Reply |
unclear-response |
bOooOooOooo I'm not sure how to help you. Try "find candy", "trick or treat", "give out candy", or "exit". |
|
Send and Wait for Reply |
find-collect-zipcode |
How spOooOoOooky of you. Help me conjure up your local haunts: what's your zip code? |
|
Send and Wait for Reply |
give-collect-zipcode |
How spOooOoOooky of you. What's your zip code? |
|
Send Message |
exit |
Thank you and Happy Halloweeeeeeen! |
Line up the first three widgets neatly in a horizontal line below the split_1 widget, and move the exit widget down and to the right so it’s out of the way.
With the widgets created, you can now add the connections/transitions from the split_1 widget, as described in the next step.
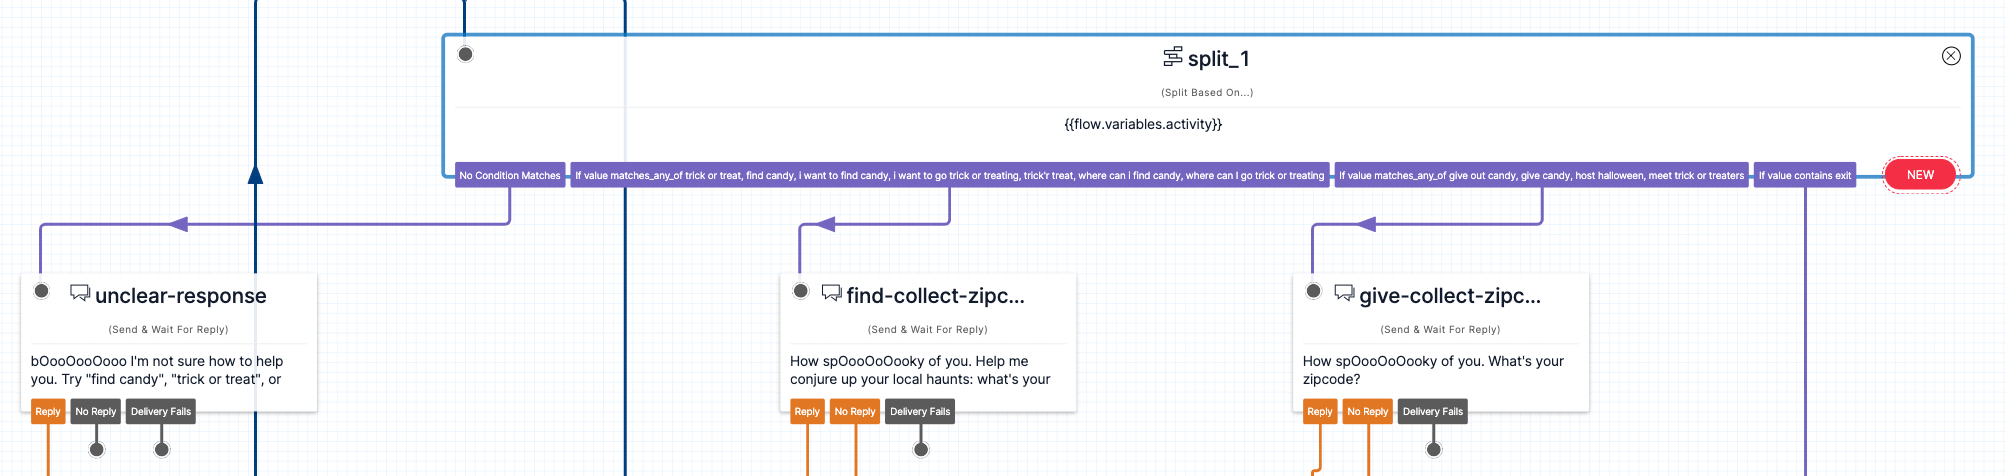
Set up transitions for the split_1 widget
Select the split_1 widget, and then in the configuration panel, select Transitions to configure the connections.
There will be an option for If No Condition Matches already. From the drop down, select your unclear-response widget.
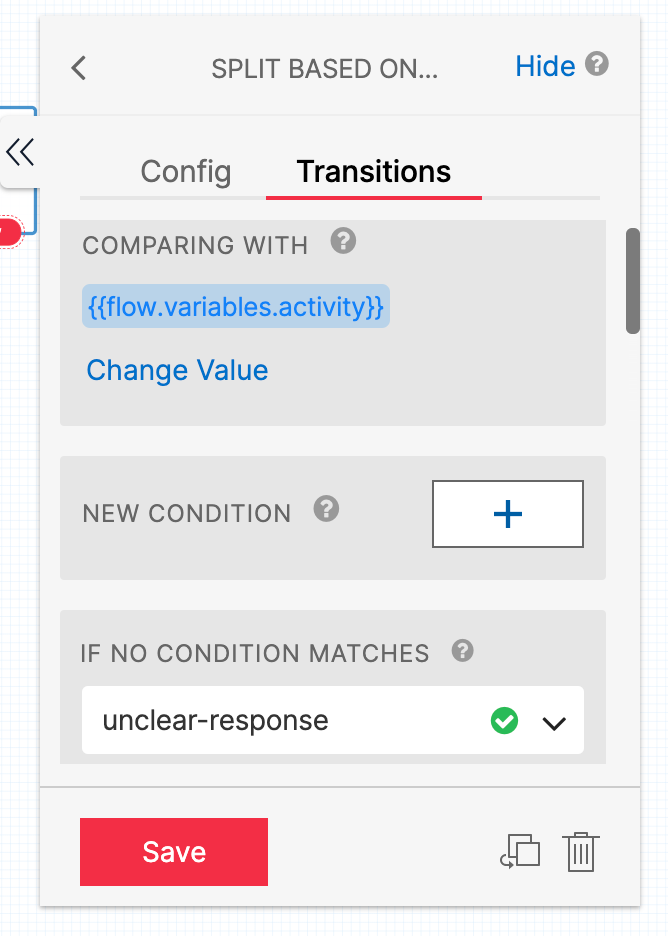
Then, add a new condition by clicking the + button next to New Condition.
In the new condition editor, select Matches Any Of from the first drop down, and then enter your list of sample responses for finding candy, separated by commas, in the second field. From the second drop down, select your find-collect-zipcode widget.

Repeat this same process for the give-collect-zipcode and exit widgets, using your comma-separated list of potential responses for each of those options. When you’re done, save the split_1 widget. At this point, this part of the flow should look something like this:
Continue with the find and give candy flows
Now you’ll work on the part of the flow that follows a user indicating they want to either find treat-or-treat locations or add their location to the list. This part of the flow will look like the following image:
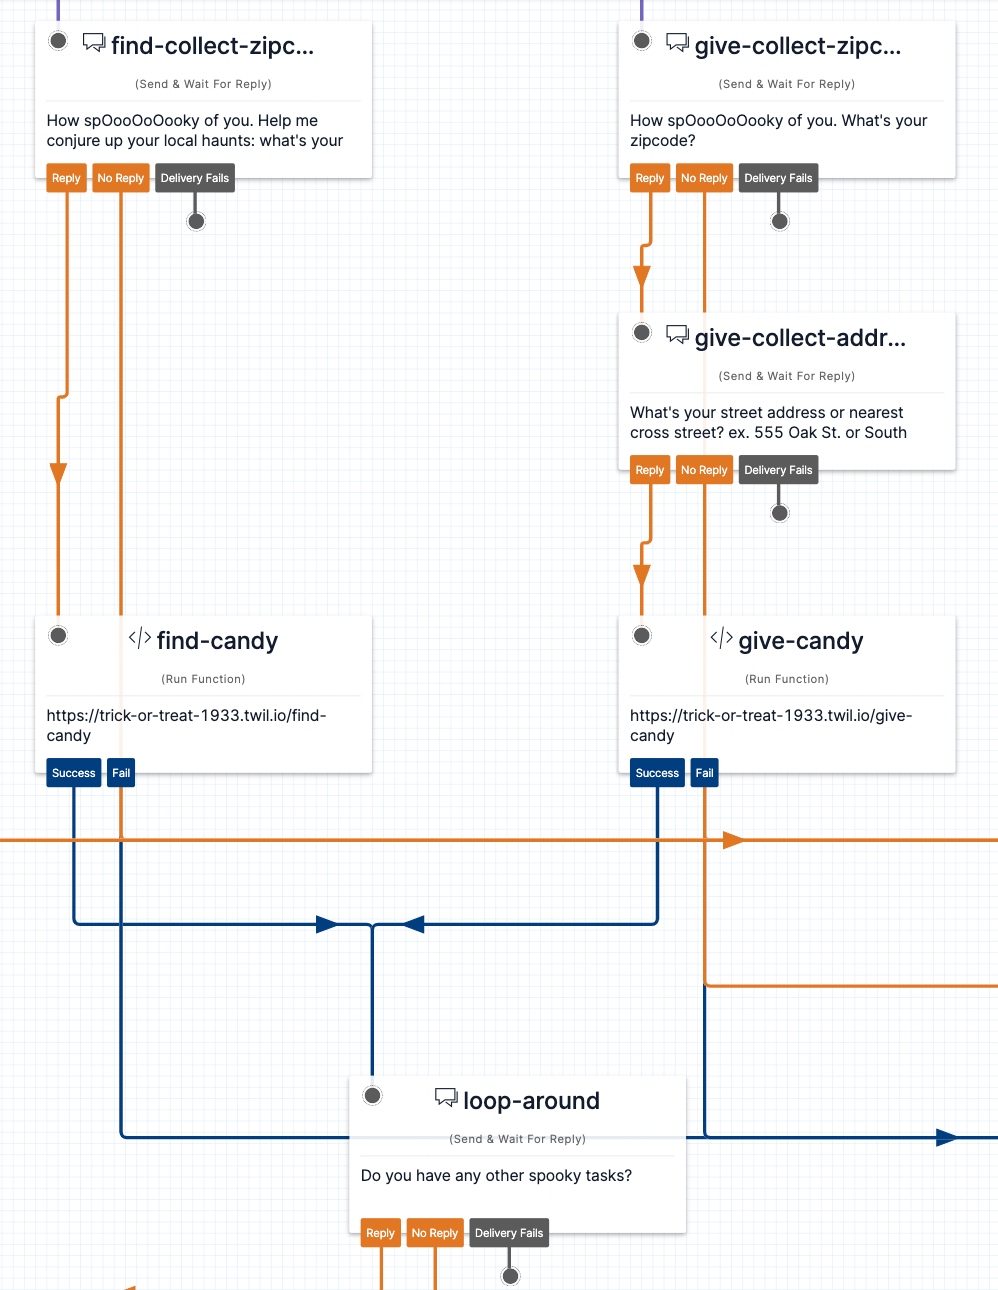
The users zip codes were already collected in the find-collect-zipcode and give-collect-zipcode you added above.
Now you’ll want to pass these zip codes to the associated Twilio functions you created earlier.
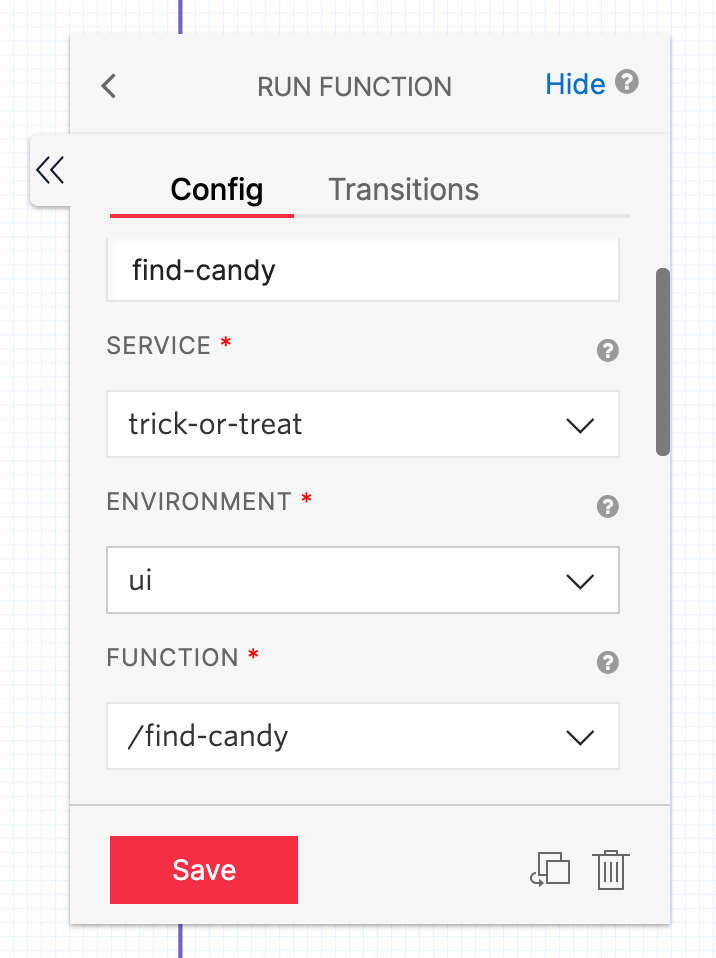
Below the find-collect-zipcode widget, leave a little space, and add a Run Function widget from the widget library. Call the new widget find-candy, and in the dropdowns select your function service, ui environment, and the name of the function you want to run, which should be /find-candy.
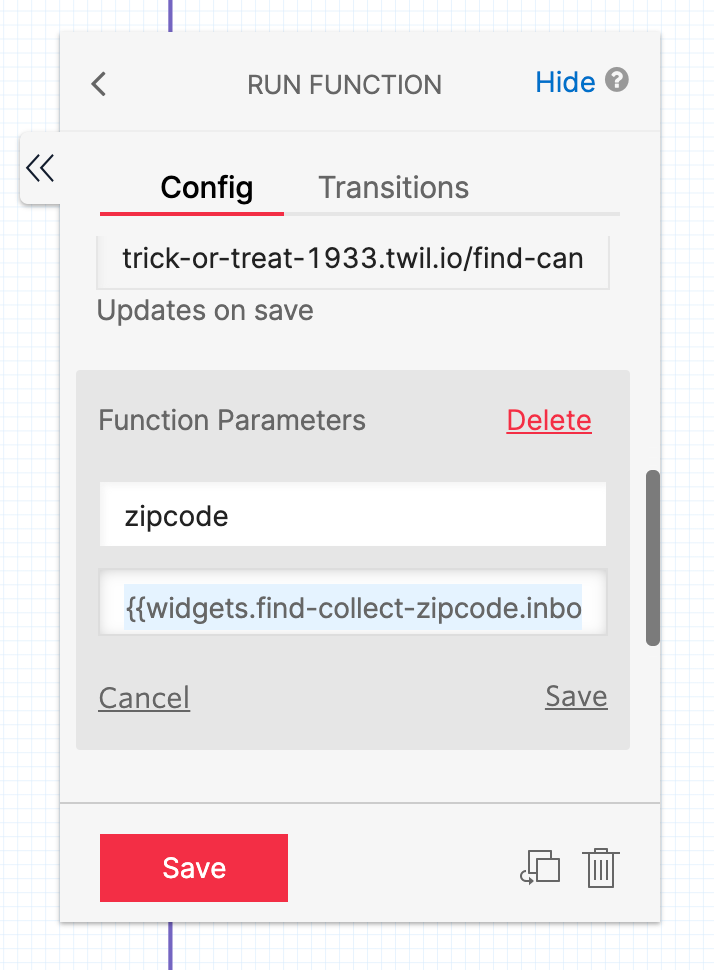
Then, keep scrolling down in the configuration panel to find the Function Parameters section. Click the Add button to add a new function parameter. In the key field, type “zipcode” and in the value field add {{widgets.find-collect-zipcode.inbound.Body}}.
Save the widget, and then connect it to the Reply option of the find-collect-zipcode widget.
The process for the give candy part of the flow will be the same, except you need to collect the user’s street address or cross streets before running the /give-candy function.
To do this, add an additional Save and Wait for Reply widget to below the give-collect-zipcode widget. Name it give-collect-address and set the message body to “What's your street address or nearest cross street? ex. 555 Oak St. or South Maple and Main”. Connect this widget to the Reply option of the give-collect-zipcode widget.
After saving the new widget, you can add the Run Function widget for /give-candy, being sure to add two function parameters:
- key:
zipcode, value:{{widgets.give-collect-zipcode.inbound.Body}} - key:
address, value:{{widgets.give-collect-address.inbound.Body}}
Connect this widget to the Reply option of the give-collect-address widget.
Now, you could end the flow for these two interactions here. But to give the user a better experience, after running the functions, you could prompt them to see if they have any other tasks to complete.
Basically, at this point, you want the user to be able to start the entire flow over again. For example, what if after looking for trick-or-treat locations, the user also wants to list their location? With Studio, you can reuse all the widgets you’ve already created to keep the flow going. In this case, you’ll just need to prompt them and if they engage, collect their response to direct the chatbot, just like you did earlier.
Loop around to the beginning
Centered below the find-candy and give-candy widgets, add another Save and Wait for Reply widget with name loop-around, and message body “Do you have any other spooky tasks?”.
Connect the Success options for both the find-candy and give-candy widgets to this widget.
Below and to the left of the loop-around widget, add a Set Variables widget. Name this widget set-task-variable2, and in the configuration panel set the variable name to activity and the value to {{widgets.loop-around.inbound.Body}}. Connect this widget to the Reply option of the loop-around widget.
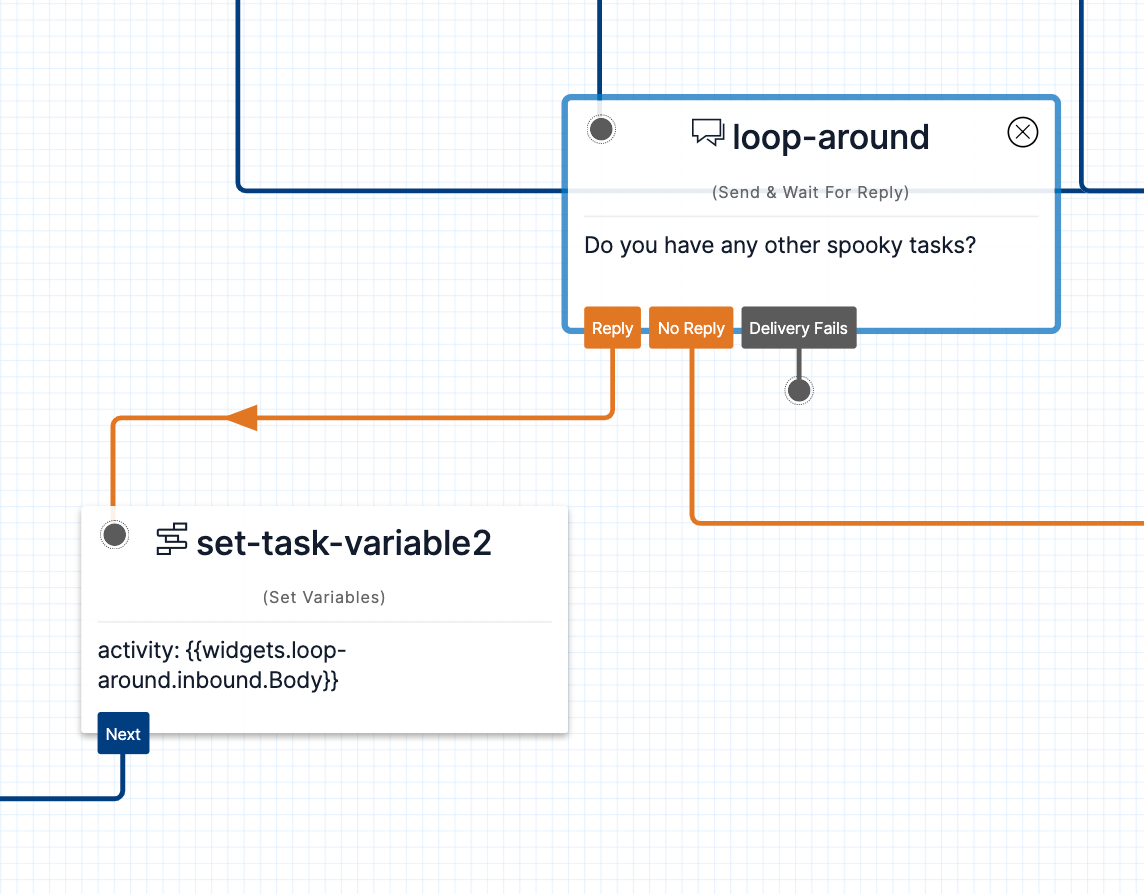
Earlier in this tutorial, you saved the initial user response to a variable called activity. The value of the activity variable was used to split the flow of the chatbot. In this step, you allowed the user to override that variable with the user’s new requested activity.
Connect the Next option of the set-task-variable2 widget all the way back up to the split_1 widget. With this connection, your user can continue interacting with the chatbot for as long as they like.
Handle unclear responses
If the user sends a reply that doesn’t match the find candy, give candy, or exit conditions, then it’s considered an unclear response. You created the unclear-response widget earlier in this tutorial.
Because you don’t want the interaction to end if the user submits an unclear response (you want them to try again!), the unclear-response widget waits for a reply. In the same way you overrode the activity variable after collecting the loop-around response, you’ll override it again here with a new Set Variables widget.
Add this widget directly below the unclear-response widget:
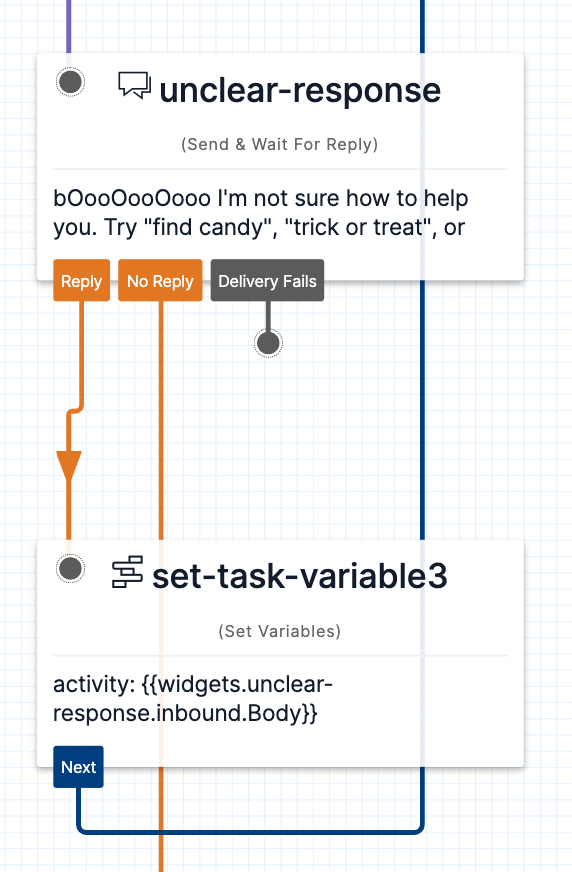
Configure the widget’s name to be set-task-variable3, the variable name to be activity, and the variable value to be {{widgets.unclear-response.inbound.Body}}.
Connect the Next option of the set-task-variable3 widget to the split_1 widget.
Handle exits
The last step is to handle exits. Exits occur when a user asks to exit or when they never reply. Review all your widgets and connect any unconnected No Reply and Fail options to the exit widget.
After making the exit widget connections, be sure to save any active widgets, and then hit the Publish button at the top of the canvas. At this point your chatbot Studio flow is complete!
Connect your Twilio phone number to the chatbot
The last step is to connect your Twilio phone number to your Studio flow.
To do so, navigate to the Active Phone Numbers section of the Twilio Console. Find the phone number you intend to use for your chatbot, and click on it to open the number’s configuration page.
Scroll down to the Messaging section of the page.
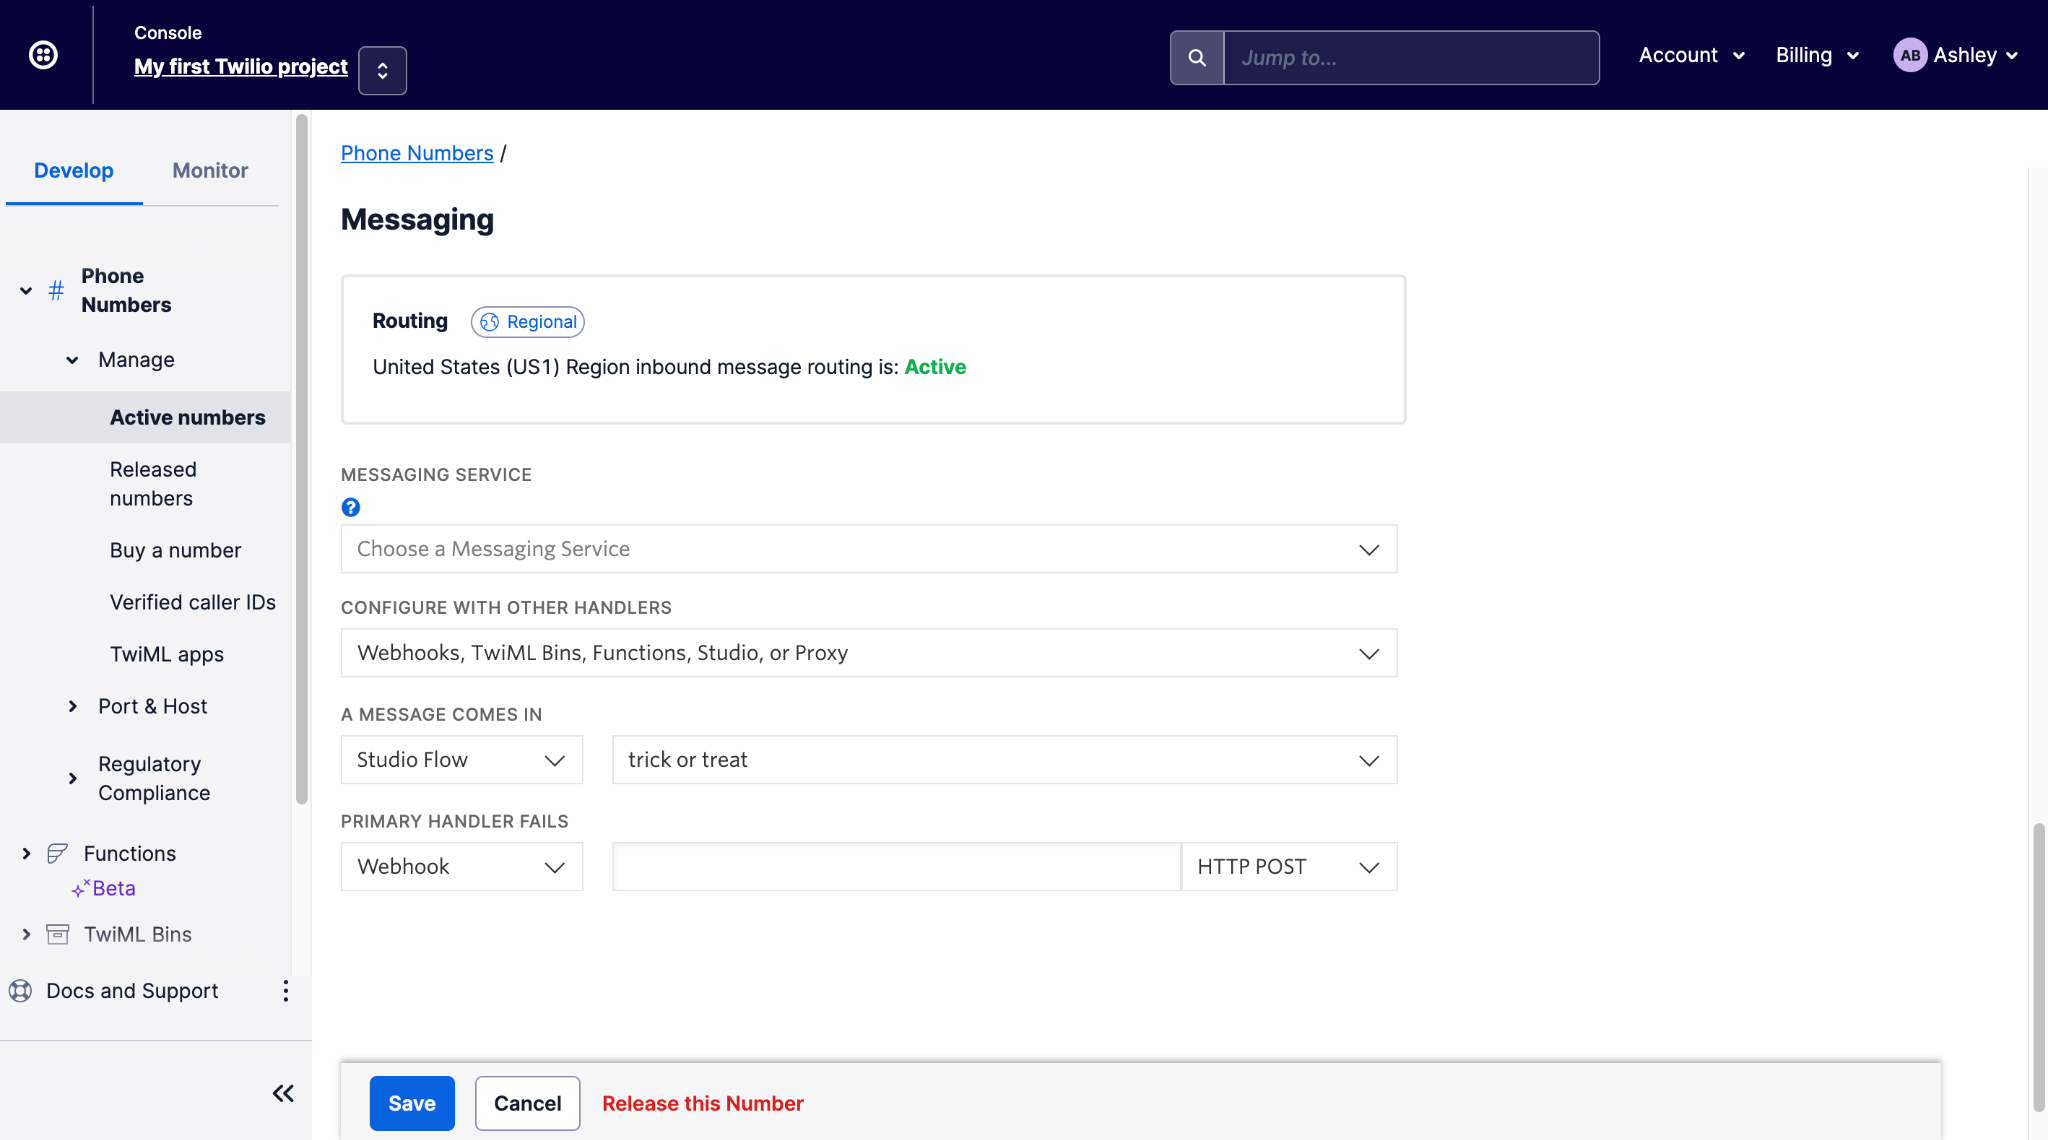
Under Configure with other handlers dropdown, be sure Webhooks, TwiML Bins, Functions, Studio, or Proxy is selected.
For the A Message Comes In drop down, select Studio Flow and in the second dropdown, select the name of your studio flow.
Then, click the Save button at the bottom of the page.
You’re all done!
Test your chatbot
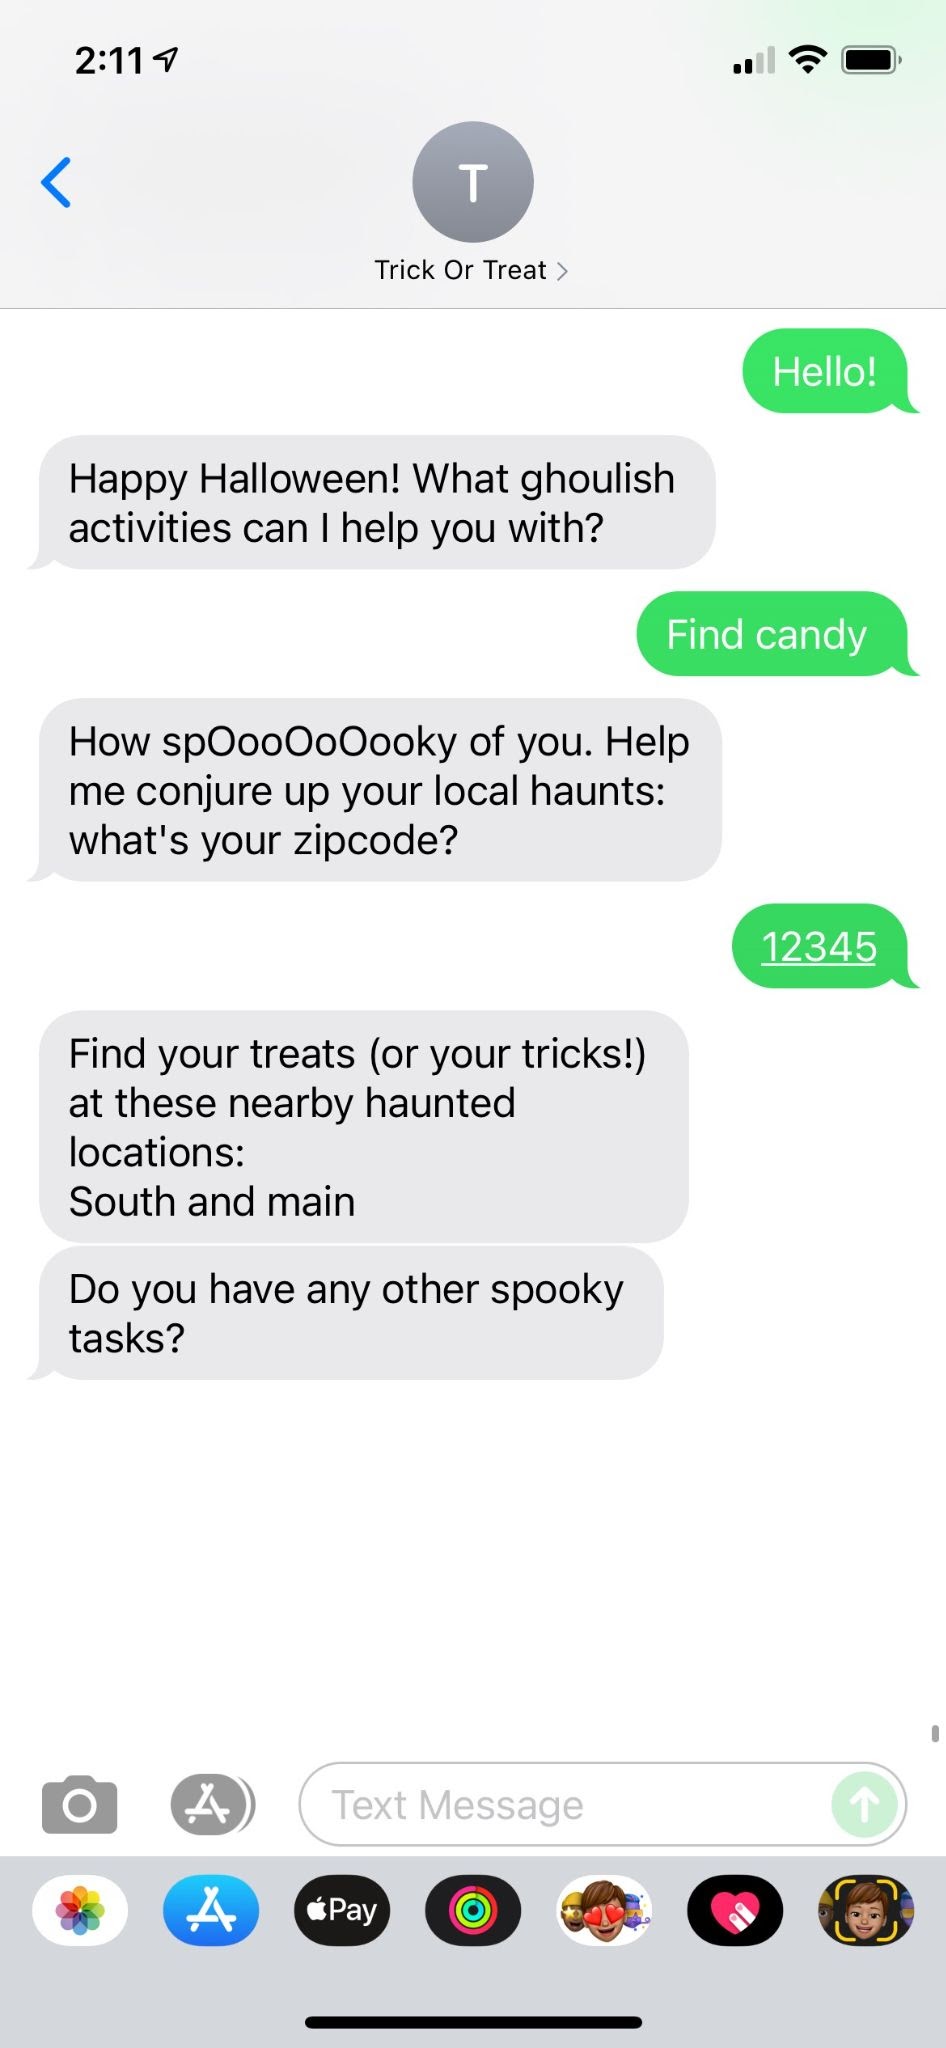
Take your chatbot for a spin. Send any text message to the Twilio phone number you just configured.
Next steps
I hope you had a great time building this chatbot and learned a lot about Twilio Studio and Twilio Functions. Complete your project by learning how to connect your chatbot to Airtable, or check out some of our other haunted articles, like this one on building a ghost-writing app with GPT-3, or this one on building a socially distant candy dispenser.
Happy hallowEeEeEeEeeeen!
Ashley is a JavaScript Editor for the Twilio blog. To work with her and bring your technical stories to Twilio, find her at @ahl389 on Twitter. If you can’t find her there, she’s probably on a patio somewhere having a cup of coffee (or glass of wine, depending on the time).


Related Resources
Twilio Docs
From APIs to SDKs to sample apps
API reference documentation, SDKs, helper libraries, quickstarts, and tutorials for your language and platform.
Resource Center
The latest ebooks, industry reports, and webinars
Learn from customer engagement experts to improve your own communication.
Ahoy
Twilio's developer community hub
Best practices, code samples, and inspiration to build communications and digital engagement experiences.