Build a Survey App With Python, Twilio, and Airtable
Time to read:
"Scandia 010" by How I See Life is licensed under CC BY-ND 2.0
Airtable is like a cool big-budget superhero crossover between a spreadsheet and a database.
It’s easy to write to an Airtable from your Twilio app, so we’re going to take that idea and build off of it to make a SMS-driven survey app using Python and the Flask framework.
The survey app we are going to build will gather NPS, which stands for Net Promoter Score, a metric used to measure customer experience. However, you can customize the survey for purposes specific to your needs. Try it out by texting your favorite emoji to the number below.

We’ll go through this step-by-step, and we will do it all in a single file. If you would like to download the complete project you can find it in this GitHub repository: https://github.com/Eclairemoy/nps-survey
Building the Project
Prerequisites
To build the project you will need:
- A free Airtable account.
- Python 3.6 or newer, which you can download at python.org.
- ngrok. We will use this spiffy utility that will give the Flask application running on your system a public URL that Twilio can connect to. You can download a copy for Windows, MacOS or Linux.
- A free or paid Twilio account. If you are new to Twilio get your free account here (this link will give you $10 when you upgrade).
- A Twilio number with SMS capabilities (this quickstart will help you get going)
Here’s a roadmap of what we’ll do in this post:
- Create an Airtable Base
- Set up Your Flask application
- Write the Survey Code
- Buy a Number
- Connect the App Using Ngrok
Create an Airtable Base
You can create your own Airtable base, or you can copy this one that I made by hitting “Copy Base” in the upper right hand corner.
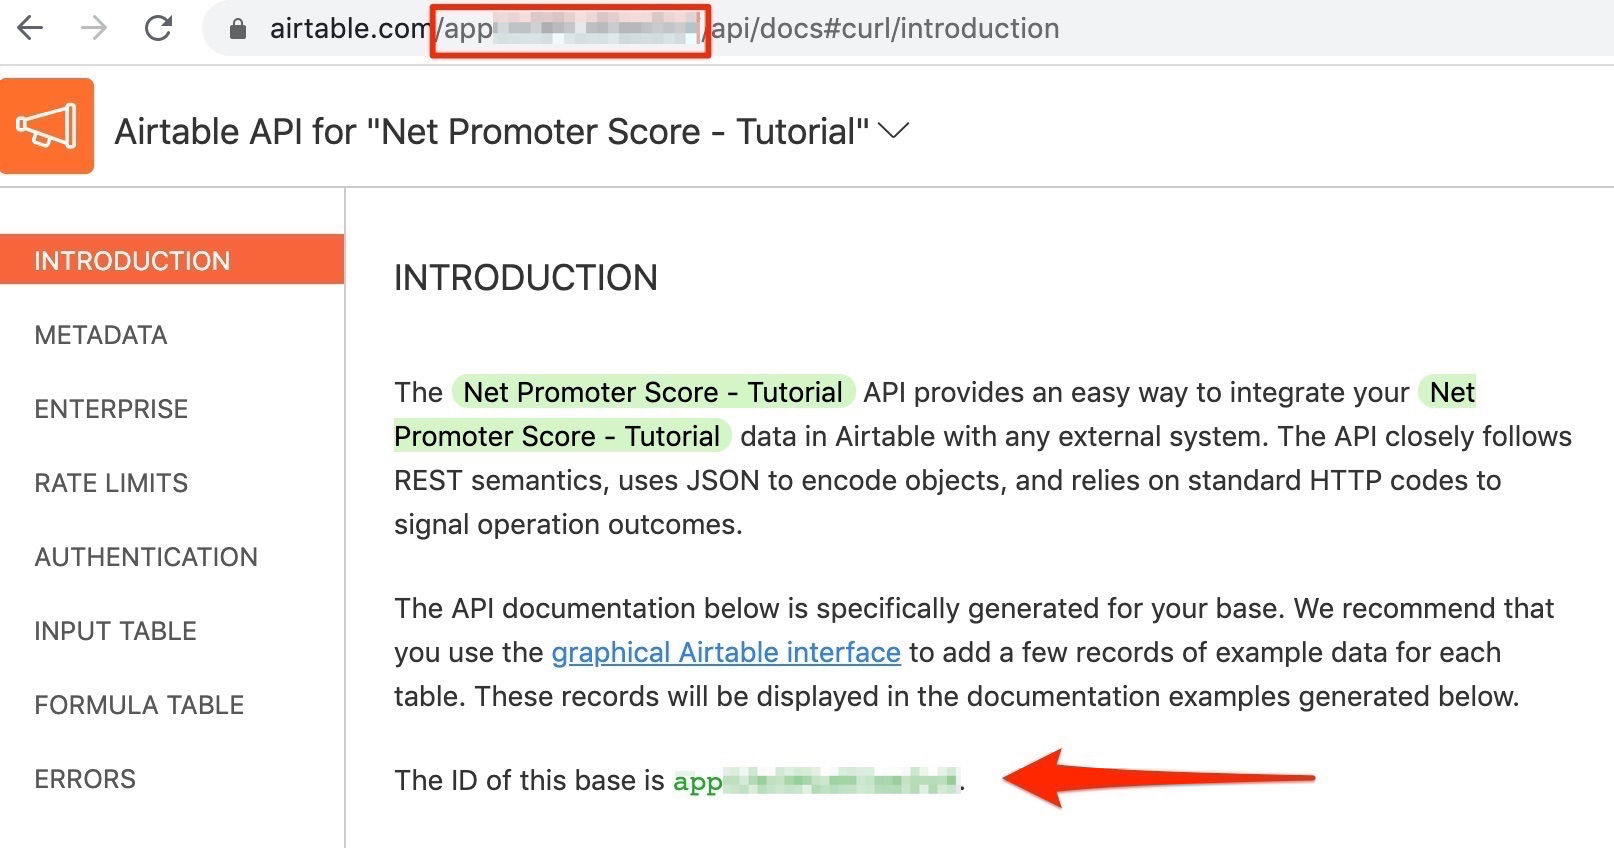
You’re going to need the Airtable API key and a base ID to access the base from your app. You will get the API key from your account page. You will get the base ID from the auto-generated API documentation when you click on the base that you want to use (Net Promoter Score - Tutorial if you are using the copy). You can pull it from the URL, or the introduction section.
Create a Python Virtual Environment
Let’s create a virtual environment where we will install our Python dependencies.
If you are using a Unix or MacOS system, open a terminal and enter the following commands (note that if you have multiple versions of Python on your machine, you may need to use the Python3 command to specify that version):
For those of you following the tutorial on Windows, enter the following commands in a command prompt window:
The last command you see uses pip, the Python package installer. This will install the Python packages in this project, which are:
- The Twilio Python Helper library to use write our SMS message as TwiML
- The Flask framework, to create the server
- Python-dotenv, to import the contents of our .env file as environment variables
- Airtable Python Wrapper, which provides a class with handy methods to read and write from your Airtable base
For your reference, at the time this tutorial was released these were the versions of the above packages and their dependencies:
Set Up the Project
This is not going to be the fanciest app,but I recommend taking what we have here and making it fancier if you want. Also, listen to Reba McEntire’s Fancy while you go through this tutorial.

Use the Flask framework and start by creating the directories.
We'll also create a .env file to use later where we'll add environment variables.
Then, create the directory where you want the app to go.
We’ll make a single file called main.py to hold all the juicy bits of our app.
Set Environment Variables
Before we go any further, we need to set our environment variables.
Open your .env file, then add in the text using your Airtable API Key and base ID (information on where to find that is above under the “Create an Airtable Base” heading).
Start the Server
Next, wire in the parts that will make Flask run. We’re going to create two routes in main.py that will correspond with the “GET” and “POST” methods. Eventually “GET” will retrieve scores from our Airtable base. For now, we will create a dictionary as a placeholder.
We should be able to run the server now! All you will see on a GET request is the empty dictionary, but it can be nice to know that our set up is working so far. Here’s how we run the server.
You should see something like the following output once the server starts:
Once that is running, you can navigate to http://127.0.0.1:5000/get-scores. If you see this, you’re on the right track.

A quick joke before we keep going:
“Is your server running? You better go catch it”.
Send the Survey and Store Responses
We can now write the code in main.py that will send the SMS survey as an autoresponder. We’ll first need to update our import statements to make sure we have access to the different helper libraries. We’ll also call load_dotenv to access our environment variables.
In our send_survey function, create an instance of the Airtable Class from the wrapper library. We’ll pass in the AIRTABLE_BASE_ID and the name of our table (which is Input).
We will get the text of the incoming message, the sender’s phone number, and the Twilio number that they are texting in to from the request.
Sessions are super important to this project. The session keeps track of where the user is at in the survey, which we are going to store in a key called sms_count. It’s also where we will temporarily store their survey responses until we are ready to write to Airtable. These responses are organized using the sender’s phone number as a key named sender_phone_number.
If we’re starting the survey for the first time sms_count will not exist. Let’s create that key in the session if it’s not there. We’ll also initialize a new empty dictionary within that dictionary for the responses with the key sender_phone_number.
We need the sms count to determine which survey question to send the participant. We can store that in its own variable as a string, named sms_count.
This is optional, but I like to create a mechanism to reset the session for when I’m testing the survey. The below code will clear out the session object.
Next, we will write a helper function to get the text that should be sent in the SMS message. We will pass in sms_count to get the right string of text based on where the participant is in the survey.
Back in our send_survey function, let’s add a new variable called sms_message. We’ll call our helper function here.
We need to store the participants’ question responses in the session, increment the sms_count in the session, and insert the data into airtable once the participant responds to the last question. The Airtable insert will fail if data for each column is not present, which is why we only insert after the survey is finished. Another thing to note, is that the data type you insert must match the data type that you set for the column.
The last step of this section is to use the Twilio Helper Library to generate TwiML and send the SMS message to the participant.
Read from Airtable and Calculate NPS
Now that we’ve stored the data in our Airtable base, we can access it using a GET request. We can pass in our phone number as a query parameter, and then use the Airtable Python Wrapper to retrieve the responses.
We’ll use the request context to access our phone number.
Next, we initialize the airtable class. Remove the empty dictionary we used as a placeholder previously, and create a new empty dictionary called airtable_data_dict and an empty list of scores called score_list.
We are going to get the data from Airtable, and put it in our airtable_data_dict dictionary. We are also going to add the score from each record to score_list. This is because we will want to use this list of scores to calculate the total NPS.
The formula for calculating NPS is (Number of Promoters — Number of Detractors) / (Number of Respondents) x 100. Let’s write a helper function to do this calculation for us.
Finally, we will call our calc_nps function and pass in score_list and store the result in a variable called nps_total_score. We will create a new dictionary object with values that are the NPS score and a dictionary of all the survey responses. Flask will convert this to JSON for you in the return statement.
Your finished main.py should look like this:
If your server has stopped, re-run flask run. And now on to buy and configure a Twilio number to test our app.
Buy A Programmable Phone Number
If you don’t already have a Twilio Programmable Phone Number, follow the instructions here to get one:
- Navigate to the Buy a Number page in the console
- Search for a number that has SMS capabilities (in the United States, that’s all of them)
- Click “Buy Number”
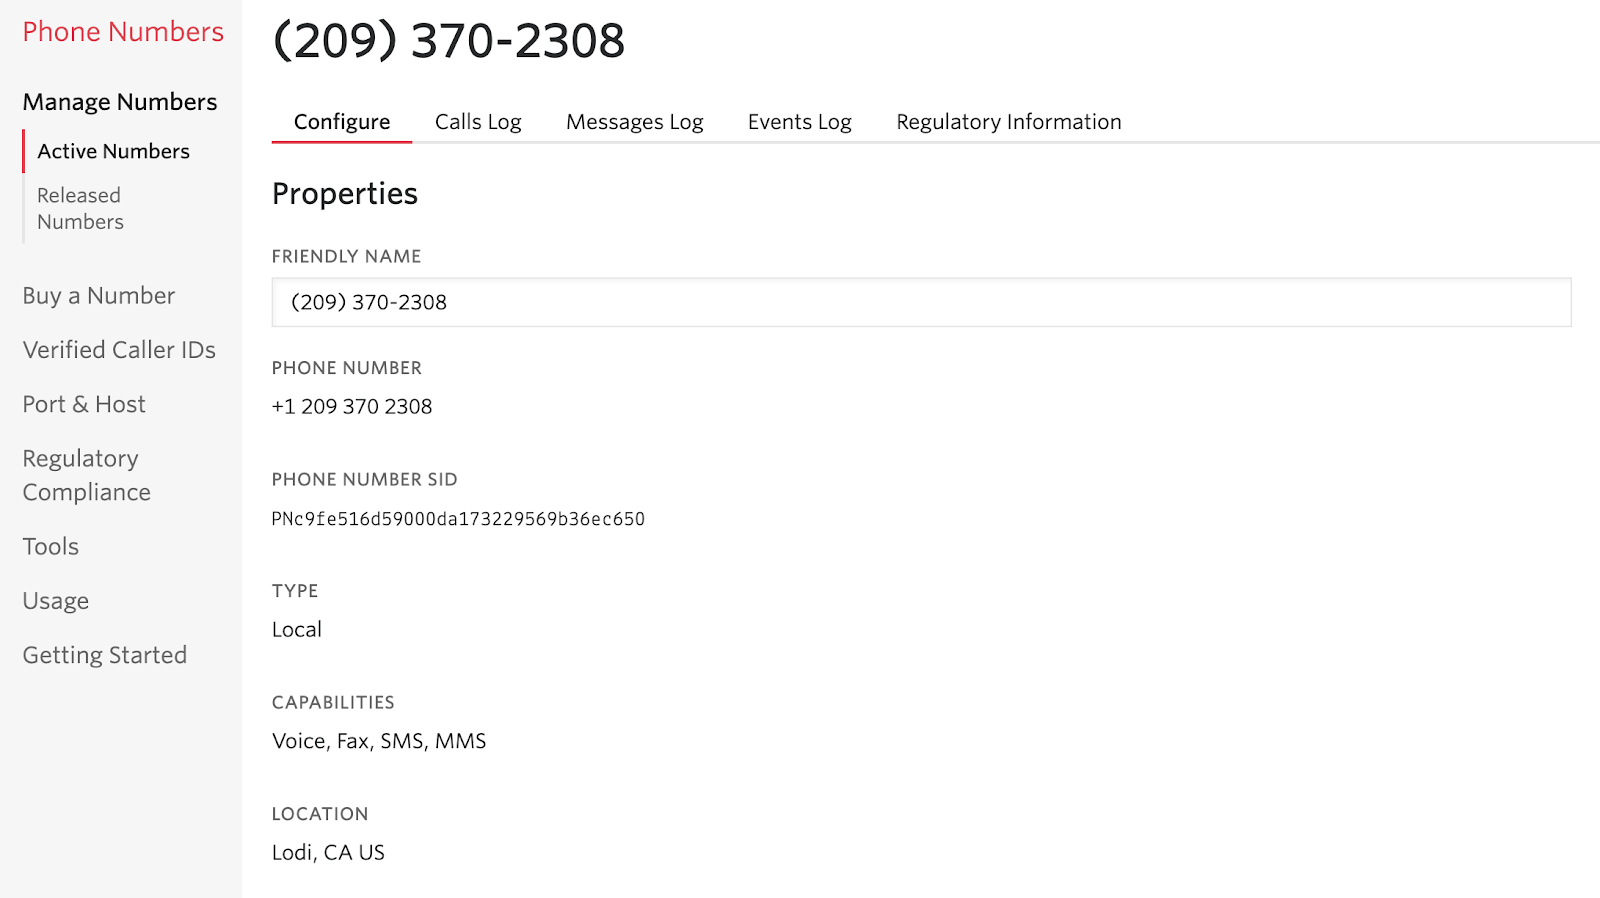
If successful, you should come to a page that looks like this.
Connect to Twilio Using Ngrok
We need to open up a tunnel between our locally running server and a public-facing URL on the ngrok.io domain. Keep your Flask server running, and in a new window, in the directory where you have ngrok installed, run this command:
It should look something like this:

Grab the forwarding link from your ngrok terminal that starts with “https://” (underlined in red above) and copy it.
Now open up your Twilio console for the Programmable Phone Number you purchased and scroll down to the Messaging section. Drop the ngrok link into the “A Message Comes In” Webhook input.
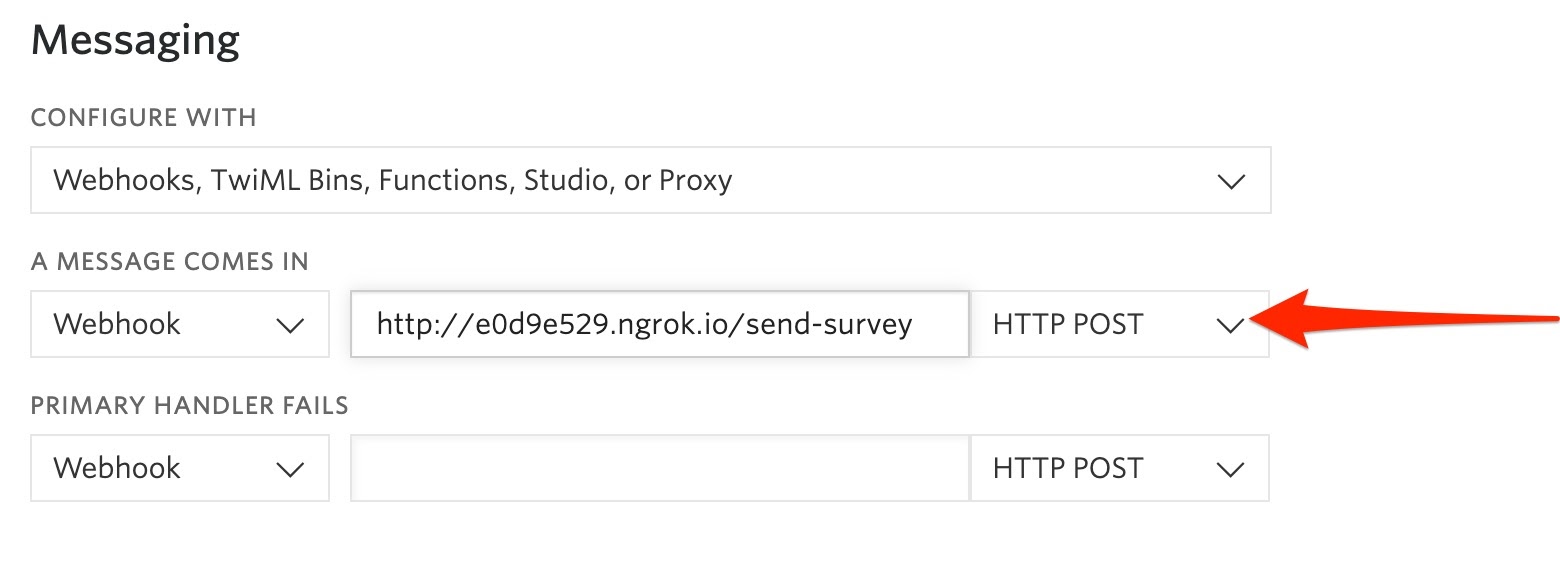
Hit save, and text in to your number to see if it works. Once you’ve finished the flow, test the GET request — you should get JSON formatted like the below.
http://127.0.0.1:5000/get-scores?number=<your_phone_number_here>
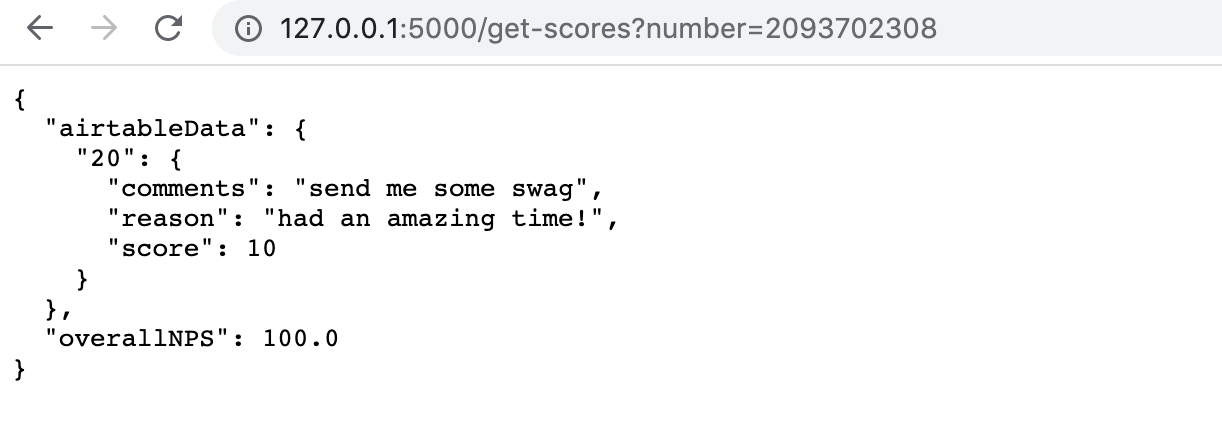
The code displayed will show the Airtable data (named airtableData) as values listed by ID, and the calculated NPS score named overallNPS.
If you change any of the Field Names, also known as columns, in the Airtable, be sure that you update those where they are accessed in get_scores using record['fields']. If you are working with an empty Airtable, calc_nps will fail, because there will not be any scores passed in. For this reason, it is recommended that you use the example Airtable, or make sure you have dummy data in your base to avoid that error.
Conclusion: Building an Airtable NPS calculator in Python
Today you:
- Started an Airtable Base
- Made a Python SMS-app using Twilio
- Stored and accessed data from your app to Airtable
If you want to try out building a Twilio app using Airtable and Twilio Functions, please check out this post. And whichever stack you choose, I’d love to hear about what projects you’re working on! Message me and let me know at lmoy [at] twilio [dot] com.
Related Posts
Related Resources
Twilio Docs
From APIs to SDKs to sample apps
API reference documentation, SDKs, helper libraries, quickstarts, and tutorials for your language and platform.
Resource Center
The latest ebooks, industry reports, and webinars
Learn from customer engagement experts to improve your own communication.
Ahoy
Twilio's developer community hub
Best practices, code samples, and inspiration to build communications and digital engagement experiences.


