Conduct an SMS Survey with Twilio Studio
Running surveys can be a great way to get feedback from your customers and end-users. SMS surveys allow them to give that feedback on the go. In this tutorial, you'll look at how to build a Twilio Studio Flow that hooks into your application via REST API and conducts a brief SMS survey.
Before you get started, you'll need:
- A Twilio Account. If you are new to Twilio, create a free account. You can review the features and limitations of a free Twilio account here.
- A Twilio Phone Number. View instructions for purchasing a Twilio Phone Number here.
New to Twilio Studio? Before completing this tutorial, you should familiarize yourself with the mechanics of working with Studio by reviewing the Getting Started guide.
You'll start with a new Twilio Studio Flow. A Flow is an individual workflow you create to handle your use case. For example, in this case you're going to be creating an SMS Survey, which conditionally responds to an incoming message with another message. All the logic for this will exist in the Twilio Studio Flow you create.
To create a new Studio Flow:
-
Log into your Twilio account and navigate to the Studio Dashboard.
-
Click the Create a Flow button to create your first Studio Flow. If you already have some Studio Flows (awesome!), tap the + icon instead.
-
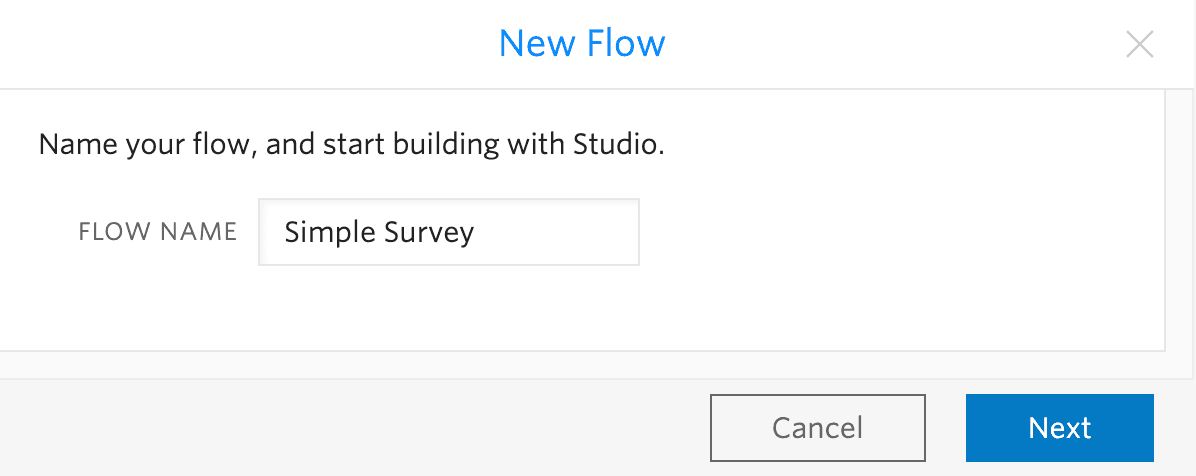
Name your Flow. You can name your Flow anything you like; we're calling ours "Simple Survey".
-
Click Next to select a template. You'll see a few different templates you can use but you'll want a blank Canvas for this tutorial, so select Start from scratch on the template selection screen.
After you've created the Flow, you'll see the Flow's Canvas. The Canvas is where you will build out the rest of the logic for the survey.
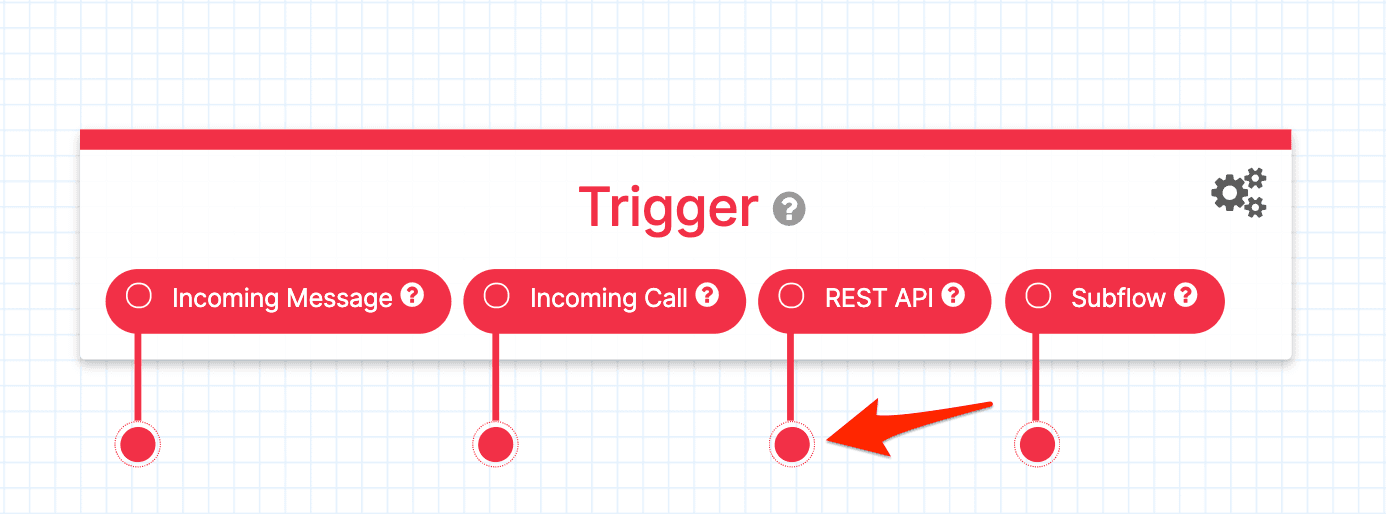
You'll notice that the Canvas comes with a widget already in place - that's the Trigger widget. It will kick off your Flow when the trigger you specify is fired. In this case, your trigger is going to be a REST API call. See the REST API section of the Studio User Guide to learn how to make these calls.
You'll now build out some questions for your survey. In the Widget Library, scroll down to the Messaging section. Click and hold the Send & Wait for Reply widget, and drag it onto the Canvas. This widget allows you to send an outgoing message, wait for a reply, and collect the user's response. Check out the Send & Wait for Reply documentation for more info.
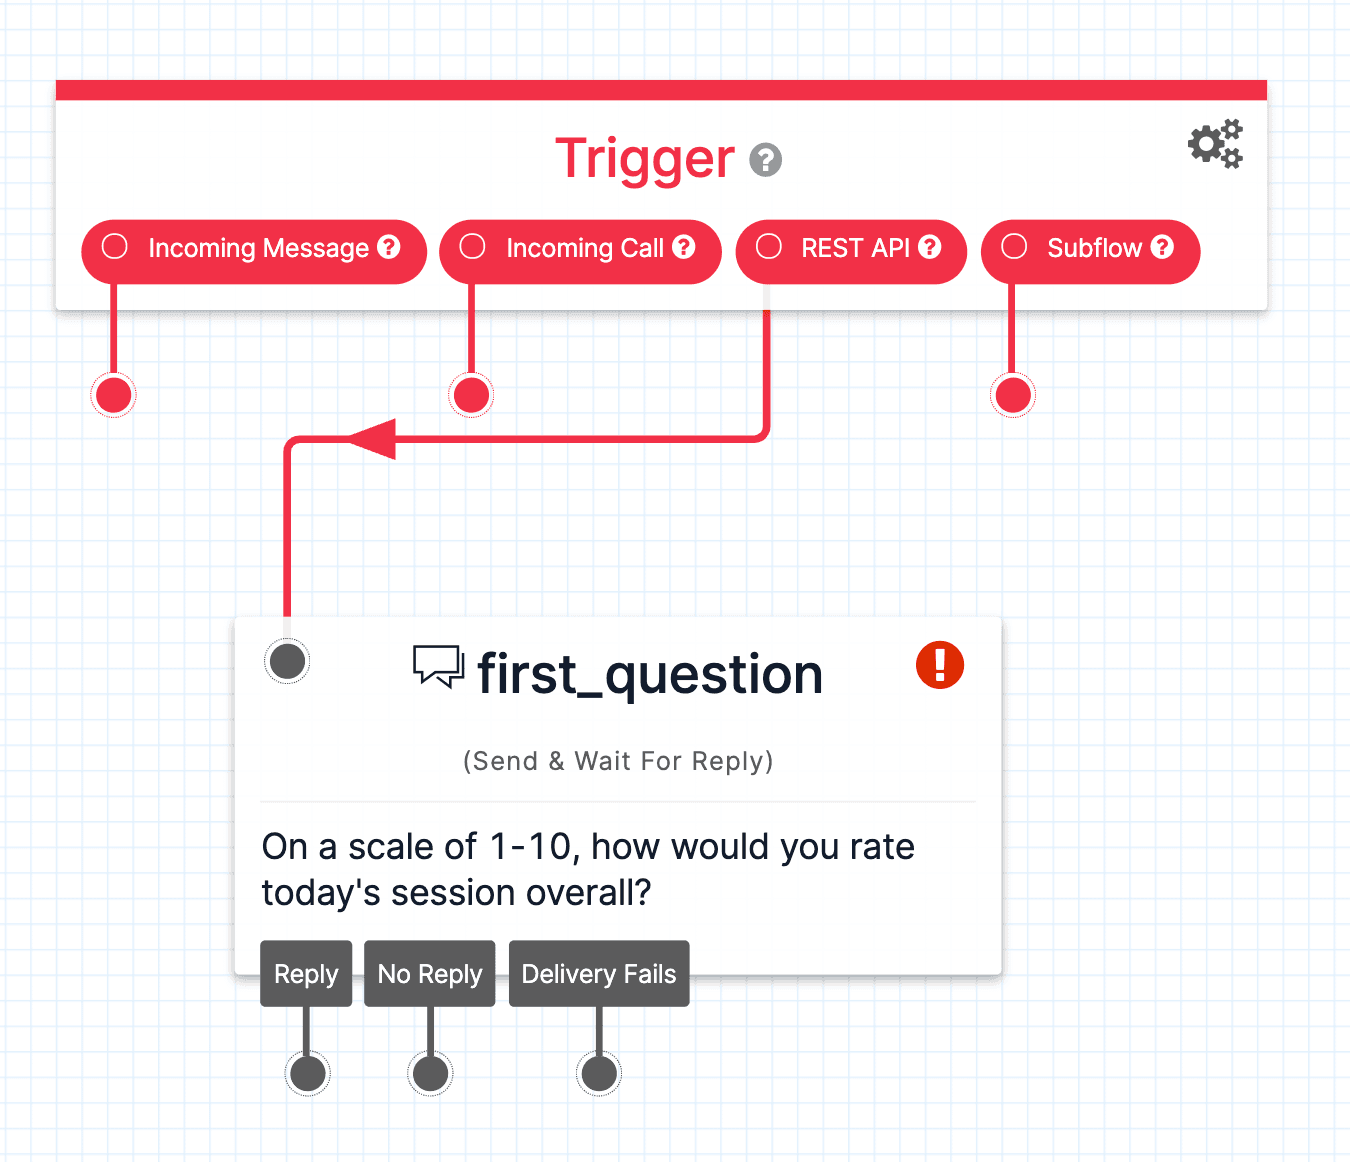
Once the widget is on the Canvas you can configure it in the widget's configuration menu on the right side of the Canvas. Give your widget a name (ours is first_question), and write out your first survey question in the Message Body.
Next, connect the Send & Wait for Reply widget you just added to the REST API Trigger. Click the red dot under the REST API Trigger and drag the red arrow to the gray dot on Send & Wait for Reply widget. This will send an SMS to the user with a survey question to reply to.
Your survey participants will reply to the first question with a number between 1 and 10. To check that the response is a number between 1 and 10 you will use the Split Based On… widget.
The Split Based On… widget allows you to split up your Flow and connect to specific widgets based on certain conditional logic. Using this widget, you can check that the value of the inbound message you receive from your survey participants fits the condition you set. Read more about it here.
Start by dragging a Split Based On… widget onto the Canvas from the Flow Control heading in the Widget Library. Give the widget a name (ours is check_response_1).
Next, you'll set the Variable to Test. Find the Send & Wait For Reply widget in the dropdown (in our example, it's called first_question), and select inbound.Body from the list. This will allow you to test the reply body of the message you receive in response to the first survey question.
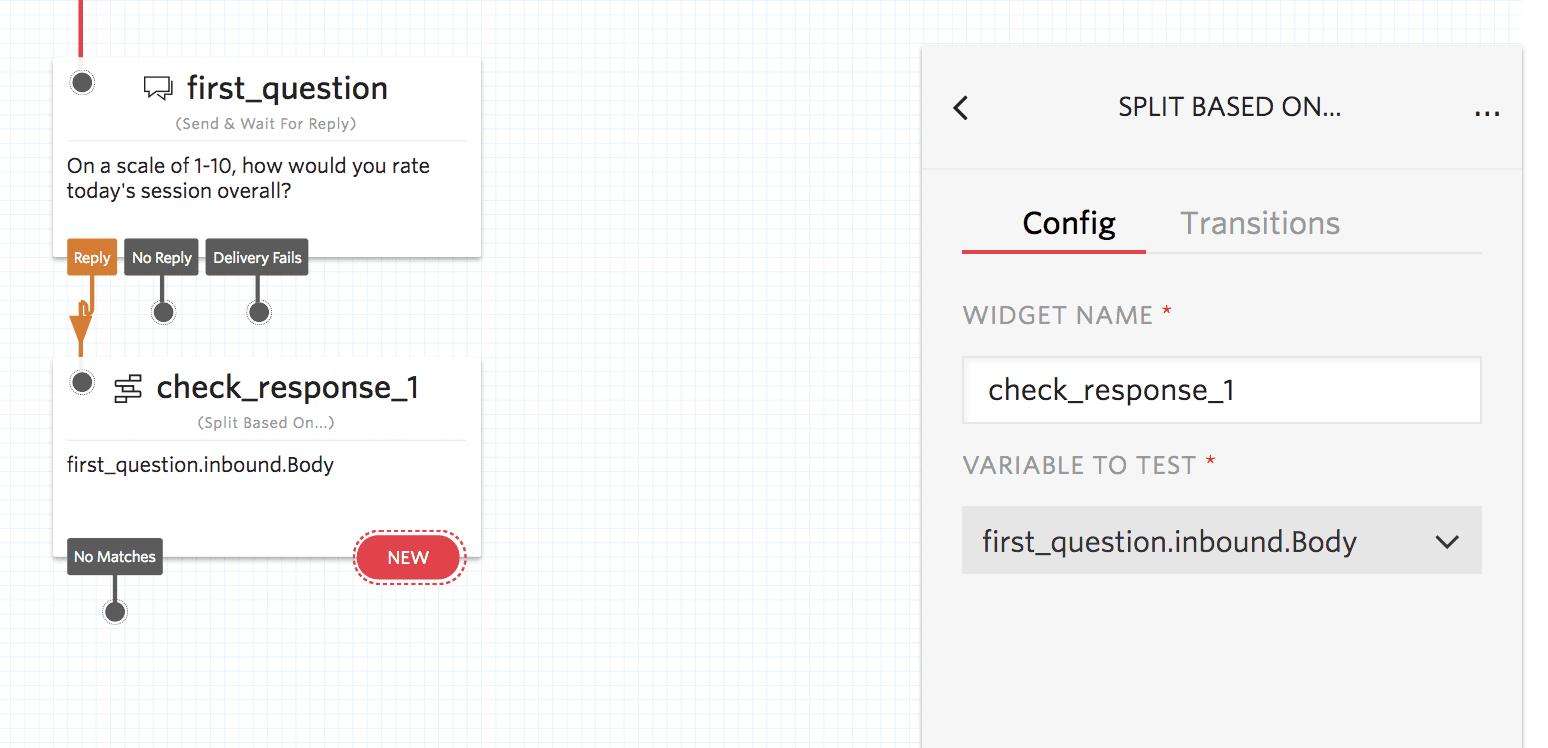
Next, you'll need to state the choices you're looking for in the user's responses — numbers between 1 and 10. Tap the red New at the bottom of the Split Based On… widget to reveal the Transition On... dropdown menu. Select Condition Matches to create a new Transition.
Transitions define how the Flow advances from one widget to the next based on specified conditions. Read more about Transitions in the Studio Getting Started Guide.
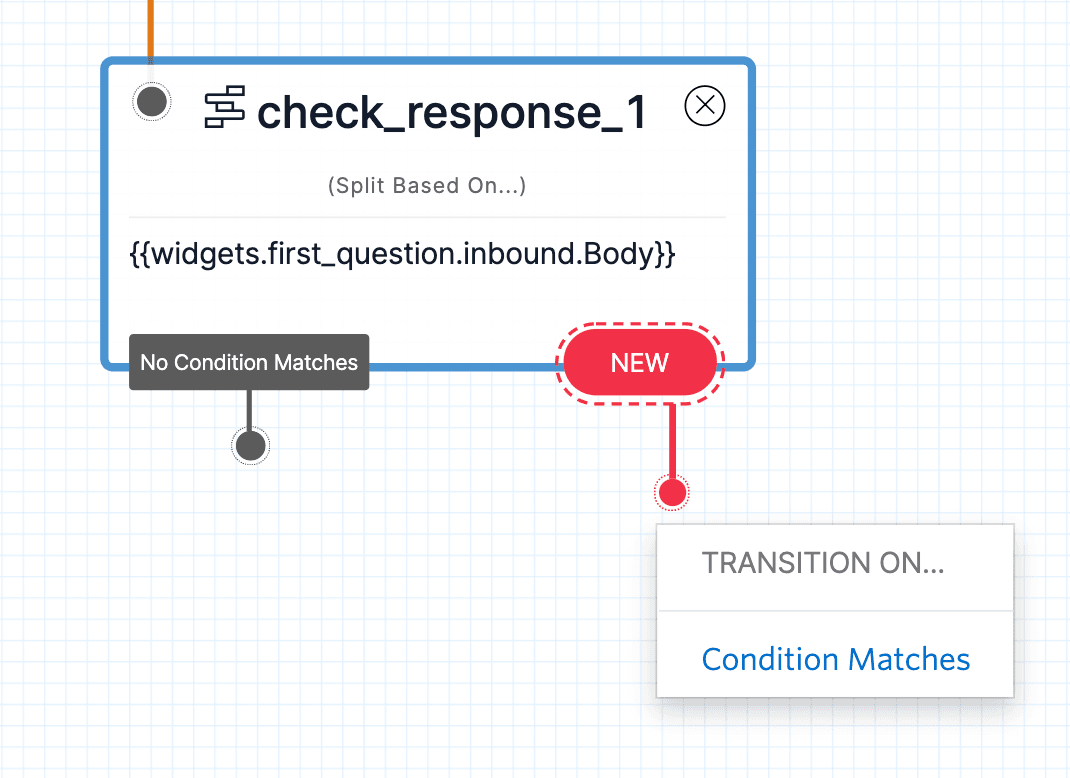
In the right sidebar, find the new Transition that you just created, and select Regex from the dropdown. Set this value to ^(?:[1-9]|0[1-9]|10)$ (a regular expression that evaluates to integers between 1 and 10).
Save the new Transition and it will appear on the widget.
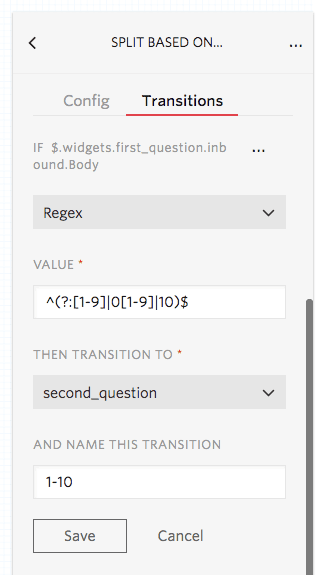
If the user enters something that the survey Flow recognizes (a number between 1 and 10), you should prompt them with the next question. Drag another Send & Wait For Reply widget onto the Canvas, and repeat the steps you just took to add a question and evaluate the response. Continue to repeat for each question in your survey, adjusting the Transition conditions each time based on the expected format of response.
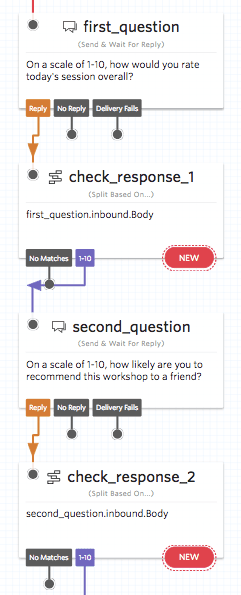
What if the survey participant enters something other than a number between 1 and 10? You can account for those cases with the No Matches condition on your Split Based On… widgets.
Ideally, you'll guide the user towards a correctly-formatted response by gently suggesting the correct format.
To send a message that guides the user to a correctly-formatted response:
- Drag a Send Message widget from the Messaging section of the Widget Library onto the Canvas.
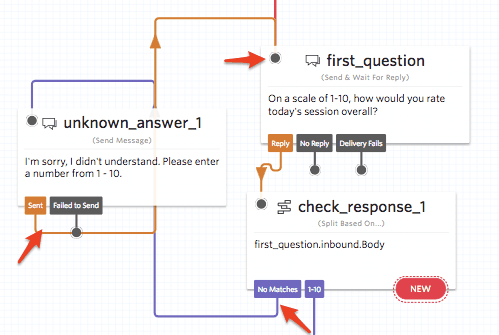
- Set the Message Body to something prompting the user to try again. We used: "I'm sorry, I didn't understand. Please enter a number from 1 - 10."
- Connect the new Send Message widget to the No Matches condition on your Split Based On… widget.
- Connect the Sent Condition from your Send Message widget back to your original question to give the user a second chance to answer.
Now that you have your survey questions in place and a simple handler for unexpected inputs, you're ready to send the survey data back to your servers!
- Drag an HTTP Request widget onto the Canvas from the Tools & Execute Code section of the widget Library.
- Connect the HTTP Request widget to the last question's Split Based On… widget.
- Set the Request URL in the widget's configuration menu to your endpoint (we'll use
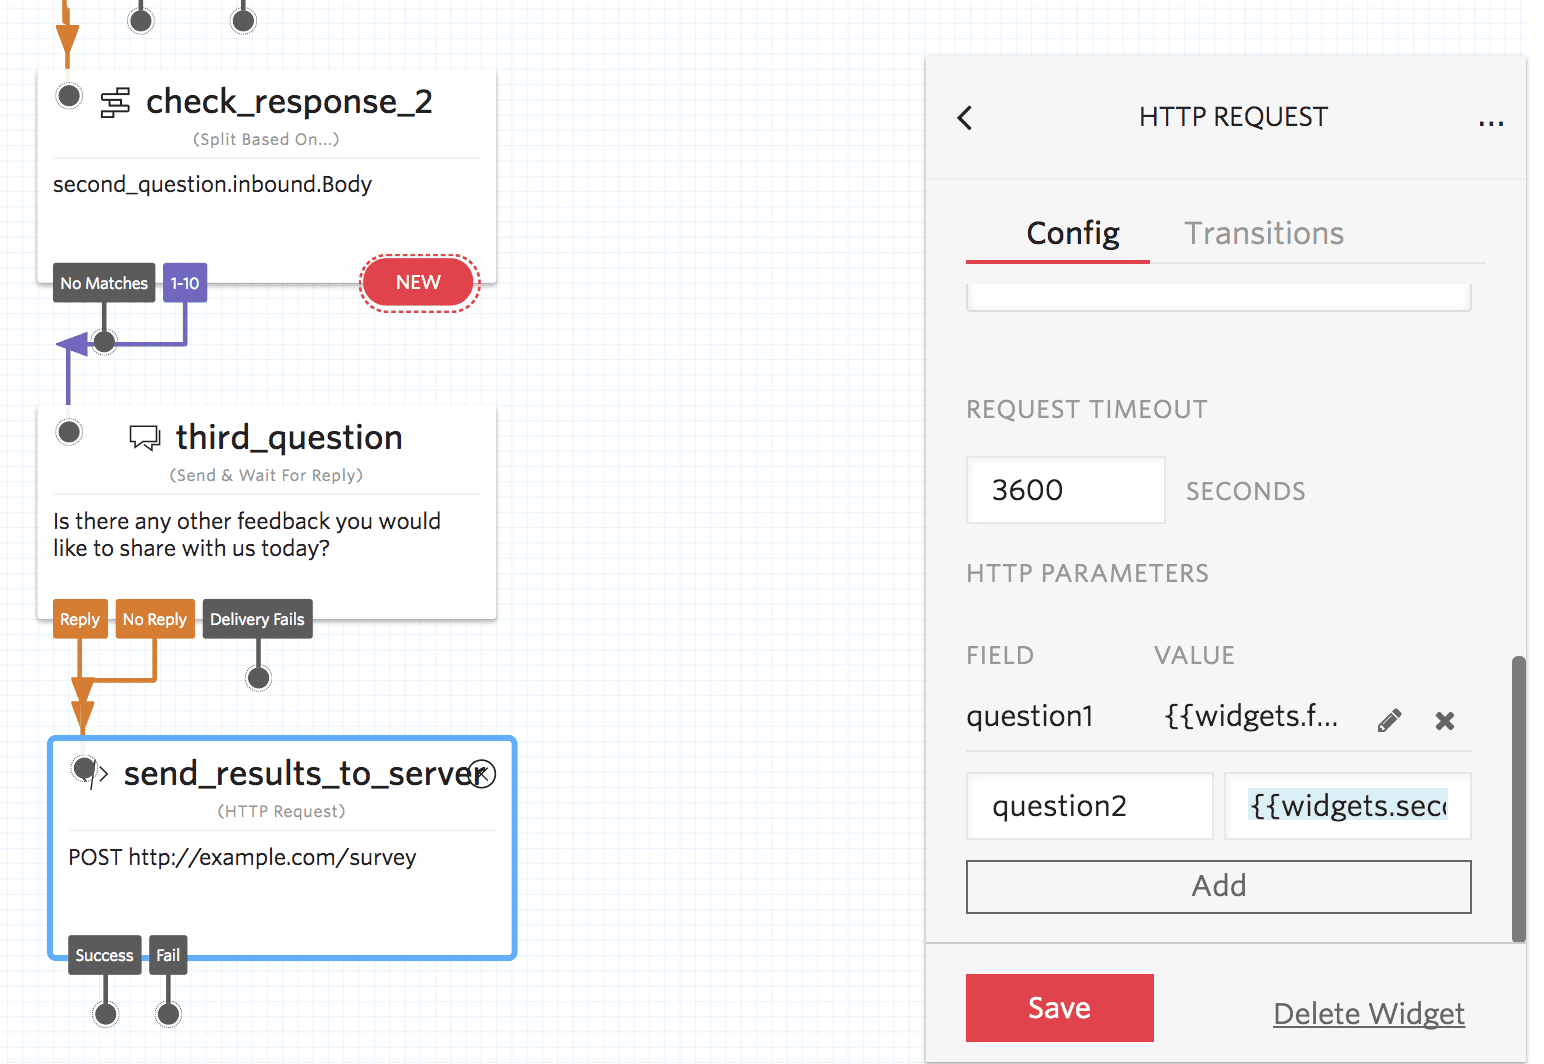
http://example.com/survey, but yours will look different). - Scroll down to the Field and Value Section of the HTTP Request widget's configuration menu. Add new Fields for each question in your survey. Note: The corresponding Value will be the same variable you tested in the Split Based On… widget for that question. For example, our first Field "question1" has a value of
{{widgets.first_question.inbound.Body}}, formatted in the Liquid template language.
What is the Liquid Template Language?
Studio supports the Liquid template language, which is a language used to load dynamic content throughout your Studio Flow. Using Liquid, Studio dynamically interprets the text between the two curly braces based on something — in this case, the Message Body we receive in the user's SMS response to our question. When we send our HTTP request, the parameters with our survey data will be included and we can track results.
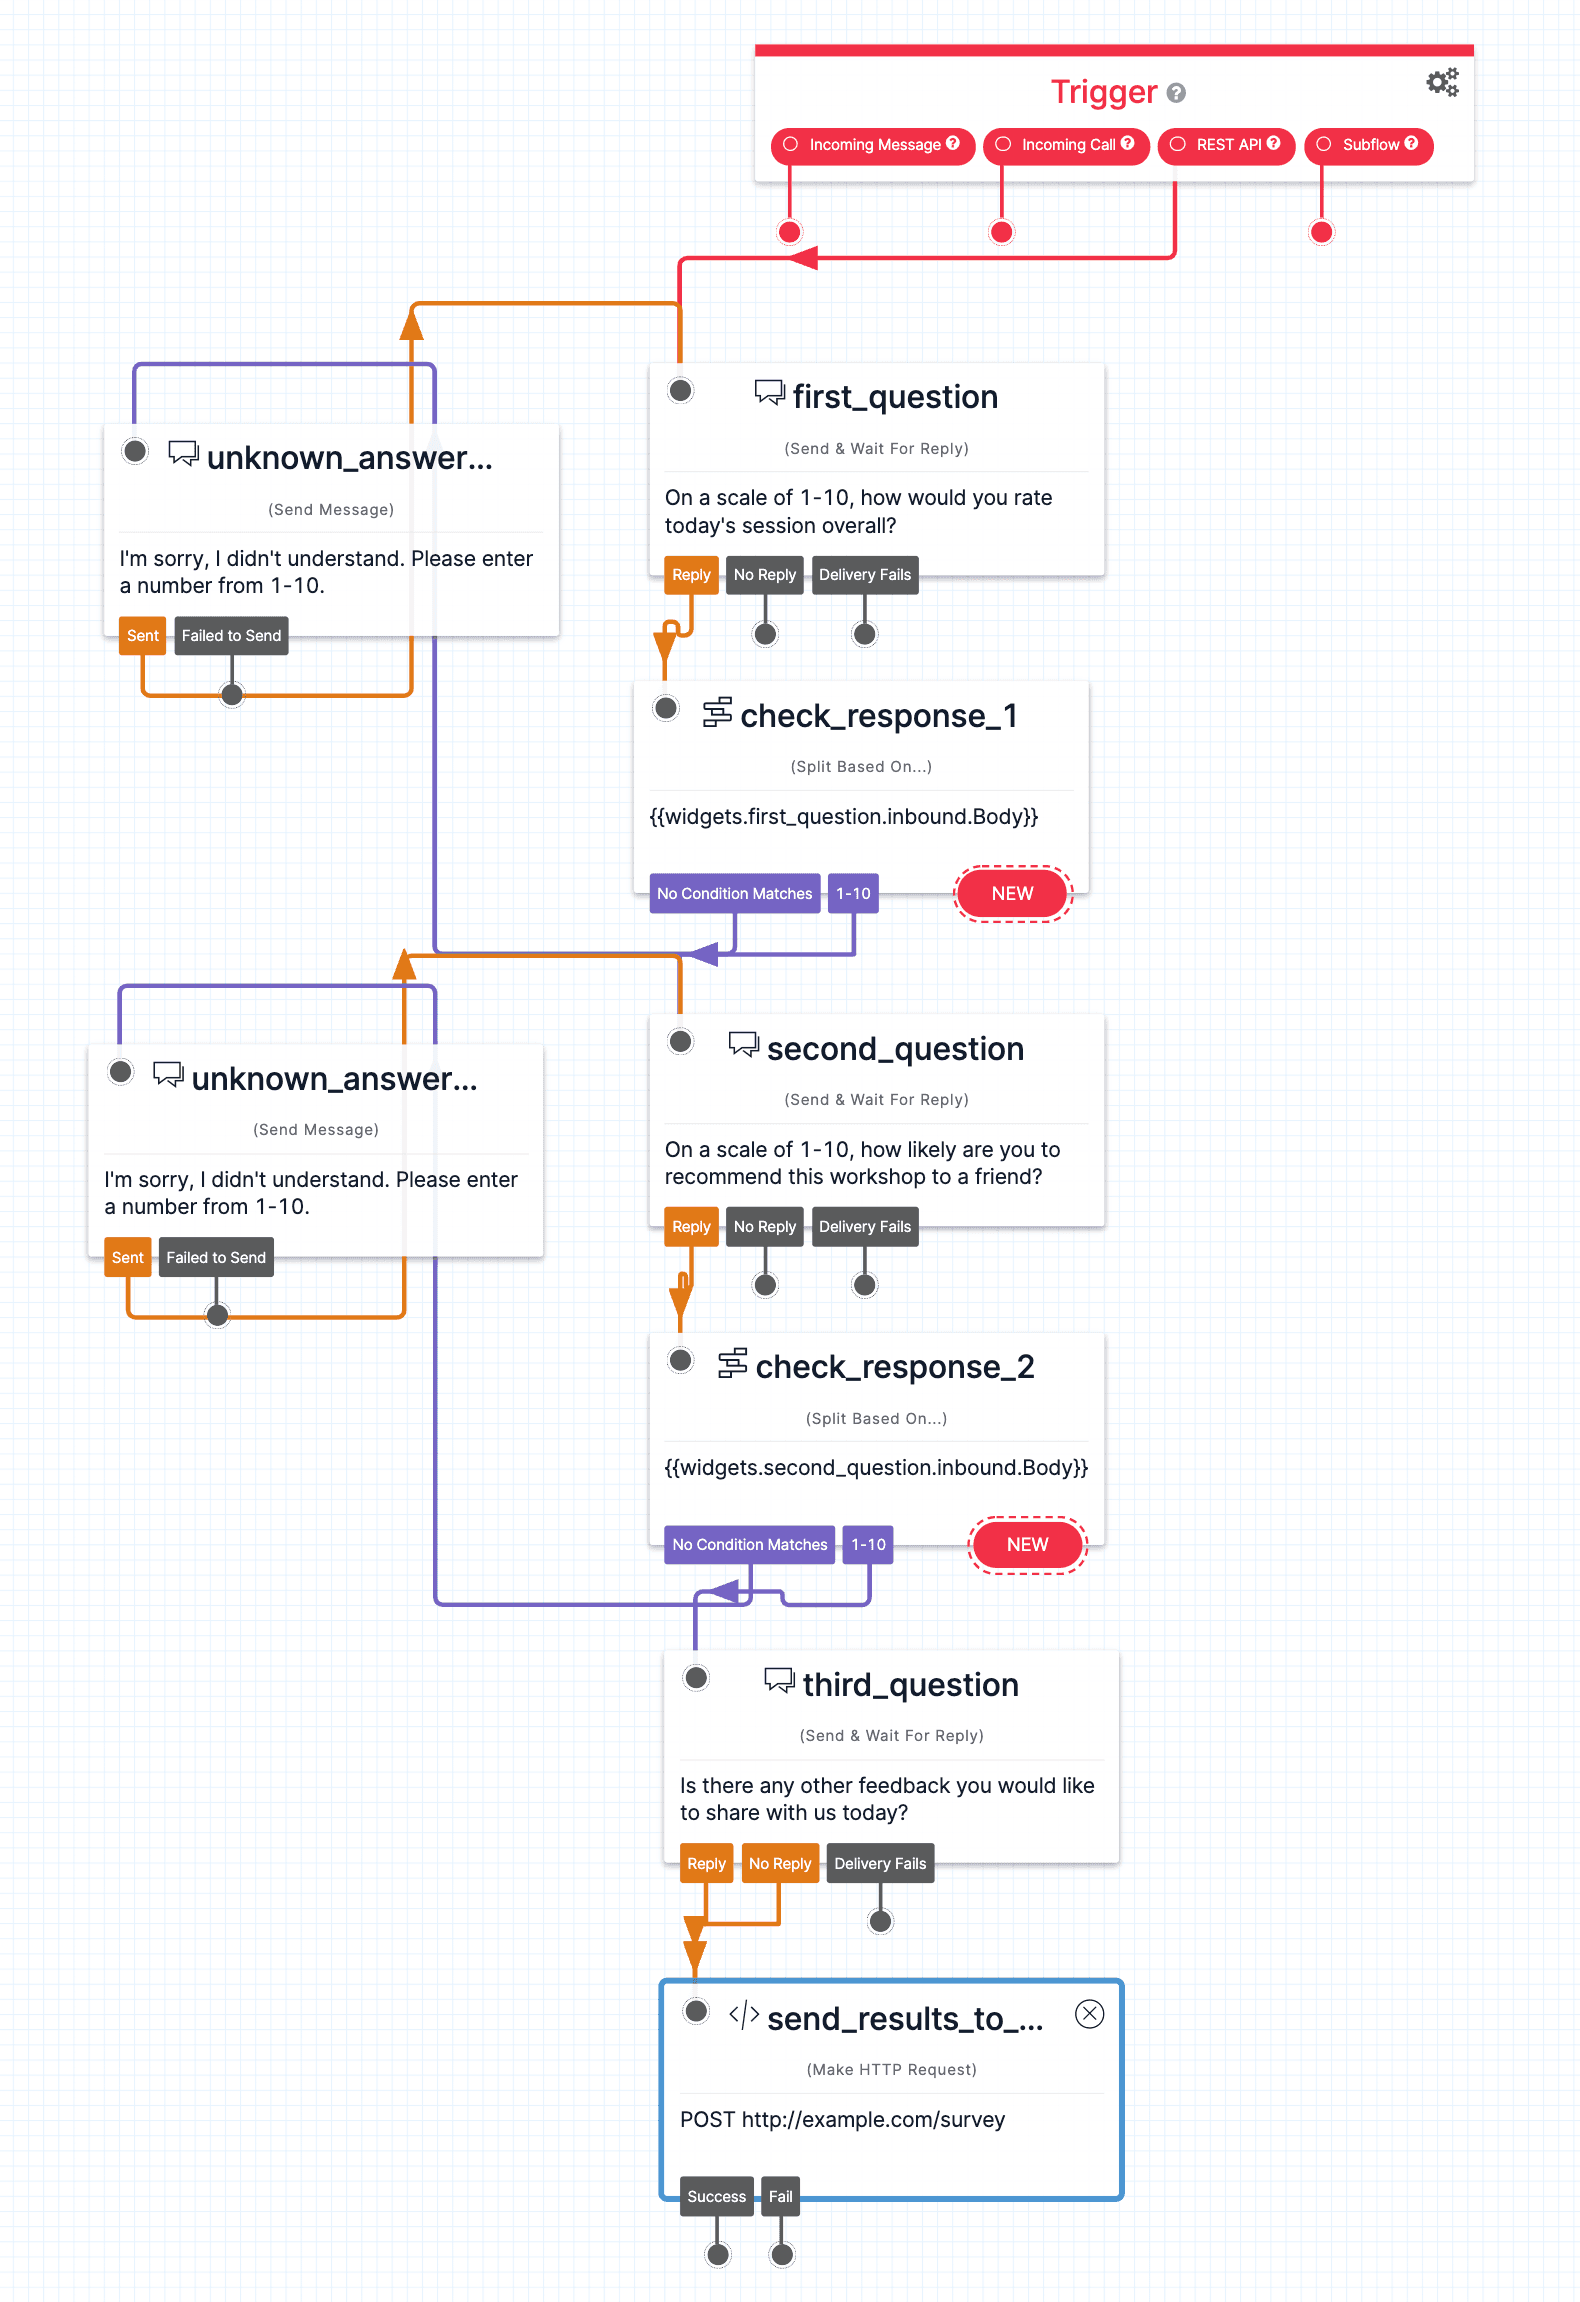
The final state of your Canvas starts with a Trigger widget that receives an incoming REST API request. The Trigger widget then sets off Send & Wait For Reply, Split Based On..., and Send Message widgets to prompt the user with questions and evaluate their responses for format. Finally, an HTTP Request widget allows us to send the survey responses back to our servers.
Time to test it out! You can make a request from your API to Studio and kick off this survey Flow, then text responses to each question (try entering something other than a number between 1 and 10 to test the No Matches condition).
Get ready to get instant SMS feedback from your users!
If you're ready to dive a bit deeper into endpoint details, parameters, curl requests with Twilio Studio, see the REST API section of the Studio User Guide.