Set up Salesforce Service Cloud Voice (SCV) with Twilio
Not a HIPAA Eligible Service or PCI Compliant
Twilio for Salesforce Service Cloud Voice (SCV) is not a HIPAA Eligible Service or PCI compliant and should not be used in workflows that are subject to HIPAA or PCI.
Follow this guide to set up Salesforce Service Cloud Voice (SCV) with Twilio as the Partner Telephony Provider. This integration enables Salesforce service reps to make and receive calls in Salesforce using the capabilities of the Twilio platform.
The SCV integration supports the Voice channel.
Using SCV with Twilio, these features are available:
- Inbound calling using TaskRouter
- Outbound dialing using Dialpad and Click-to-Dial
- Studio Interactive Voice Response (IVR)
- Real-time transcription using Conversation Intelligence (classic)
- Call recording and playback in Salesforce
- Omni-flow automation for voice call record creation
- Voice call record customization
- Supervisor barge-in and listen
- External Call Transfer
In addition, you can access this functionality from Twilio Console & Flex UI:
- Real-time reporting and queue stats
- Historical reporting (if you use Flex Insights)
Before starting the setup process, make sure you have the following accounts:
- A Flex account
- An Okta Workforce Identity developer account or an account with another IdP that supports SAML 2.0.
- A Salesforce Developer Edition account.
You need to set up single sign-on (SSO) both for your Flex account and your Salesforce account.
Follow the instructions in this section to use Salesforce or Okta as your identity provider (IdP). You only need to follow the instructions for the IdP you choose. If you use an IdP other than Salesforce or Okta, your SSO configuration steps may differ from what's described in this document. In that case, follow the instructions documented for your IdP instead.
Follow the steps in Configure SSO for Flex with Salesforce as IdP, making sure you do the following:
- Configure your Salesforce org as an IdP.
- Add Flex as a connected app in Salesforce.
- Check that your Salesforce users appear as agents in Flex after they log in to Flex using Salesforce as the IdP.
Tip: If you want to assign different roles to agents, you can create a custom field in the Salesforce user object (for example, a field named Twilio_Role__c) and then create a custom attribute with the same name as the roles value (for example, $User.Twilio_Role__c).
If you want Salesforce to dynamically assign the user's role in the IdP based on their role in Twilio, create a custom field in the Salesforce User object to store the Twilio role.
- In Salesforce, search for and select Object Manager.
- Select the User object, click Fields & Relationships, then click New.
- Create a field to store the user's role. For example,
Twilio_Role. - Search for and select Manage Connected Apps.
- Open the Flex connected app you created when you set up SSO and add a new custom attribute.
- In Key, type
roles. - In Value, insert the field you created to store the user's role. If you named the field
Twilio_Role, you'll see the value formatted as$User.Twilio_Role.
This ensures that SSO takes the role value from the custom field on the User object.
To see a video walkthrough of this process, refer to Okta and Salesforce SAML SSO Integration.
- Log in to your Okta developer account and go to Applications > Browse App Catalog.
- Select Salesforce, then click Add Integration.
- Keep the default values, then click Next.
- In the sign-on options, select SAML 2.0.
- Click View Setup instructions, then follow the instructions to configure SSO in Salesforce.
- To let Okta and Salesforce share users and groups, configure provisioning using the following Okta documentation:
- When you've completed the provisioning steps, assign users in Okta.
- In Salesforce, in your organization, go to Domains, then select the SSO setting you created as the sign-in method. This enables Salesforce-initiated login.
- To complete the basic setup, follow the steps in Configure Okta IdP with Flex.
- In Okta, add agents to the Flex app and assign them Flex roles.
- To test your configuration, log in to Flex as an agent and confirm you have the expected permissions.
Tip: Check your Okta configuration to confirm that the same user is assigned to both Salesforce and Flex.
- In Okta, go to the Admin Console.
- Navigate to Security > API > Trusted Origins.
- Add your Salesforce lightning org URL as a trusted origin.
- In Salesforce, go to the Setup Home page. You can access this page using the Setup menu.
- Search for and select Partner Telephony Setup. The Service Cloud Voice page appears.
- In the Enable Service Cloud Voice section, enable Turn on Voice with Partner Telephony.
- Add a permission set group. For instructions, follow the Salesforce documentation Create a Permission Set Group.
- Add the following permission sets to the group:
-
Partner Telephony Permission Set
-
Salesforce Voice Contact Center Supervisor (Partner Telephony)
-
Salesforce Voice Contact Center Rep (Partner Telephony)
-
Salesforce Voice Contact Center Admin (Partner Telephony) Tip: if you don't see Partner Telephony Permission Set as an option, try turning off Service Cloud Voice and turning it back on.
After adding these permission sets, you can see them in your permission set group.
-
- Return to the Permission Set Groups page and click Manage Assignments to assign this group to your users.
If you want to enable recording, an additional permission set is required. The steps to add this permission set are covered later in this document in the Enable call recording section.
For Salesforce to integrate with Twilio, you need to create both external and named credentials in your Salesforce org.
You can create an external credential that either uses your Twilio account credentials (account SID and auth token) or that uses an API key you generate in Twilio Console.
We recommend using a restricted API key because it's more secure, avoids using your auth token directly, and provides scoped access.
- Open Twilio Console.
- On your account dashboard, in the Account Info section, click Go to API Keys.
- On the API keys & tokens page, click Create API key.
- Set the Key type to Restricted - Beta.
- In the Permissions section, in the Product and associated resources table, expand Flex, then select
scv-certificate. - Click Create.
- Copy the secret key and store it in a safe location. You'll need to enter its values in Salesforce.
- From the Salesforce Setup Home page, search for and select Named Credentials.
- Select the External Credentials tab.
- Create a new credential for Twilio Flex, set the Authentication Protocol to Basic Authentication, then click Save.
- Within your Twilio Flex external credential, go to the Principals section and create a new principal.
- Set the following fields:
- Parameter Name: Any name of your choice.
- Sequence Number:
1 - Identity Type: Named Principal
- Username and Password:
- If you generated an API key to use for your credentials, set the Username to the SID generated with your key and the Password to your secret.
- If you want to directly use your Flex account credentials, set the Username to your Flex Account SID and the Password to your Flex Auth Token.
- Click Save.
- Return to the Named Credentials page.
- Create a new named credential with the following values.
Field Value Label Any recognizable label name. Name Set to Twilio_Flex. URL Set to https://flex-api.twilio.com. Allowed Namespace for Callouts Twilio_Scv Authentication Set to the External Credentials list for the credential you just created. - Go to Profiles, then select the profile of your user. For example, System Administrator.
- Go to the Enabled External Credential Principal Access section and click Edit.
- Select the external credential you created and add it to Enabled External Credential Principals.
- In Salesforce, view the TwilioScv installation package.
- Select Install for All Users.
- Expand Advanced Options, then select Compile only the Apex in the package.
Warning
When you install the package in a Production or Sandbox environment that already contains Apex classes, make sure to select Compile only the Apex in the package. If you use the default compilation option, the installer might detect conflicts and fail.
- From the Salesforce Setup Home page, search for and select Partner Telephony Contact Center.
- In the Set Up Your Contact Center section, next to Create Your Contact Center, click New.
- In the New Partner Contact Center for Voice dialog:
- Select Twilio, then click Next.
- Enter the Display Name and API Name, then click Next.
- Enter the following information, then click Next:
- In Twilio Account Sid, add your Flex Account Sid.
- In Twilio Instance Sid, add your Flex Instance Sid.
- Real-Time Transcription is disabled by default. If you want to enable it, select Enabled in the dropdown.
- Select the Named Credential you created in the previous section.
- Click Confirm and finish Contact Center creation.
If you've successfully linked your Twilio account, you'll see that a Disconnect Account button has replaced the Connect Account button on the Contact Center Details page. If you still see Connect Account, your Twilio account was not linked correctly and you must try this process again.
If the Salesforce Create Contact Center page disappeared before you could select a named credential, go to the contact center you just created and click Connect Account to select the named credential.
Note: If setup fails, remove the Contact Center from Partner Telephony settings before uninstalling the Twilio package. This step prevents user interface errors.
- Go to your newly created contact center and verify that the information is accurate.
- Add your user to the contact center. For instructions, follow the Salesforce documentation Manage Call Center Users.
Tip: If you previously set up a call center in your Salesforce org (for example, using Salesforce Open CTI), you need to remove users from the call center before assigning them to your contact center. Salesforce users can only belong to one call center or contact center at a time.
Using SCV with Twilio provides the following supervisor functionality:
- Agents can flag a supervisor for help.
- Supervisors can listen in on a call.
- Supervisors can barge in on a call to provide assistance to the agent and customer.
To configure a supervisor user:
- Assign the Contact Center Supervisor (Partner Telephony) permission set to a permissions set group. For instructions, see the Salesforce documentation Create a Permission Set Group.
- Assign that permission set group to users with the supervisor profile.
Supervisors can view queue-related metrics in Salesforce by mapping Salesforce queues to their corresponding Twilio queues.
Important: Salesforce queues and Twilio queues must have the same name for the mapping to work correctly.
To map queues:
- In Salesforce, go to Setup.
- Search for and select Partner Telephony Contact Centers.
- Open your contact center.
- Under Queue Mapping, map each Salesforce queue to the corresponding Twilio queue.
Command Center for Service provides an agent summary that allows supervisors to view all available agents. To learn more about Command Center for Service features, see the Salesforce documentation Set Up Command Center for Service. If your Flex account has Flex Insights enabled, supervisors can view other metrics from the Flex dashboard.
To enable Command Center for Service for your SCV integration:
- Search for and select App Manager, then find Twilio for Service Cloud Voice. This app was added when you installed the Twilio Partner Telephony package.
- Click Edit.
- In App Settings, click Navigation Items.
- Add Command Center for Service to your Selected Items, then click Save.
- From the Salesforce Setup Home page, search for and select Presence Statuses.
- Create a new status for each status that exists in your TaskRouter Activities. For example, Available and Offline. Creating the same statuses in Salesforce that you have in TaskRouter ensures that the user's status remains synced between Flex and Salesforce.
- Go to Users > Profiles, then select the profile of your user. For example, System Administrator.
- Find Enabled Service Presence Status Access, then click Edit.
- Add your statuses to Enabled Service Presence Statuses.
- Assign these statuses to profiles of users in the contact center.
- From the Salesforce Setup Home page, search for and select Trusted URLs.
- Add a trusted URL for the URL of the IdP used for your Flex instance. Make sure that you keep CSP Context as All.
- In Twilio Console, go to Flex > Users and Access > Single Sign-On.
- Edit your SSO configuration.
- In the Trusted URLs field, add
https://assets.flex.twilio.com/assets/twilio-scv-sdk/prod/1.0.0/index.html. - Click Save.
If you want to use this feature, follow the Salesforce documentation Configure After Conversation Work Time.
- Use SSO to log in to Salesforce as the agent user you configured earlier in the process.
- Navigate to Setup > App Launcher, then select the Service Cloud Voice app.
- After the app launches, verify the following:
- You can see the omni-channel widget, which is a dialpad that appears on the left side of the screen.
- The system uses SSO to automatically sign you in to Flex.
- You can make or receive voice calls.
- Calls you make to the configured Twilio number are routed to Service Cloud Voice and appear in the agent omni-channel widget in Salesforce.
Tip: Ensure that third-party cookies are enabled before testing in incognito mode or a new browser window.
To pass IVR attributes from Studio to Salesforce, you must create a custom field in the Salesforce Voice Call object and map that field to attributes you add to the Send to Flex widget in your Studio Flow.
This section uses the example of passing the case ID to Salesforce. In your implementation, use a naming convention that suits your use case.
Create a field to store the attributes passed from Studio. The Studio data must match your Salesforce field setup, so how you name this field also establishes how you'll name your Studio attributes.
- From the Salesforce Setup Home page, search for Voice Call and select the result for the Object Manager.
- Follow Salesforce's instructions to create a custom field.
- Make sure you set the Data Type to Text. This is required because Studio passes its attributes as a string.
The following screenshot shows an example field definition. Notice the API Name field. Whatever name you set for this field, you must use the same name when you create the field in your Studio attributes.

- Identify or create the Studio Flow that gathers the custom input you want to send to Salesforce. If you need help creating a new Flow, see How to build an IVR with Twilio Studio.
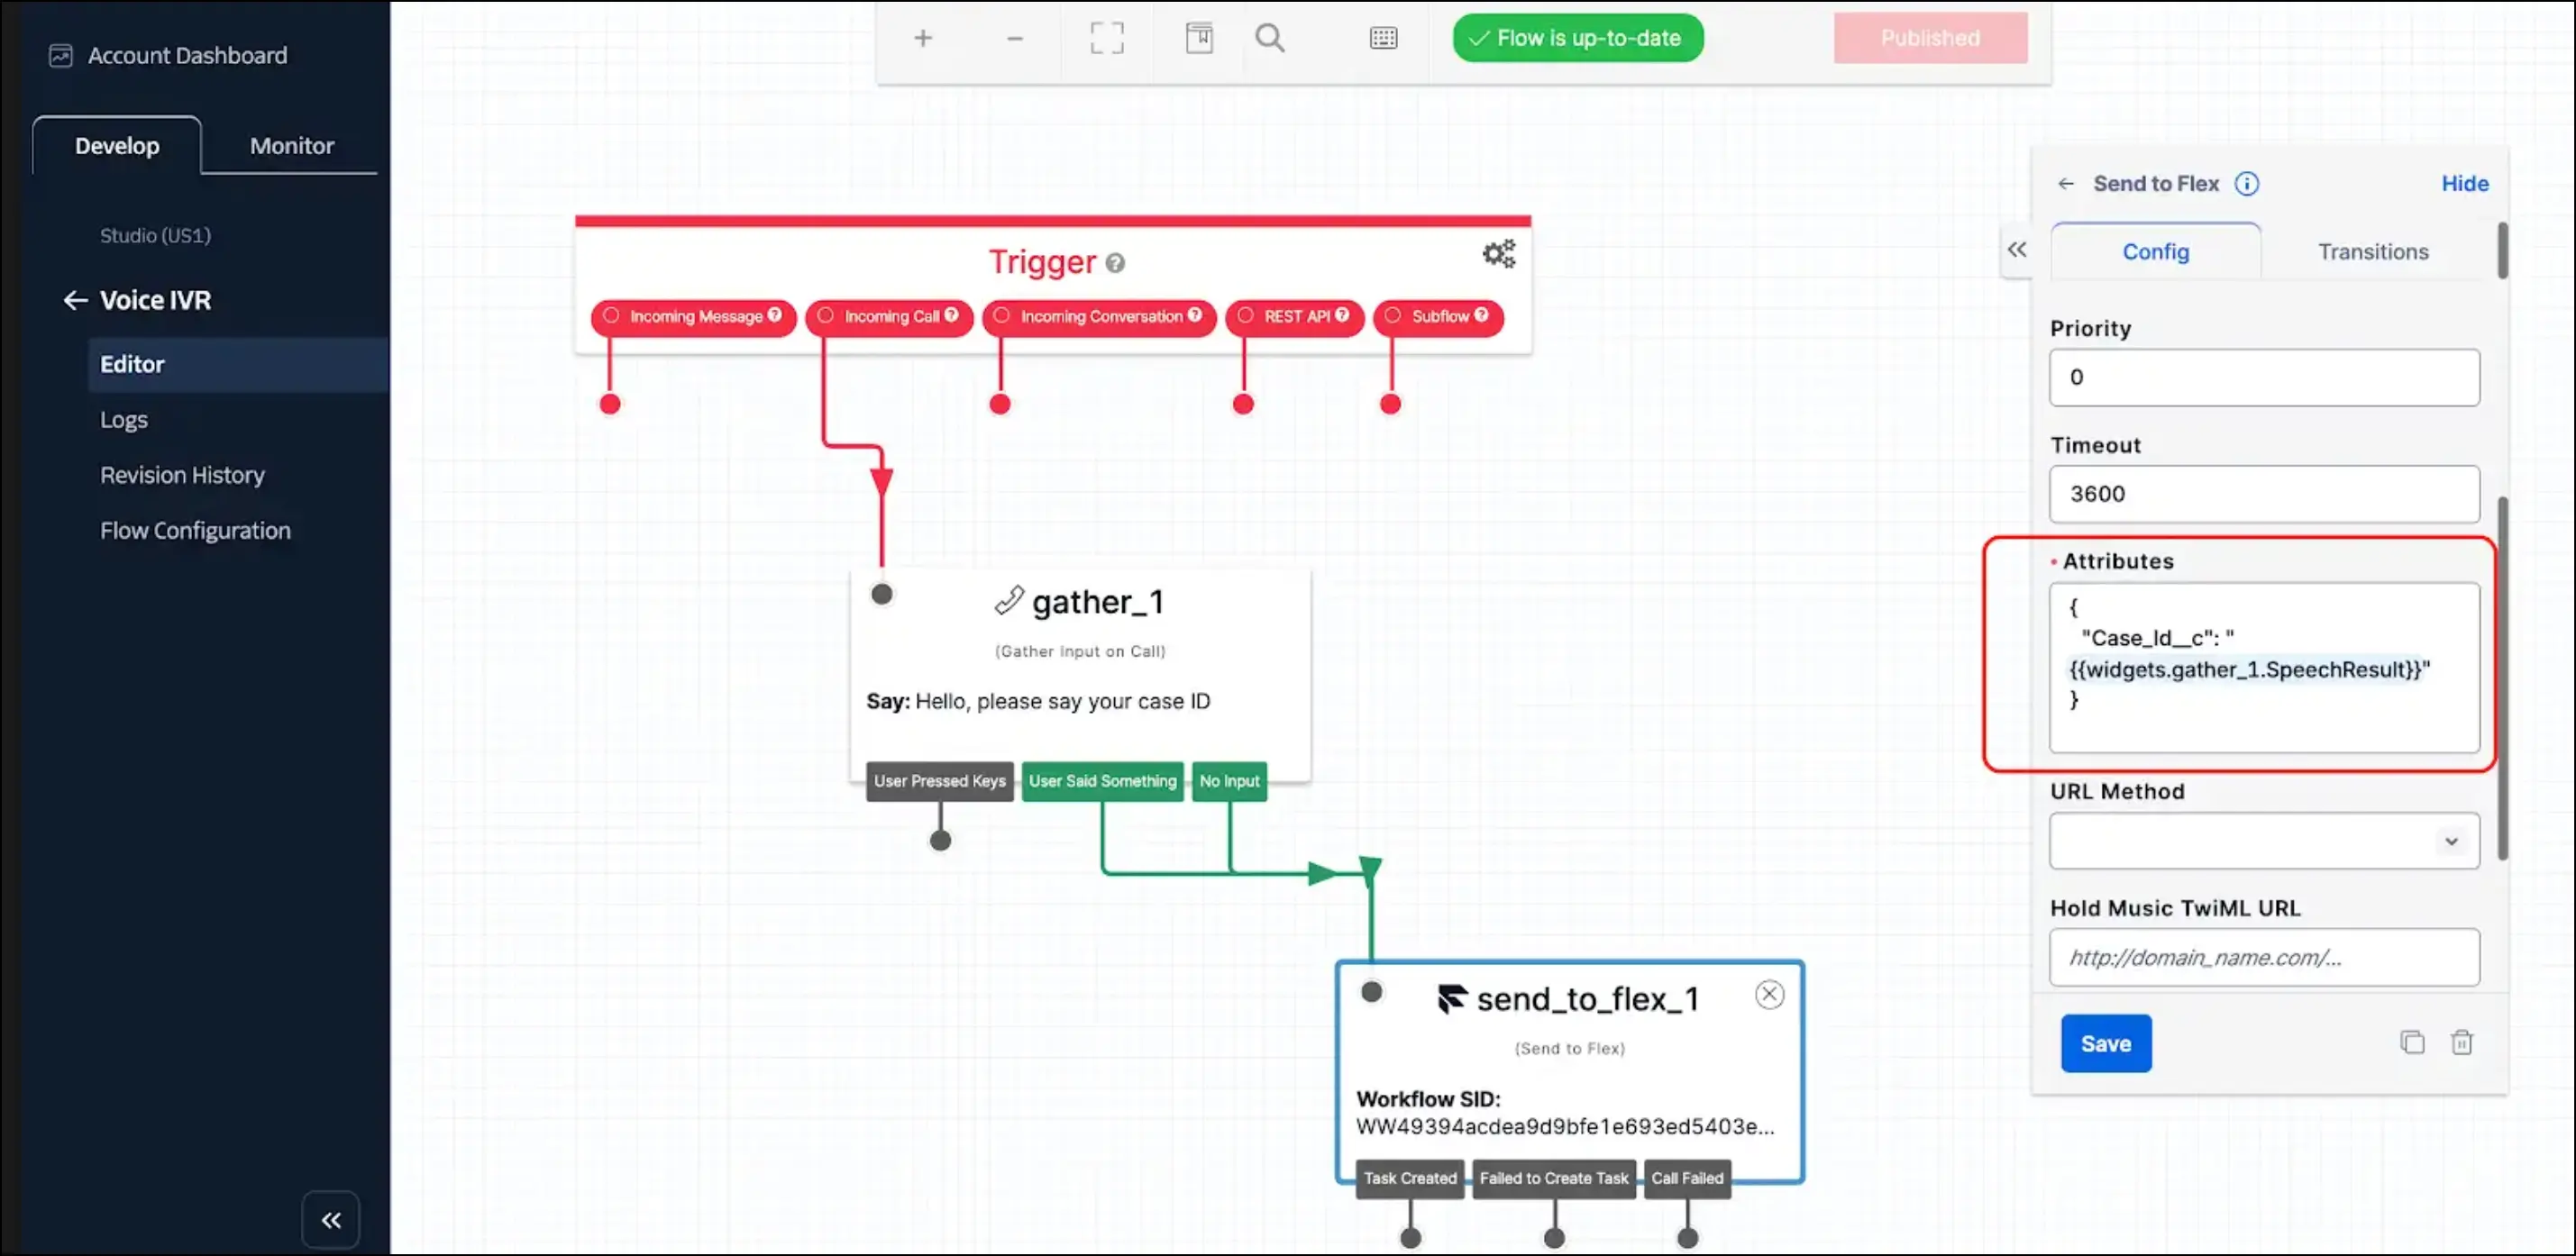
- In your Flow, route your Gather Input on Call widget to the Send to Flex widget.
- In the Send to Flex widget's Attributes section, add code to define the following:
- The field name. This must be the same as the API Name from your Salesforce field.
- The name of the widget in your Flow that gathers customer input. This is represented as MY_WIDGET_NAME in the following example:
1{2"fieldName": {{widgets.MY_WIDGET_NAME}}3}
The following screenshot shows an example of the required Studio configuration. Notice how the Send to Flex widget's attributes reference both the Salesforce API Name and the name of the widget that collects the information to pass.
To make an outbound call, enable Flex Dialpad and make sure you select a default caller ID.
To enable call recording in Flex:
- In Twilio Console, go to Flex > Channel management > Voice.
- In the Call Recording section, select Enabled.
If you want agents to be able to pause and resume call recordings, follow these steps in Salesforce:
- In your Salesforce org, return to your permission sets, and then clone the permission set assigned to your agents.
- Edit the cloned permission set and enable the Control Call Recording permission.
- Assign the updated permission set to your agents.
With call recording enabled, the recording is available for playback on the Voice Call Record page in Salesforce after a call ends. Playback includes full controls and supports variable playback speeds.
Call transcription is available using Twilio Conversation Intelligence (classic). If you use Conversation Intelligence (classic) alongside your Salesforce integration, real-time transcription appears in the Conversations tab in Salesforce as soon as a call connects.
If you want to use Twilio Conversation Intelligence (classic) capabilities, such as Language Operators, to analyze SCV call transcriptions, create a new Intelligence Service with the unique name scv-intelligence-service. All call transcriptions appear under Conversation Intelligence (classic) > Transcripts in the Twilio Console. If you want to add Language Operators, you can configure them within the scv-intelligence-service that you created.
Call transcripts are stored separately in Salesforce and Twilio
To delete a call transcript, you must both remove the data from your Salesforce instance and delete the transcript from your Twilio account.