Components of a Twilio Video app
A multi-participant video application with Twilio Video has three main components:
- Access Token server: The back-end component that generates Access Tokens. Access Tokens allow you to control which users have access to specific Rooms.
- Video Room: The Room where Participants will share their audio and video. You can create this on the server side using Twilio's REST API, or on the client side.
- Front-end interface: The user interface for the Video app built with one of three Twilio Video client-side SDKs (for JavaScript, Android, or iOS). The SDK receives media and signaling data, and then your front-end app determines how to handle and render that data.
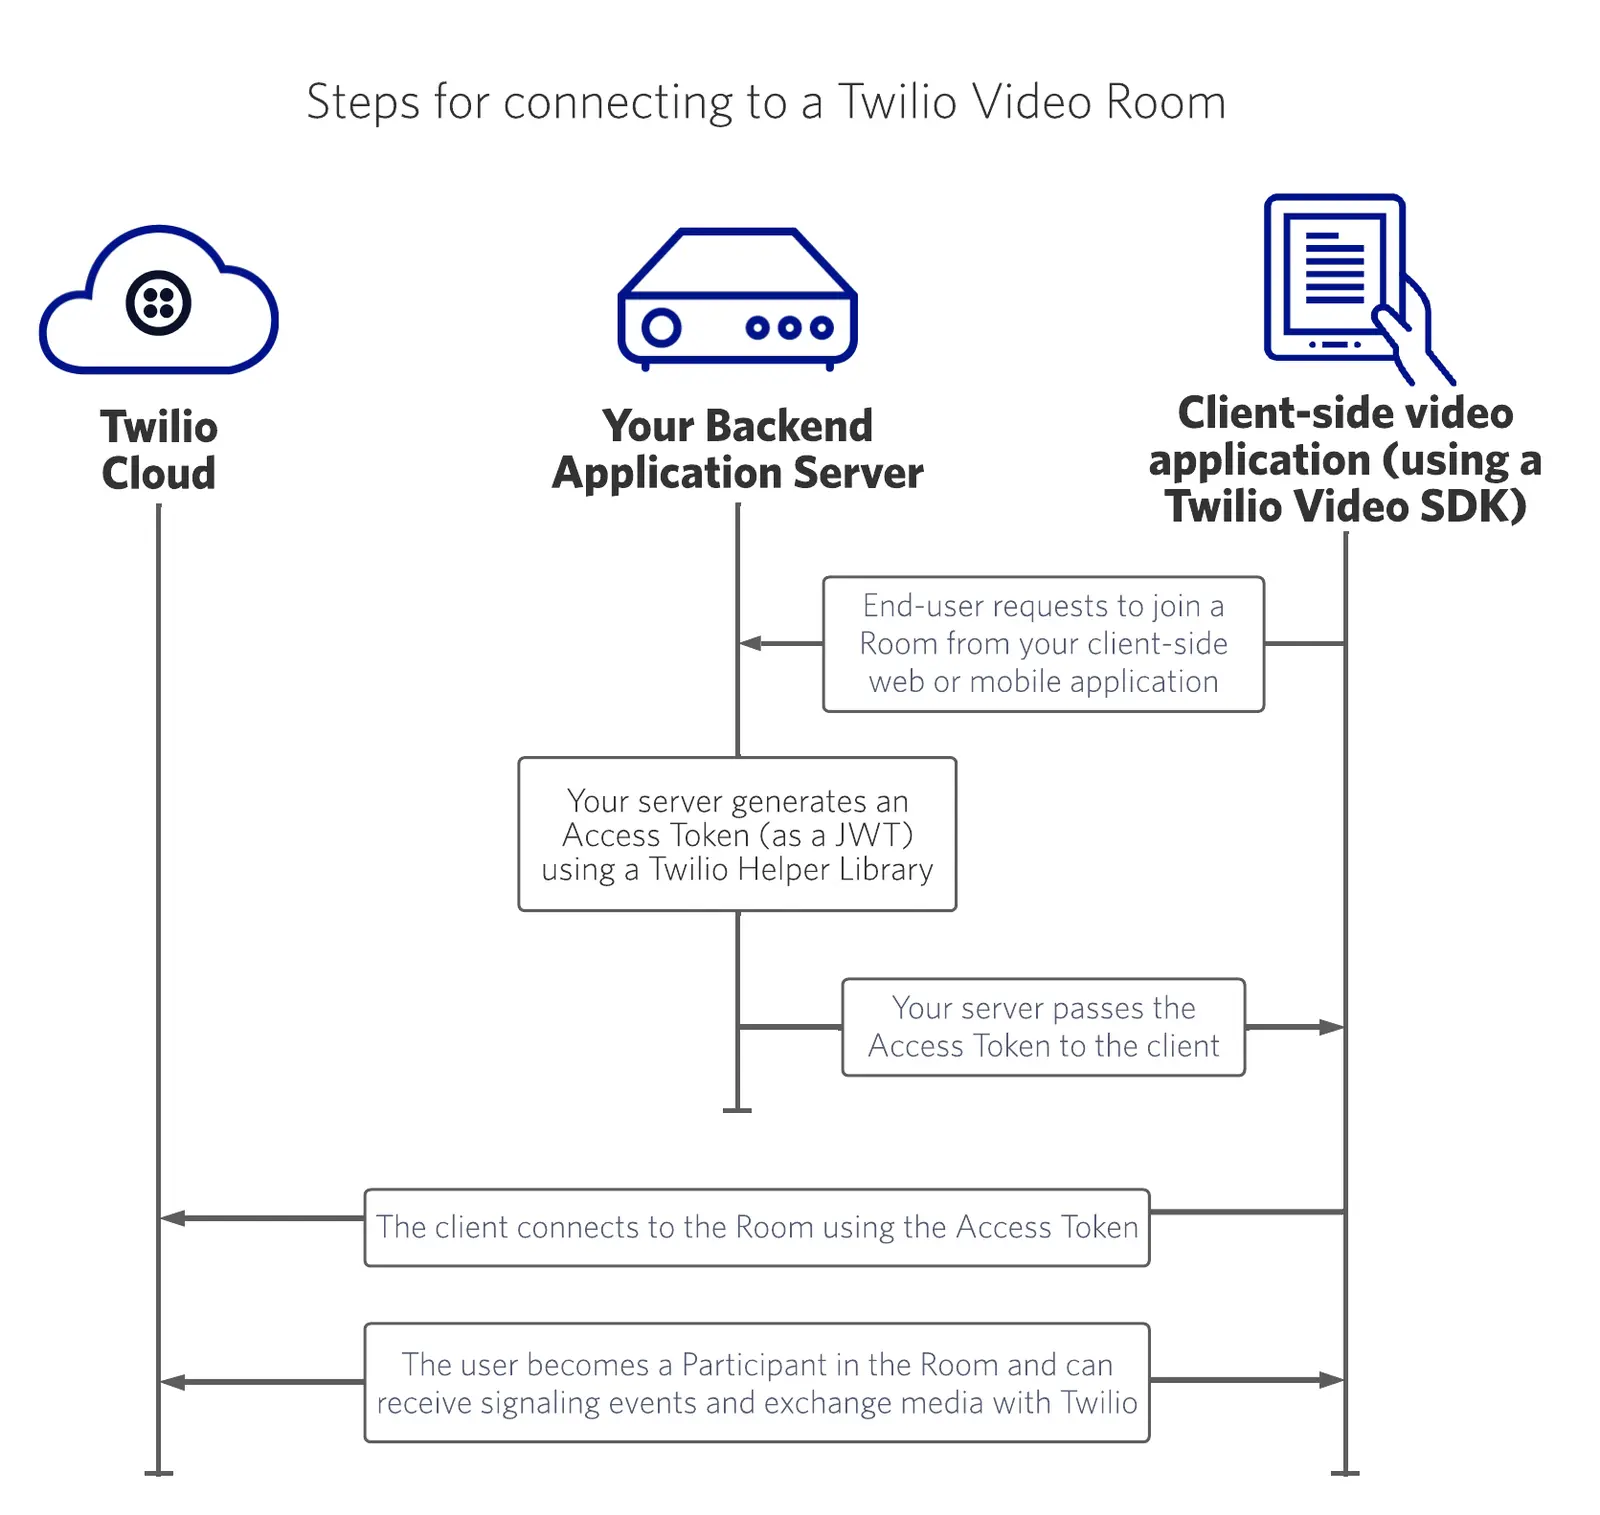
Access Tokens let your application control which users can join a specific Room. Every Participant needs an Access Token to connect to a Room. Access Tokens are short-lived JSON Web Tokens (JWTs) signed with your Twilio credentials. Access Tokens contain grants that define and limit the actions a user can perform. For Video apps, Access Tokens contain grants for identity and Video services access, including an optional Room parameter to further limit access.
The back end, or server side, of your application generates Access Tokens. You can use Twilio server-side SDKs to generate an Access Token. For more information about grants and Video Access Token, see the Access Token documentation.
If you don't want to host your own server to create Access Tokens, you can use a serverless Twilio Function to create an Access Token server hosted in Twilio's cloud. Learn more about generating Access Tokens without a server and creating a serverless video application in the Twilio Blog.
You can create a Video Room using the REST API in your back-end server, or you can create and join rooms on the client side.
With client-side Room creation, you create Rooms only when a Participant attempts to join a Room. The first time a Participant tries to connect to a Room using an Access Token, Twilio checks whether a Room with the specified name exists in your account. If the Room doesn't exist, Twilio creates the Room following the default Room settings configured in the Default Room Settings section of the Twilio Console. If the Room exists, Twilio adds the Participant to the Room.
To create Rooms before Participants join them, use the Video REST API.
When you create a Room with a POST /v1/Rooms request, you can specify Room settings such as the maximum number of Participants and maximum duration. If you don't specify these settings when you create the Room, the Room defaults to the settings configured in the Twilio Console.
See Understanding Video Rooms for more information about the difference between creating Rooms with the REST API and client-side Room creation.
After you create your Access Token server and choose how you'll create Video Rooms, use a Video Client SDK to build your app's front-end interface. Each SDK Quickstart guide includes code samples for the following tasks.
Access Tokens let your application control which users can join a specific Room. Your application should fetch an Access Token for the end user from your Access Token server. Then, the front-end application uses that Access Token to connect to a Room. Once a user joins the Room with an Access Token, they become a Participant in the Room.
Participant tracks are streams of data generated by a microphone, camera, or other source. There are three types of Participant track:
- Video: Data from video sources such as cameras or screens
- Audio: Data from audio inputs such as microphones
- Data: Other data generated by a Participant within the application. You can use the Data track to build features like whiteboarding, in-application chat, and more.
Video Room tracks follow a publish/subscribe pattern. A Participant publishes their video, audio, or data tracks and all other Participants can subscribe to those published tracks. All data goes from a Participant to the Twilio Selective Forwarding Unit (SFU), which forwards that data to other Participants. Your application receives the data from all the tracks you've subscribed to, and you can choose how to display or play that data on the page.
Through the Participant track model, you control which tracks you display in your application. You can implement functionality such as muting, presentation mode, paginating Participant videos, and hiding Participants from others.
Twilio sends your front-end application notifications about events such as Participants connecting or disconnecting from a Room, or Participants publishing/unpublishing tracks and subscribing/unsubscribing from tracks.
Your application should listen for these signaling events so it can handle them appropriately. For example, your application should listen for the participantDisconnected event so it can stop displaying a disconnected Participant's inactive data stream. You can learn more about the types of signaling events in the documentation for the client-side SDK you're using.
Once you have this basic working video application, you can continue to add more capabilities.
Get started on your app and learn more about Twilio Video with the following resources.
Learn more about building a video application with each client-side SDK with Getting Started guides.
Quickstart applications are minimal Twilio Video applications that demonstrate the basics of working with Twilio Video. Use these to get started with a small demo application that you can then deconstruct or add on to and understand core Twilio Video components.
Quick Deploy applications are full-featured apps that demonstrate a wide variety of Twilio Video capabilities. Use Quick Deploy apps to get started with a robust set of Video tools. They're open-source and you can use or alter them in any way to fit your video conferencing use case.
Twilio's Blog has many posts about building applications with Twilio Video. You can explore many different Twilio features and see examples using a variety of languages and frameworks. To find all our Video blog posts, filter posts for the "Video" tag. You can also find translated blog posts on the Twilio Blog.