Screen Sharing with JavaScript and Twilio Programmable Video
Time to read: 8 minutes
July 15, 2020
Written by
Reviewed by

The Twilio Programmable Video API allows you to build customized video chat applications on top of the WebRTC standard. In this article, I’m going to show you how to add a screen sharing option to a browser-based Programmable Video application built in JavaScript.

Tutorial requirements
In this tutorial we are going to add a screen sharing feature to the video chat application built with JavaScript and Python on a previous introductory tutorial. To run this application on your computer you need the following requirements:
- Python 3.6 or newer. If your operating system does not provide a Python interpreter, you can go to python.org to download an installer.
- A free or paid Twilio account. If you are new to Twilio get your free account now! This link will give you $10 when you upgrade.
- A web browser that is compatible with the Twilio Programmable Video JavaScript library (see below for a list of them). Note that this requirement also applies to the users you intend to invite to use this application once built.
Supported web browsers
Since the core video and audio functionality of this project is provided by Twilio Programmable Video, we'll need to use one of the supported web browsers listed below:
- Android: Chrome and Firefox
- iOS: Safari
- Linux: Chrome and Firefox
- MacOS: Chrome, Firefox, Safari and Edge
- Windows: Chrome, Firefox and Edge
While the list of browsers that support video calling is fairly extensive and all of them can display screen sharing tracks, only a subset of these browsers have the ability to start a screen sharing session. In particular, none of the mobile browsers can do this, and on the desktop the following versions are required:
- Chrome 72+
- Firefox 66+
- Safari 12.2+
Check the Programmable Video documentation for the latest supported web browser list, and the Screen Capture page specifically for browser versions that support this feature.
Installing and running the tutorial application
Let’s begin by setting up the example application. This application is available on GitHub. If you have the git client installed, you can download it as follows:
The master branch in this repository already includes all the code to support the screen sharing feature. If you plan on coding along with this tutorial, then switch to the only-video-sharing branch using the following command::
If you don’t have the git client installed you can also download the complete application as a zip file. Or if you are intending to code along with the tutorial, then just the video calling portion.
Creating a Python virtual environment
Once you have downloaded and set up the code, we will create a virtual environment where we can install our Python dependencies.
If you are using a Unix or MacOS system, open a terminal, change to the project directory and enter the following commands:
For those of you following the tutorial on Windows, enter the following commands in a command prompt window:
The last command uses pip, the Python package installer, to install the Python packages used by this application. These packages are:
- The Twilio Python Helper library, to work with the Twilio APIs
- The Flask framework, to create the web application
- Python-dotenv, to import the contents of our .env file as environment variables
- Pyngrok, to expose the development version of our application temporarily on the Internet
Setting up your Twilio account
This application needs to authenticate against the Twilio service using credentials associated with your account. In particular, you will need your Account SID, an API key SID and its corresponding API Key secret. If you are not familiar with how to obtain these credentials, I suggest you review the instructions in the tutorial for the “Setting up your Twilio account” section in the video sharing tutorial.
The application includes a file named .env.template which includes the three configuration variables needed. Make a copy of this file with the name .env (dot env) and edit it as follows:
Running the application
The application should now be ready to run. Make sure the virtual environment is activated, and then use the following command to start the web server:
The application is now running, but it is only able to receive local connections originating in the same computer. To assign a temporary public URL, enabling us to connect from a phone or another computer, we will use ngrok, which is already installed as part of the Python virtual environment. To start ngrok, open a second terminal window, activate the virtual environment (either source venv/bin/activate or venv\Scripts\activate depending on your operating system) and then enter the following command:
The second terminal will now show something similar to this screen:
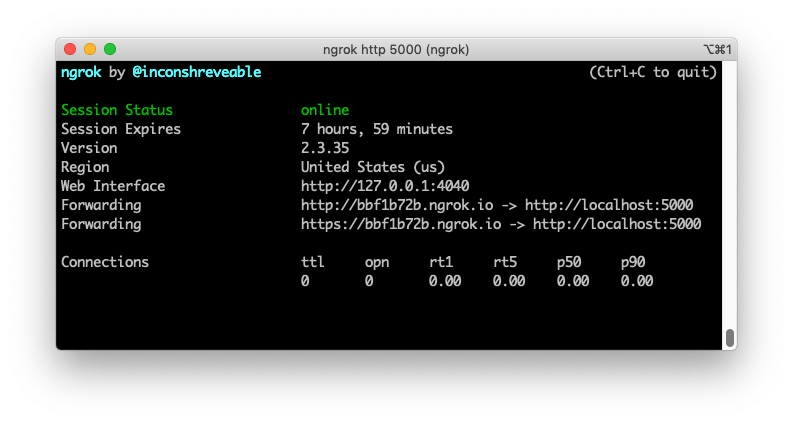
Ngrok will assign a public URL to your server. Find the values listed against the "Forwarding" keys to see what it is. We'll want to use the URL that starts with https://, since many browsers do not allow unencrypted sites to access the camera and the microphone. In the example above, the public URL is https://bbf1b72b.ngrok.io. Yours is going to be similar, but the first component of the domain is going to be different every time you run ngrok.
While having both the Flask server and ngrok running on your computer, you can use the public https:// URL from ngrok to connect to your server from an external source such as another computer or smartphone.
If there are any aspects of this application that you would like to understand better, the first tutorial will give you all the answers that you need.
Introduction to the getDisplayMedia API
To capture a video stream of a user’s screen we are going to use the browser’s getDisplayMedia API. Assuming the room is stored in a room variable, the following snippet of code will start a screen sharing session and publish it to the room:
The getDisplayMedia() call will prompt the user to select what they would like to share. The implementation of this selection is provided by the web browser. Here is how it looks on Chrome:
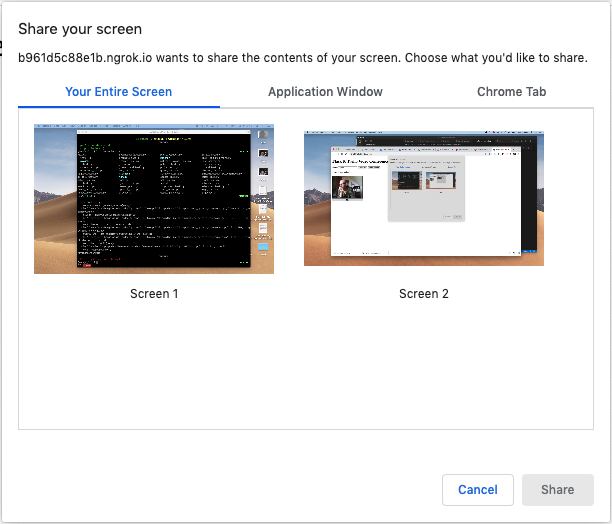
Here the user can opt to share a complete screen, a single window, or even a browser tab. Once a selection is made, the video track is created and published to the call. At this point, all other participants are going to receive the trackSubscribed event, which is the same event that alerts the application when a participant’s video track is published.
To stop sharing a screen we have to unpublish the track from the call and then stop the video track. We can do that with the following code:
To learn more about screen sharing with the Twilio Programmable Video API, check the documentation.
Layout improvements
Before we integrate screen sharing into the application, there are a few changes that we need to make to the page layout. One is adding a “Share Screen” button, which we are going to place next to the “Join call” button.

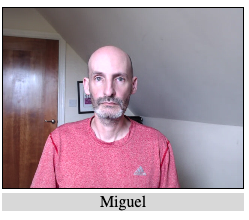
The current layout assumes that each participant will have a single video track which is presented with the name below it. When a participant adds a screen sharing track, the name will span both tracks. To make it more clear that a participant is sharing a screen, we’ll add a background color to the <div> element that shows the name. This is how it will look for a participant sharing just their camera:
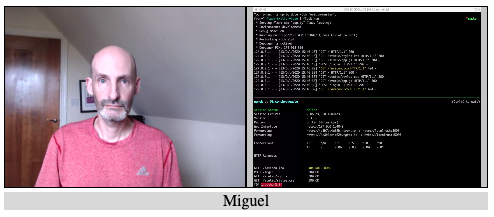
When the participant starts sharing their screen in addition to the video, the name will be centered across both tracks. The background color helps to indicate who owns the screen track:
Let’s make these changes. First, let’s add the screen share button to the base HTML page. This is the updated version of file *templates/index.html* so you can replace all the code with the following:
Note that we are adding the screen sharing button in a disabled state since you have to be in a call before you can use this feature.
In addition to the new button, I have added a class label to the <div> element that contains the participant name. This will make it easier to add the background color in the CSS file.
The updated static/styles.css file including the new label background color and some minor cleanup is shown below:
The label class also needs to be added to each participant in the participantConnected() function in file static/app.js:
Starting a screen sharing session
We are now ready to implement screen sharing in the app.js file. At the top of the file, add an instance of the new button and a new variable that will hold the local screen sharing track:
Then at the bottom, associate a handler with the click event on this button:
Then, anywhere in the file we can add our screen sharing handler:
We are using the screenTrack variable not only to hold the video track, but also as a way to know if screen sharing is enabled or not. When this variable has a
falsy value we know screen sharing is not enabled, so we start a new session, using the technique shown above. We also change the label in the button to “Stop sharing”.
We also set the onended event on the screen sharing track. Some browsers provide their own user interface to end a screen sharing session. Chrome displays this floating widget, for example:

Stopping the stream by clicking this “Hide” button will effectively end the screen sharing. However, the application and the Twilio Video API will not know screen sharing has ended and will continue to show the track with a frozen or black image to all participants. The onended event is a way to receive a callback when the user ends the stream in this way. All we need to do is send the callback to our handler function to do the proper cleanup.
The last set of changes deal with the state of the screen share button, which starts disabled. Once the participant connects to a call we can enable this button, and we disable it again on disconnection:
When a screen sharing session is initiated, we updated the label to read “Stop sharing”. We will now need to reset this when a participant disconnects.
With these changes, a basic screen sharing feature is now complete. Run the application, along with ngrok, connect to a video call from at least two different browser windows (on the same or different devices), and try sharing your screen from one to the other!
Adding a full-screen feature
When sharing video, having large video tracks isn’t a major concern. However, when screen sharing, showing a small thumbnail sized video track is going to make most text unreadable. To make screen sharing more usable we can add a zoom feature that makes any video track full-screen just by clicking on it:

To zoom a video track we are going to assign the track a new CSS class called participantZoomed, and at the same time we are going to assign a participantHidden class to every other track. Here is the updated static/styles.css files with these new classes:
Next, we need to add click event handlers in all of the tracks. For the local video track, modify the addLocalVideo() function:
For the video tracks from other participants we can add the handler in the trackSubscribed() function:
The zoomTrack() handler is shown below:
The zoom-in procedure iterates over all the elements of the container div, which are the participants in the call. For each participant it iterates on its tracks, applying the participantZoomed to the selected track and participantHidden to all the others. The hidden class is also applied to the <div> element that holds the participant’s name. The zoom-out process applies the same process in reverse.
A complication that arises from these changes is when a track that is currently zoomed-in is unpublished from the call. In this case we need to execute the zoom-out procedure before letting the track go. We can do this in the trackUnsubscribed() handler:
And with this the screen sharing feature is complete!
Conclusion
I hope by following this tutorial you will be able to add screen sharing to your own Twilio Programmable Video application.
If you need to support screen sharing in other browsers besides Chrome, Firefox and Safari, or maybe in older versions of these, my colleague Phil Nash has written some tutorials that you may find useful:
- Screen Capture in Google Chrome (using a browser extension)
- Screen Capture in Firefox (using a browser extension)
- Screen Capture in Microsoft Edge
I’d love to see what cool video chat applications you build!
Miguel Grinberg is a Python Developer for Technical Content at Twilio. Reach out to him at mgrinberg [at] twilio [dot] com if you have a cool Python project you’d like to share on the Twilio blog!

Related Resources
Twilio Docs
From APIs to SDKs to sample apps
API reference documentation, SDKs, helper libraries, quickstarts, and tutorials for your language and platform.
Resource Center
The latest ebooks, industry reports, and webinars
Learn from customer engagement experts to improve your own communication.
Ahoy
Twilio's developer community hub
Best practices, code samples, and inspiration to build communications and digital engagement experiences.