Create Conference Calls in Node.js
In this guide we'll show you how to use Programmable Voice to create and manage conference calls with your Node.js web application. We'll also cover how to monitor your conference and its participants during the call. The code snippets in this guide are written using modern JavaScript language features in Node.js version 6 or higher, and make use of the following modules:
Ready? Let's get started.
An XML response for a conference call with TwiML
1<?xml version="1.0" encoding="UTF-8"?>2<Response>3<Dial>4<Conference>My conference</Conference>5</Dial>6</Response>
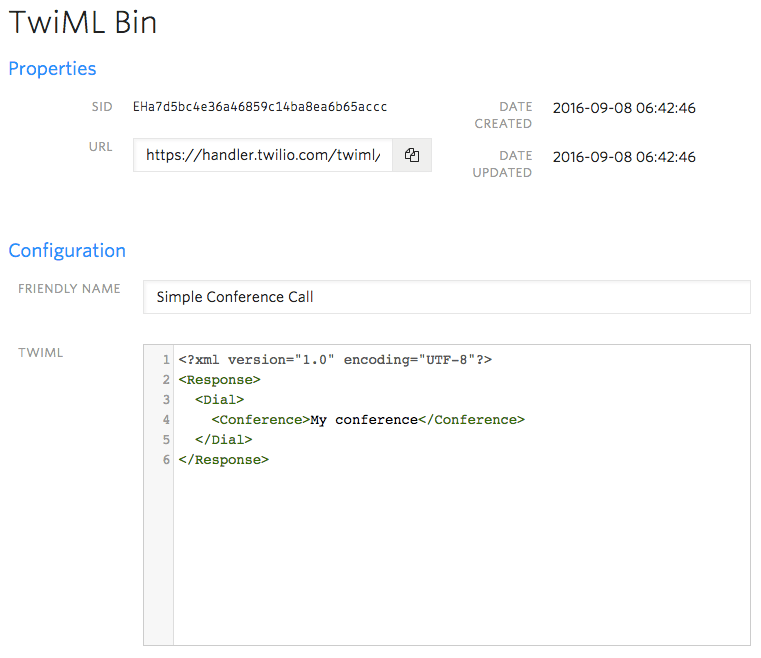
A handy tool we provide to host static TwiML from the Twilio Console is called TwiML Bin.
Just go to the TwiML Bin page in the Developer Center and click the plus button to create a new TwiML Bin. You can then add any static TwiML you want to host. Here's an example:

Click "Save" and your TwiML Bin is ready to use with any of your Twilio phone numbers.
With our TwiML created and placed in a TwiMLBin, let's configure a phone number with it.
Warning
If you are sending SMS messages to the U.S. or Canada, before proceeding further, be aware of updated restrictions on the use of Toll-Free numbers for messaging, including TF numbers obtained by purchasing them. These restrictions do not apply to Voice or other uses outside of SMS messaging. See this support article for details.
In the Twilio Console, you can search for and buy phone numbers in countries around the world. Numbers that have the Voice capability can make and receive voice phone calls from just about anywhere on the planet.

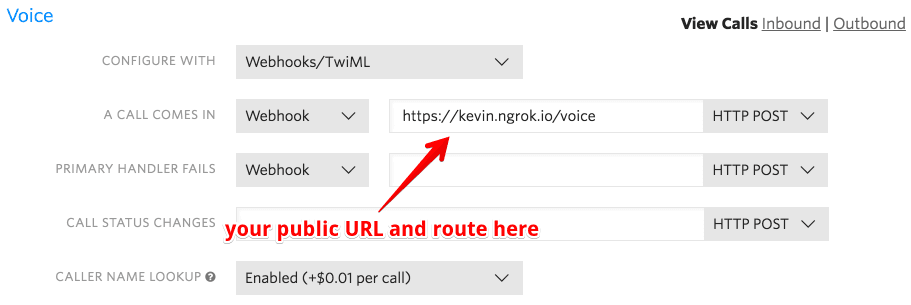
Once you purchase a number, you'll need to configure that number to send a request to your web application. This callback mechanism is called a webhook. This can be done in the number's configuration page.

Now give your number a call. You'll hear hold music when you first join — call in from another phone number and the conference call will begin.
TwiML Bins are great for setting up conference call lines, but with the power of JavaScript we can do so much more. Let's see how.

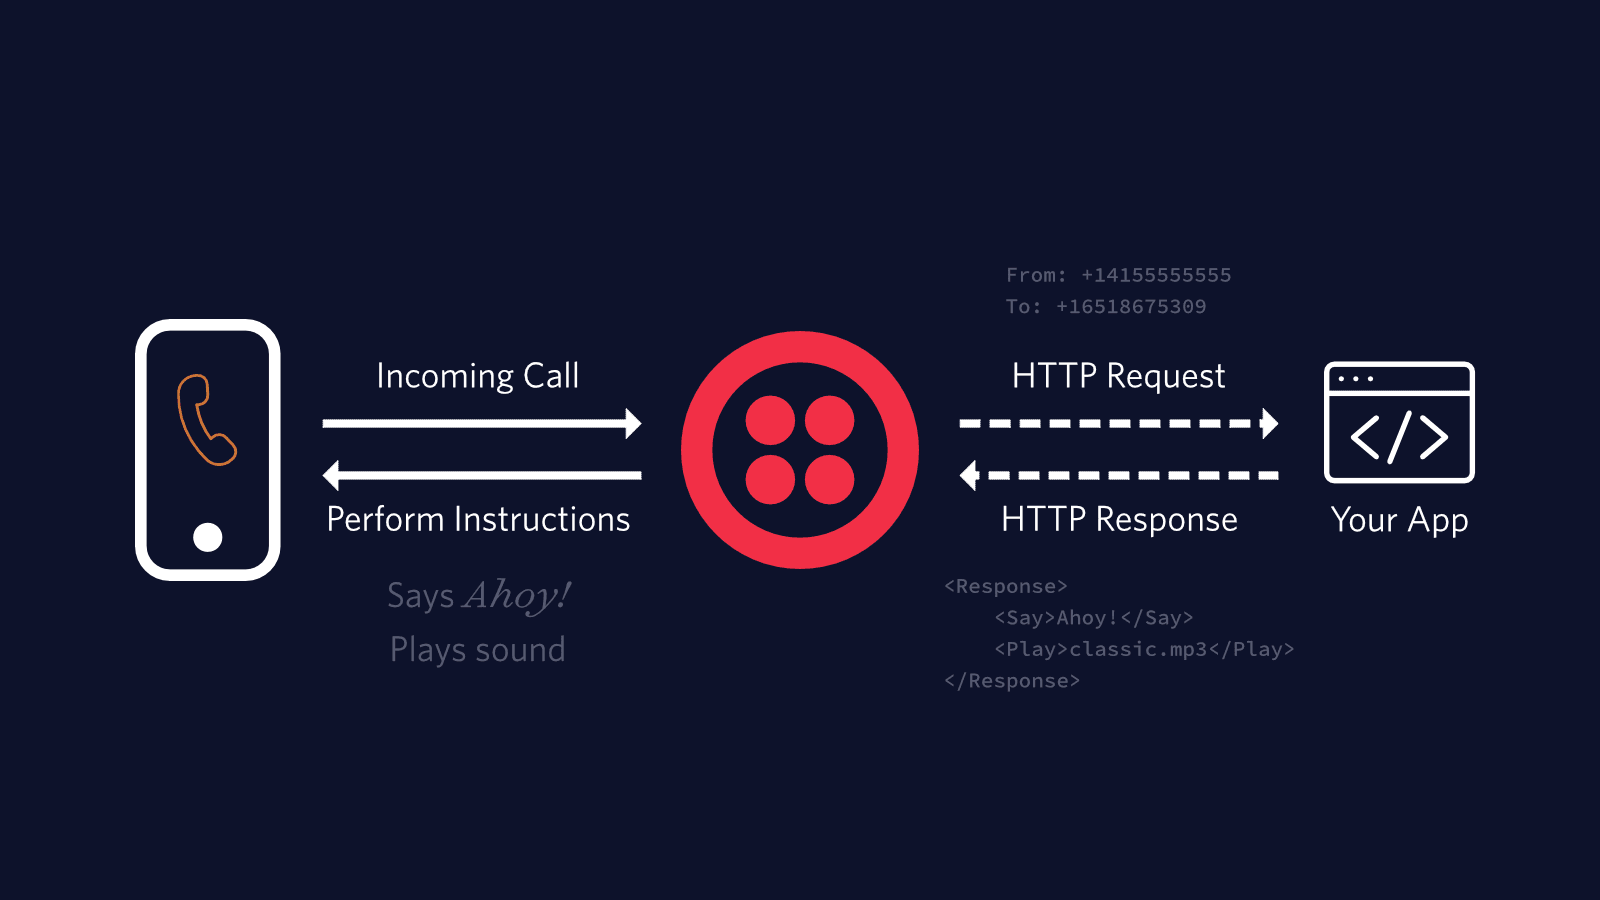
When a phone number you have bought through Twilio receives an incoming call, Twilio will send an HTTP request to your web application asking for instructions on how to handle the call. Your server will respond with an XML document containing TwiML that instructs Twilio on what to do with the call. Those instructions can direct Twilio to read out a message, play an MP3 file, make a recording and much more.
To start answering phone calls, you must:
- Buy and configure a Twilio-powered phone number capable of making and receiving phone calls, and point it at your web application
- Write a web application to tell Twilio how to handle the incoming call using TwiML
- Make your web application accessible on the Internet so Twilio can make an HTTP request when you receive a call
Now comes the fun part - writing code that will handle an incoming HTTP request from Twilio!
In this example we'll use the Express web framework for Node.js to respond to Twilio's request and we'll use the Twilio Node.js SDK to generate our TwiML.
1const express = require('express');2const VoiceResponse = require('twilio').twiml.VoiceResponse;3const urlencoded = require('body-parser').urlencoded;45// Update with your own phone number in E.164 format6const MODERATOR = '+15558675310';78const app = express();910// Parse incoming POST params with Express middleware11app.use(urlencoded({ extended: false }));1213// Create a route that will handle Twilio webhook requests, sent as an14// HTTP POST to /voice in our application15app.post('/voice', (request, response) => {16// Use the Twilio Node.js SDK to build an XML response17const twiml = new VoiceResponse();1819// Start with a <Dial> verb20const dial = twiml.dial();21// If the caller is our MODERATOR, then start the conference when they22// join and end the conference when they leave23if (request.body.From == MODERATOR) {24dial.conference('My conference', {25startConferenceOnEnter: true,26endConferenceOnExit: true,27});28} else {29// Otherwise have the caller join as a regular participant30dial.conference('My conference', {31startConferenceOnEnter: false,32});33}3435// Render the response as XML in reply to the webhook request36response.type('text/xml');37response.send(twiml.toString());38});3940// Create an HTTP server and listen for requests on port 300041console.log('Twilio Client app HTTP server running at http://127.0.0.1:3000');42app.listen(3000);
In this example we use a couple advanced <Conference> features to allow one participant, our "moderator," to better control the call:
- startConferenceOnEnter will keep all other callers on hold until the moderator joins
- endConferenceOnExit will cause Twilio to end the call for everyone as soon as the moderator leaves
We use the "From" argument on Twilio's webhook request to identify whether the current caller should be the moderator or just a regular participant.
In order for the webhooks in this code sample to work, Twilio must be able to send your web application an HTTP request over the Internet. Of course, that means your application needs to have a URL or IP address that Twilio can reach.
In production you probably have a public URL, but you probably don't during development. That's where ngrok comes in. ngrok gives you a public URL for a local port on your development machine, which you can use to configure your Twilio webhooks as described above.
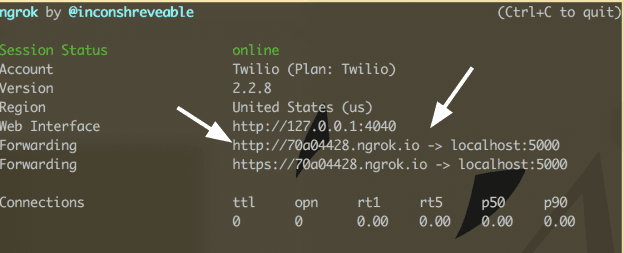
Once ngrok is installed, you can use it at the command line to create a tunnel to whatever port your web application is running on. For example, this will create a public URL for a web application listening on port 3000.
ngrok http 3000
After executing that command, you will see that ngrok has given your application a public URL that you can use in your webhook configuration in the Twilio console.

Grab your ngrok public URL and head back to the phone number you configured earlier. Now let's switch it from using a TwiML Bin to use your new ngrok URL. Don't forget to append the URL path to your actual TwiML logic! ("http://<your ngrok subdomain>.ngrok.io/voice" for example)

You're now ready to host dynamic conference calls with your Express app. Grab some friends and give it a try!
If this guide was helpful, you might also want to check out these tutorials for Programmable Voice and Node.js. Tutorials walk through full sample applications, implementing Twilio use cases like these:
Happy hacking!