Send Dynamic Emails with Python and Twilio SendGrid

May 20, 2020
Written by
James Putterman
Contributor
Opinions expressed by Twilio contributors are their own

Send Dynamic Emails with Python and Twilio SendGrid

Email is a critical part of any business communication strategy, both internally and externally. Today the need to have dynamic, content-driven, responsive email campaigns is critical. Twilio SendGrid allows organizations to deliver on this need with a highly performant and customizable CRM that works well in both the GUI and programmatically via API.

In this tutorial, we’ll set up a free SendGrid account and, using Python, send ourselves both simple text/html emails as well as high-res, dynamic content. We’ll also retrieve sending data like the number of emails sent, how many were opened or clicked, if any bounced, etc.

By the end of the tutorial you’ll be able to:

  • Set up a free SendGrid account and API key for interacting with the service
  • Set up a Python application that calls the SendGrid Web API v3, sends emails to different lists, and retrieves statistics about those sends
  • Start working with SendGrid as a CRM and deliver prebuilt, customized email campaigns to targets programmatically

Requirements:

  • Python 3.6 or later - if your operating system doesn’t have a Python interpreter, you can go to python.org to download an installer
  • A text editor or IDE - I preferVisual Studio Code which is super lightweight and has a ton of great extensions but there’s alsoAtom,Notepad++ and lots more
  • A SendGrid account - if you’re new to Twilio/SendGrid create a free account or, if you already have an account, log in

Set Up Your SendGrid account and API key

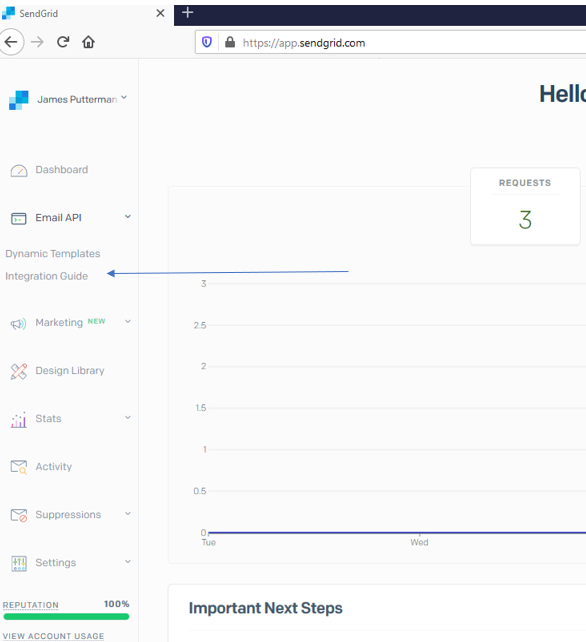
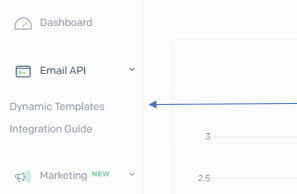
Once you’ve signed up for SendGrid, log in and access your SendGrid Dashboard. From here we’ll set up our API key by clicking the caret by “Email API” and then “Integration Guide”:

Integration guide option

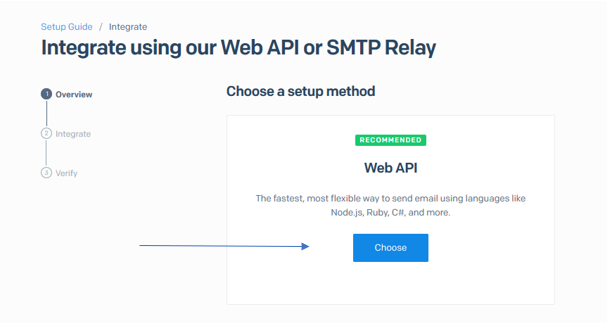
Choose “Web API” on the next step:

web api setup method

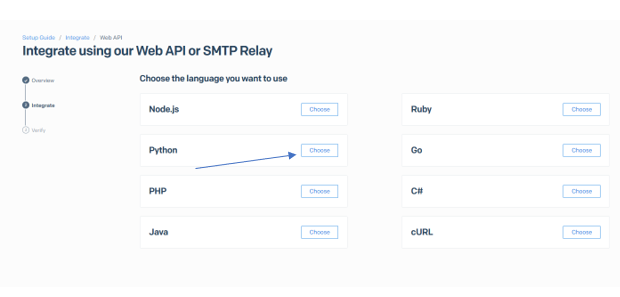
And choose Python on the next page:

python integration

Click the blue “Create Key’ button on the next screen:

create api key

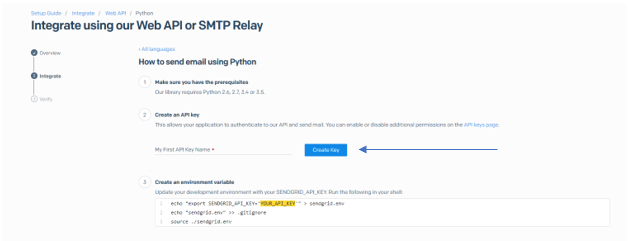
Once you have your key value, store it securely in your environment as “SENDGRID_API_KEY” as detailed in step 3 on the page. For MacOS and Linux users:

export SENDGRID_API_KEY=SG.XXXXXXXXXXXXXXXXXXXXXXXXXXXX

If you are using Windows:

# for command prompt
set SENDGRID_API_KEY = SG.XXXXXXXXXXXXXXXXXXXXXXXXXXXX

# for powershell
$Env:SENDGRID_API_KEY = SG.XXXXXXXXXXXXXXXXXXXXXXXXXX

Refer here if you want to create the Windows variable through the UI.

Once you’ve got your key stored securely, you’re ready to get started. You can follow the rest of the directions on the page in steps 4 and 5 to install the SendGrid pip package and send a test email if you like, but I recommend you follow along with the tutorial to create a virtual environment and keep your code and dependencies together.

Create a Python virtual environment

Now let’s create a Python virtual environment for our project and install the SendGrid Web API helper library:

For Linux and MacOS:

$ mkdir SendGrid
$ cd SendGrid
$ python3 -m venv sendgrid-venv
$ source sendgrid-venv/bin/activate
(sendgrid-venv) $ pip3 install sendgrid

For Windows:

$ md SendGrid
$ cd SendGrid
$ python -m venv sendgrid-venv
$ sendgrid-venv\Scripts\activate
(sendgrid-venv) $ pip install sendgrid

Send a Test Email

Now we’re ready to write some code and send ourselves a test email from SendGrid. Paste the code below in your text editor in a file called SendEmail.py:

#!/usr/bin/env python3

# using SendGrid's Python Library
# https://github.com/sendgrid/sendgrid-python
import os
from sendgrid import SendGridAPIClient
from sendgrid.helpers.mail import Mail

# from_address we pass to our Mail object, edit with your name
FROM_EMAIL = 'Your_Name@SendGridTest.com'


def SendEmail(to_email):
    """ Send an email to the provided email addresses

    :param to_email = email to be sent to
    :returns API response code
    :raises Exception e: raises an exception """
    message = Mail(
        from_email=FROM_EMAIL,
        to_emails=to_email,
        subject='A Test from SendGrid!',
        html_content='<strong>Hello there from SendGrid your URL is: ' +
        '<a href=''https://github.com/cyberjive''>right here!</a></strong>')
    try:
        sg = SendGridAPIClient(os.environ.get('SENDGRID_API_KEY'))
        response = sg.send(message)
        code, body, headers = response.status_code, response.body, response.headers
        print(f"Response Code: {code} ")
        print(f"Response Body: {body} ")
        print(f"Response Headers: {headers} ")
        print("Message Sent!")
    except Exception as e:
        print("Error: {0}".format(e))
    return str(response.status_code)


if __name__ == "__main__":
    SendEmail(to_email=input("Email address to send to? "))

Our code above does the following:

  • We import the os library to get to our environment variables and also the ‘Mail’ module from the SendGrid helper library
  • We define a function, SendEmail that takes one parameter, an email address. With that email address we create a message object and provide values for the from_email, to_email, subject, and html_content arguments
  • Then we create an instance of the SendGridAPIClient object, pass it our key, and call the send() method with our message object passed in
  • Finally we assign and print out our various response objects and a success or error message.

You can replace the URL in the anchor tag in html_content with whatever you want; your website, Github, or leave it set to Google. It’s important to have a link to click on so that then we can check our clicks statistics. High open/click-through rates are the ultimate goal of any email campaign.

There are a multitude of parameters you can play with as we’re going to see, but I recommend you leave FROM_EMAIL set to some version of yourname@sendgridtest.com. That gives you a better chance for good deliverability and helps your emails to not look like spam to email domain monitoring systems. Sender Reputation is a big deal!

Once you’re ready, run the code either in the IDE or through the command line and input an email address you monitor (note that deliverability may vary by domain/email provider, more on that later). If successful, you should receive your email (fast!) and see something like the following in the console:

(sendgrid-venv) $ python SendEmail.py
Email address to send to? TestEmail@test.com
Response code: 202
Message Sent!

Success!

Sending Multiple Emails With Addressing Tags

The code examples that follow next will send out two emails by default but can be altered to send out many more, easily. I suggest you use plus addressing (also called address tags) to ensure you keep your Sender Reputation high.

Tag sare great for testing because they’re free and easy to create, simply add +1 (and then +2, +3, etc.) before your domain (@example.com) as necessary. This allows you to receive multiple emails on a single email address, thereby minimizing your chances of receiving a complaint or being flagged as spam. If you add multiple recipients to any script for testing, make sure you use address tags properly.

Sending Customized HTML Emails

You can see from the above that it’s fast and easy to customize simple HTML emails with variables, links, etc. While most campaigns focus a large amount of time on dynamic content, HTML emails still have value. For example, below is a script that will deploy customized HTML emails. Customization is achieved via the use of the substitutions and subject parameters. Place this in a file called SendHTML.py:

#!/usr/bin/env python3
import os
from sendgrid.helpers.mail import Mail, To
from sendgrid import SendGridAPIClient

# from address we pass to our Mail object, edit with your name
FROM_EMAIL = 'Your_Name@SendGridTest.com'

# create our To list to pass to our mail object
# the substitutions in this list are the dynamic HTML values
TO_EMAILS = [
    To(
        email='your_email@domain.com',  # update with your email
        name='Sir or Madam',
        substitutions={
            '-name-': 'James',
            '-link-': 'https://twilio.com',
            '-event-': 'Twilio Signal'
        }
    ),
    To(
        email='your_email+1@domain.com',  # update with your email alias
        name='Sir or Madam',
        substitutions={
            '-name-': 'Joe',
            '-link-': 'https://github.com/',
            '-event-': 'Developers Anonymous'
        },
        # override the subject for this particular recipient
        subject='Developers need to stick together!'
    ),
]


def SendHTML():
    """ Send an HTML email to the global list of email addresses

    :returns API response code
    :raises Exception e: raises an exception """
    # create our Mail object and populate dynamically with our to_emails
    message = Mail(
        from_email=FROM_EMAIL,
        to_emails=TO_EMAILS,
        subject='Hello from SendGrid!',
        html_content='<strong>Hello there from SendGrid</strong> ' +
        'It was good meeting you -name- at -event-.' +
        'Enjoy this -link-! ',
        is_multiple=True)

    # create our sendgrid client object, pass it our key, then send and return our response objects
    try:
        sg = SendGridAPIClient(os.environ.get('SENDGRID_API_KEY'))
        response = sg.send(message)
        code, body, headers = response.status_code, response.body, response.headers
        print(f"Response code: {code}")
        print(f"Response headers: {headers}")
        print(f"Response body: {body}")
        print("HTML Messages Sent!")
    except Exception as e:
        print("Error: {0}".format(e))
    return str(response.status_code)


if __name__ == "__main__":
    SendHTML()

SendHTML takes a list of To objects and sends each a message. Before you run this script replace your email address in the TO_EMAILS list.

Structured as is, the script will send out two emails every time it is run, and you should note we’ve set the is_multiple parameter of the Mail object to True to facilitate this. You can change the custom parameters, add more, and also add more recipient To objects, just be careful how much and who you send to.

Sending Dynamic Content to Multiple Emails

Let’s continue to improve our emails. Any good email marketing campaign needs to be extensible and customizable to be successful. SendGrid allows both via the UI and the API. For this next part, you’ll need to log back into SendGrid and set up some dynamic, pre-built templates that will make our emails look great on whatever device they’re viewed.

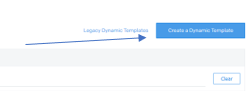
Log into SendGrid and click under “Email API” again, then select “Dynamic Templates”:

dynamic templates option

On the next screen, click the blue “Create a Dynamic Template” button and name your template whatever you like:

create dynamic template

Once you have it created, click the caret next to your template’s name to expand the frame and note the “Template ID” in the window corner, we’ll need it for our API calls later:

template id and add version button

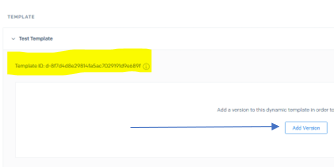
Click the “Add Version” button to begin creating our template. On the “Select a Design” page, you’ll see SendGrid’s pre-built dynamic templates. Hover over your favorite and click “Select”:

select a sendgrid design

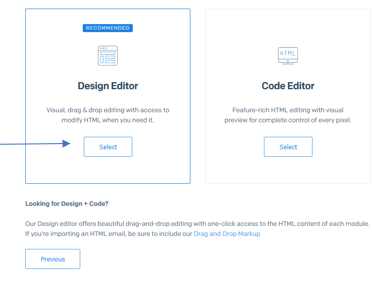
On the next page, select the recommended “Design Editor” for an intuitive drag and drop experience. However, if you’re proficient, you can edit the HTML as well:

design editor

You should see a pop up success message and a WYSIWYG design editor. Editing the HTML/content of these emails is beyond the scope of this tutorial but is entirely possible through the editor. You can also test your email from here for rapid design feedback. For our purposes, we want to set a few elements in your email: first make sure a you pick a frame and edit its URL property as below:

edit dynamic template

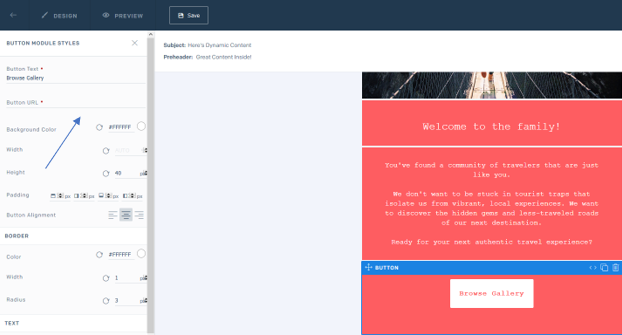
(Almost everything in the email frame has properties, so you can set as many as you like with links and use custom variables like below.)

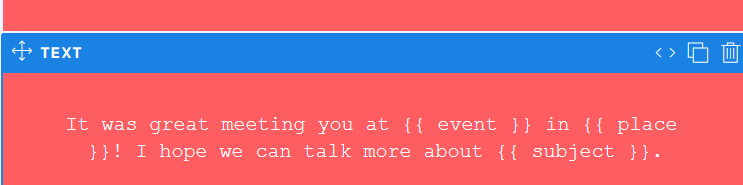
Click into the text in any module and add the following placeholders or replace text with them:

{{ subject }}
{{ place }}
{{ event }}

Example:

placeholders in dynamic template

Finally, hit “Save” in the upper bar and then hit back to make sure you have a new template with a green “ACTIVE” by it as well as the “Template ID” from earlier:

active email template

Now let’s refactor our code a bit and extend it to take advantage of this template and some of SendGrid’s other features. Place this in a file called SendDynamic.py:

#!/usr/bin/env python3
import os
from sendgrid.helpers.mail import Mail
from sendgrid import SendGridAPIClient

# from address we pass to our Mail object, edit with your name
FROM_EMAIL = 'Your_Name@SendGridTest.com'

# update to your dynamic template id from the UI
TEMPLATE_ID = 'd-d027f2806c894df38c59a9dec5460594'

# list of emails and preheader names, update with yours
TO_EMAILS = [('your_email@domain.com', 'James Holden'),
             # update email and name
             ('your_email+1@domain.com', 'Joe Miller')]


def SendDynamic():
    """ Send a dynamic email to a list of email addresses

    :returns API response code
    :raises Exception e: raises an exception """
    # create Mail object and populate
    message = Mail(
        from_email=FROM_EMAIL,
        to_emails=TO_EMAILS)
    # pass custom values for our HTML placeholders
    message.dynamic_template_data = {
        'subject': 'SendGrid Development',
        'place': 'New York City',
        'event': 'Twilio Signal'
    }
    message.template_id = TEMPLATE_ID
    # create our sendgrid client object, pass it our key, then send and return our response objects
    try:
        sg = SendGridAPIClient(os.environ.get('SENDGRID_API_KEY'))
        response = sg.send(message)
        code, body, headers = response.status_code, response.body, response.headers
        print(f"Response code: {code}")
        print(f"Response headers: {headers}")
        print(f"Response body: {body}")
        print("Dynamic Messages Sent!")
    except Exception as e:
        print("Error: {0}".format(e))
    return str(response.status_code)


if __name__ == "__main__":
    SendDynamic()

Our SendDynamic function looks similar to SendHTML, but will deploy the slick dynamic email we just created in the UI. You’ll also note we’re still passing some custom values: subject, place, and event. These correspond to our HTML placeholders and will appear in the text blocks you edited earlier. We set our message object’s template_id to our dynamic template id from the UI and send as usual.

Send away and check out your emails. Be sure to view the Dynamic email on multiple devices to see how it looks good on anything. This also lets us record more metadata.

Sending Data - Opens, Clicks, Bounces and More

Sending out dynamic, customizable emails at blazing speeds is cool but we also want to know how our campaigns are performing so that we can adjust for maximum throughput. We want to know, amongst many other things, did people open the email, did they click, and did anyone bounce or get blocked? All this sending data is critical not only for our campaign but also for our Sender Reputation.

Let’s write some more code to call the SendGrid Statistics APIs and retrieve our sending data. Place this in a file called GetSendData.py:

#!/usr/bin/env python3
import os
import json
import sendgrid

# create our client instance and pass it our key
sg = sendgrid.SendGridAPIClient(os.environ.get('SENDGRID_API_KEY'))

# define three parameters bodies for the API calls below
# general stats header parameters
STAT_PARAMS = {'aggregated_by': 'day',
               'limit': 1,
               'start_date': '2020-05-12',
               'end_date': '2020-05-13',
               'offset': 1}

# mailbox recipient header parameters
MB_PARAMS = {'end_date': '2020-05-13',
             # 'mailbox_providers': 'Gmail',
             'aggregated_by': 'day',
             'limit': 1,
             'offset': 1,
             'start_date': '2020-05-12'}

# browser views header parameters
B_PARAMS = {'end_date': '2020-05-13',
            'aggregated_by': 'day',
            # 'browsers': 'iPhone',
            'limit': 'test_string',
            'offset': 'test_string',
            'start_date': '2020-05-12'}

endpoints = [sg.client.stats.get(query_params=STAT_PARAMS),
             sg.client.browsers.stats.get(query_params=MB_PARAMS),
             sg.client.browsers.stats.get(query_params=B_PARAMS)]


def GetSendData():
    # empty list for our JSON results
    send_data = []

    # Retrieve general email stats, mailbox stats, and device stats
    # GET /mailbox_providers/stats
    try:
        print('Retrieving statistics...')
        for endpoint in endpoints:
            response = endpoint
            if response.status_code == 200:
                print('Call Successful.')
                json_response = json.loads(response.body)
                json_formatted_string = json.dumps(
                    json_response,
                    indent=4,
                    sort_keys=True)
                # print(json_formatted_string)
                send_data.append(json_formatted_string)
            else:
                print('Error on retrieval.')
        with open('SendData.txt', 'w') as f:
            for send in send_data:
                f.write(send)
            f.close()
    except Exception as e:
        print("Error: {0}".format(e))


if __name__ == "__main__":
    GetSendData()

The code above:

  • Makes three GET calls to the global statistics, mailbox, and browser API endpoints
  • Retrieves the send data from each API and appends it to a list object and
  • Writes that data to a file called SendData.txt at the end of the calls

You can (and should) change the parameter bodies at the top of the file, especially start_date and end_date. Set these to dates you know you will return data (like when you are doing this tutorial).

If you review your SendData.txt file, you’ll see a detailed breakdown of your sends; how many got delivered/opened/clicked, which domains were sent to, and a breakdown of devices and browsers. All great stuff to know to tweak your campaign. You’ll also see parts of the parameter bodies (specifically the mailbox and browser headers) commented out; you can uncomment and replace these with specific mailbox/device values to filter your results to just those domains or devices. These APIs are extremely consistent and there are far more than what we are calling here, check out the docs for more information.

Putting it All Together

Let’s add one last piece of functionality to email our statistics to ourselves as an attachment. That way we’ve got a simple (but complete) email deployment system. You can place this in a file called EmailSendData.py:

#!/usr/bin/env python3
import base64
import os
import json
import sendgrid
from sendgrid.helpers.mail import (
    Mail, Attachment, FileContent, FileName,
    FileType, Disposition, ContentId)


# create our client instance and pass it our key
sg = sendgrid.SendGridAPIClient(os.environ.get('SENDGRID_API_KEY'))

# from address we pass to our Mail object, edit with your name
FROM_EMAIL = 'Your_Name@SendGridTest.com'

# list of emails you would like the report sent to
TO_EMAILS = ['your_email@domain.com', 'your_email+1@domain.com']


def EmailSendData():
    """Reads from a file (assumed to exist), encodes the binary, then
    sends it as an email attachment to specified address

    :returns API response code
    :raises Exception e: raises an exception """
    # create our message object
    message = Mail(from_email=FROM_EMAIL,
                   to_emails=TO_EMAILS,
                   subject='Send Data attached',
                   html_content='<strong>Your Send Data is attached!</strong>')
    # read the binary version of our text file
    with open('SendData.txt', 'rb') as f:
        data = f.read()
        f.close()
    # create our attachment object, first pass the binary data above to base64 for encoding
    encoded_file = base64.b64encode(data).decode()
    # attach the file and set its properties, info here: https://sendgrid.com/docs/API_Reference/Web_API_v3/Mail/index.html
    attachedFile = Attachment(
        FileContent(encoded_file),
        FileName('Send_Data.txt'),
        FileType('text/plain'),
        Disposition('attachment'))
    message.attachment = attachedFile
    # create our sendgrid client object, pass it our key, then send and return our response objects
    try:
        #sg = SendGridAPIClient(os.environ.get('SENDGRID_API_KEY'))
        response = sg.send(message)
        code, body, headers = response.status_code, response.body, response.headers
        print(f"Response code: {code}")
        print(f"Response headers: {headers}")
        print(f"Response body: {body}")
        print('Email send data has been sent as an attachment')
    except Exception as e:
        print("Error: {0}".format(e))
    return str(response.status_code)


if __name__ == "__main__":
    EmailSendData()

This code is pretty similar to our mailing code with the exception of the attachment piece. We add an attachment object, set its various properties, and point it to our ‘SendData.txt’ file. The most important part to understand here is we must read the data from our ‘SendData.txt’ file and then encode that by passing it to the ‘base64’ class. This is necessary for the attachment to be processed properly, see this section on the Request Body for more information.

Finally we can add the above to our already existing codebase with a minor tweak where GetSendData.py will now ask the user if they want the sending data emailed to them:

#!/usr/bin/env python3

import base64
import os
import json
import sendgrid
from sendgrid.helpers.mail import (
    Mail, Attachment, FileContent, FileName,
    FileType, Disposition, ContentId)


# create our client instance and pass it our key
sg = sendgrid.SendGridAPIClient(os.environ.get('SENDGRID_API_KEY'))

# from address we pass to our Mail object, edit with your name
FROM_EMAIL = 'Your_Name@SendGridTest.com'

# email(s) you would like the statistics sent to
TO_EMAILS = ['your_email@domain.com', 'your_email+1@domain.com']

# define three parameters bodies for the API calls below
# general stats header parameters
STAT_PARAMS = {'aggregated_by': 'day',
               'limit': 1,
               'start_date': '2020-05-12',
               'end_date': '2020-05-13',
               'offset': 1}

# mailbox provider header parameters
MB_PARAMS = {'end_date': '2020-05-13',
             # 'mailbox_providers': 'Gmail',
             'aggregated_by': 'day',
             'limit': 1,
             'offset': 1,
             'start_date': '2020-05-12'}

# browser views header parameters
B_PARAMS = {'end_date': '2020-05-13',
            'aggregated_by': 'day',
            # 'browsers': 'iPhone',
            'limit': 'test_string',
            'offset': 'test_string',
            'start_date': '2020-05-12'}

endpoints = [sg.client.stats.get(query_params=STAT_PARAMS),
             sg.client.browsers.stats.get(query_params=MB_PARAMS),
             sg.client.browsers.stats.get(query_params=B_PARAMS)]


def GetSendData():
    """ Retrieves general sending data for a supplied period of time and writes
    to file

    :returns API response code
    :raises Exception e: raises an exception """
    # empty list for our JSON results
    send_data = []
    # Retrieve general email stats, mailbox stats, and device stats
    # GET /stats
    # GET /mailbox_providers/stats
    # GET /browsers/stats
    try:
        print('Retrieving statistics...')
        for endpoint in endpoints:
            response = endpoint
            if response.status_code == 200:
                print('Call Successful')
                json_response = json.loads(response.body)
                json_formatted_string = json.dumps(
                    json_response,
                    indent=4,
                    sort_keys=True)
                # print(json_formatted_string)
                send_data.append(json_formatted_string)
            else:
                print('Error on retrieval')
        with open('SendData.txt', 'w') as f:
            for send in send_data:
                f.write(send)
            f.close()
        print('Statistics written to file.')
        x = str(input('Would you like to email send data? Y/N '))
        if x[0].lower() in ['y']:
            EmailSendData()
            print('Sending Email')
        else:
            print('Exiting, thank you.')
    except Exception as e:
        print(str(e))


def EmailSendData():
    """Reads from a file (assumed to exist), encodes the binary, then
    sends it as an email attachment to specified address

    :returns API response code
    :raises Exception e: raises an exception """
    # create our message object
    message = Mail(from_email=FROM_EMAIL,
                   to_emails=TO_EMAILS,
                   subject='Send Data attached',
                   html_content='<strong>Your Send Data is attached!</strong>')
    # read the binary version of our text file
    with open('SendData.txt', 'rb') as f:
        data = f.read()
        f.close()
    # create our attachment object, first pass the binary data above to base64 for encoding
    encoded_file = base64.b64encode(data).decode()
    # attach the file and set its properties, info here: https://sendgrid.com/docs/API_Reference/Web_API_v3/Mail/index.html
    attachedFile = Attachment(
        FileContent(encoded_file),
        FileName('Send_Data.txt'),
        FileType('text/plain'),
        Disposition('attachment'))
    message.attachment = attachedFile
    # create our sendgrid client object, pass it our key, then send and return our response objects
    try:
        #sg = SendGridAPIClient(os.environ.get('SENDGRID_API_KEY'))
        response = sg.send(message)
        code, body, headers = response.status_code, response.body, response.headers
        print(f"Response code: {code}")
        print(f"Response headers: {headers}")
        print(f"Response body: {body}")
        print('Email send data has been sent as an attachment')
    except Exception as e:
        print("Error: {0}".format(e))
    return str(response.status_code)


if __name__ == "__main__":
    GetSendData()

With everything in place, you can start testing things out! Send yourself HTML or Dynamic emails, change names, subject lines, or content, and pull your sending data and have it delivered to you so you can see how your (test) emails are doing. SendGrid has a great UI for getting a high level view of your campaign, but for analytics and reporting it’s always good to pull from the source API to have all the details.

Wrap-up, Cautions about Email Sending, and Next Steps

I hope you had as much fun making this as I did. SendGrid is a highly versatile and robust platform and there are many customizations and options I didn’t get a chance to cover when writing this. I encourage you to start playing around with programmatic emails.

However, before you have too much fun, it’s important to keep in mind that Email sending is a highly monitored practice as it is so easy to deploy spam emails. It’s fast and simple to send a large amount of emails very quickly. In the Digital Age, emails will often be blocked by mailbox domain monitoring systems for anything resembling spam: a misspelled preheader, suspicious ‘from_email’, attached executable content, etc.

You may have noticed some of your emails not being delivered based on the email provider. This is all related to the highly regulated world of Email Spam. You should keep your Sender Reputation in mind at all times! It will highly influence the success of any production email campaigns you undertake. Again, this is the main reason for email address tags as they limit your risk footprint. You can also take a look at IP Warming to learn how to gain sender reputation and raise your delivery rate.

With those cautions in mind, head over to the SendGrid docs and start checking out all the other cool features. There’s a ton of great APIs to leverage and you can combine them with other Twilio services to build some really cool stuff! Thanks for reading!

James Putterman is an Integration Data Architect and Full Stack Developer in Kansas City, reach out on LinkedIn and Twitter to connect.